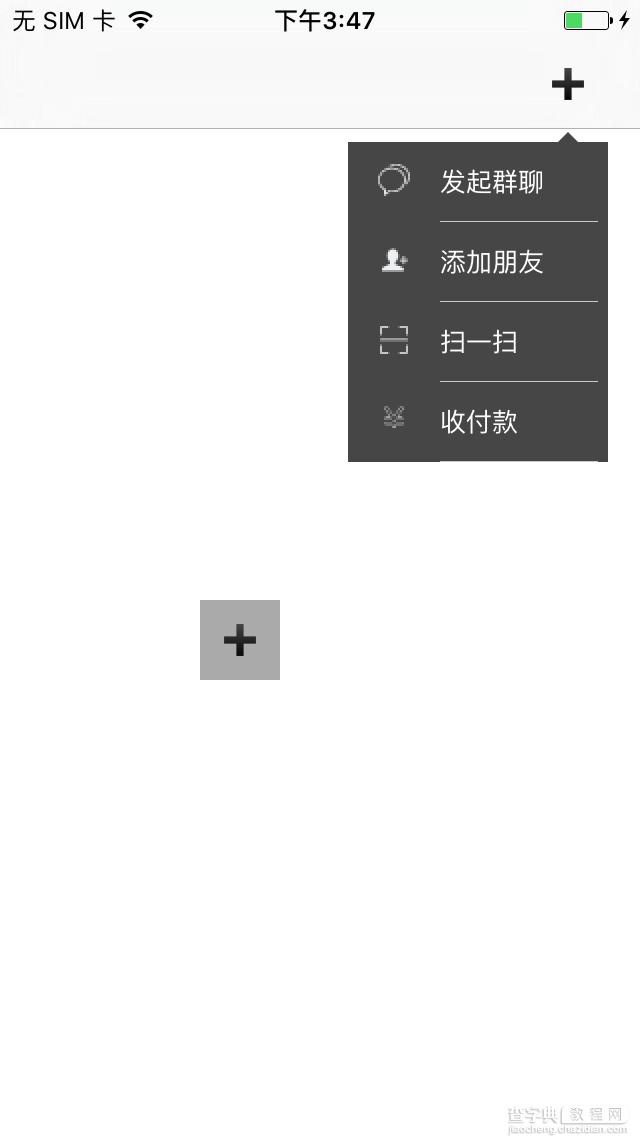
我使用DrawRect进行的View的拉伸(是这样描述的吧??), 效果图也实现了类似于微信的View效果, 你可以看一看.
创建继承于UIView的视图 .h文件
// backGoundView @property (nonatomic, strong) UIView * _Nonnull backGoundView; // titles @property (nonatomic, strong) NSArray * _Nonnull dataArray; // images @property (nonatomic, strong) NSArray * _Nonnull images; // height @property (nonatomic, assign) CGFloat row_height; // font @property (nonatomic, assign) CGFloat fontSize; // textColor @property (nonatomic, assign) UIColor * _Nonnull titleTextColor; // delegate @property (nonatomic, assign) id <selectIndexPathDelegate> _Nonnull delegate; // 初始化方法 - (instancetype _Nonnull)initWithOrigin:(CGPoint) origin Width:(CGFloat) width Height:(CGFloat) height Type:(XTDirectionType)type Color:( UIColor * _Nonnull ) color; - (void)popView; - (void)dismiss;
##.m 实现部分
定义用到的宏
#define ScreenWidth [UIScreen mainScreen].bounds.size.width #define ScreenHeight [UIScreen mainScreen].bounds.size.height #define Length 5 #define Length2 15
@property (nonatomic, assign) CGPoint origin; // 箭头位置 @property (nonatomic, assign) CGFloat height; // 视图的高度 @property (nonatomic, assign) CGFloat width; // 视图的宽度 @property (nonatomic, assign) XTDirectionType type; // 箭头位置类型 @property (nonatomic, strong) UITableView *tableView; // 填充的tableview
自定义初始化方法
- (instancetype)initWithOrigin:(CGPoint)origin Width:(CGFloat)width Height:(CGFloat)height Type:(XTDirectionType)type Color:(UIColor *)color { self = [super initWithFrame:CGRectMake(0, 0, ScreenWidth, ScreenHeight)]; if (self) { self.backgroundColor = [UIColor clearColor]; self.origin = origin; self.width = width; self.height = height; self.type = type; self.backGoundView = [[UIView alloc] initWithFrame:CGRectMake(origin.x, origin.y, width, height)]; self.backGoundView.backgroundColor = color; [self addSubview:self.backGoundView]; [self.backGoundView addSubview:self.tableView]; } return self; }
drawRect
#pragma mark - drawRect - (void)drawRect:(CGRect)rect { // Drawing code CGContextRef context = UIGraphicsGetCurrentContext(); switch (self.type) { case XTTypeOfUpLeft: case XTTypeOfUpCenter: case XTTypeOfUpRight:{ { CGFloat startX = self.origin.x; CGFloat startY = self.origin.y; CGContextMoveToPoint(context, startX, startY); CGContextAddLineToPoint(context, startX + Length, startY + Length); CGContextAddLineToPoint(context, startX - Length, startY + Length); } break; } case XTTypeOfDownLeft: case XTTypeOfDownCenter: case XTTypeOfDownRight: { { CGFloat startX = self.origin.x; CGFloat startY = self.origin.y; CGContextMoveToPoint(context, startX, startY); CGContextAddLineToPoint(context, startX - Length, startY - Length); CGContextAddLineToPoint(context, startX + Length, startY - Length); } break; } case XTTypeOfLeftUp: case XTTypeOfLeftCenter: case XTTypeOfLeftDown: { { CGFloat startX = self.origin.x; CGFloat startY = self.origin.y; CGContextMoveToPoint(context, startX, startY); CGContextAddLineToPoint(context, startX + Length, startY - Length); CGContextAddLineToPoint(context, startX + Length, startY + Length); } break; } case XTTypeOfRightUp: case XTTypeOfRightCenter: case XTTypeOfRightDown: { { CGFloat startX = self.origin.x; CGFloat startY = self.origin.y; CGContextMoveToPoint(context, startX, startY); CGContextAddLineToPoint(context, startX - Length, startY - Length); CGContextAddLineToPoint(context, startX - Length, startY + Length); } break; } } CGContextClosePath(context); [self.backGoundView.backgroundColor setFill]; [self.backgroundColor setStroke]; CGContextDrawPath(context, kCGPathFillStroke); }
弹出视图
#pragma mark - popView - (void)popView { // 同步显示 子控件(views)和(self) NSArray *results = [self.backGoundView subviews]; for (UIView *view in results) { [view setHidden:YES]; } UIWindow *windowView = [UIApplication sharedApplication].keyWindow; [windowView addSubview:self]; switch (self.type) { case XTTypeOfUpLeft: { { self.backGoundView.frame = CGRectMake(self.origin.x, self.origin.y + Length, 0, 0); CGFloat origin_x = self.origin.x - Length2; CGFloat origin_y = self.origin.y + Length; CGFloat size_width = self.width; CGFloat size_height = self.height; [self startAnimateView_x:origin_x _y:origin_y origin_width:size_width origin_height:size_height]; } break; } case XTTypeOfUpCenter: { { self.backGoundView.frame = CGRectMake(self.origin.x, self.origin.y + Length, 0, 0); CGFloat origin_x = self.origin.x - self.width / 2; CGFloat origin_y = self.origin.y + Length; CGFloat size_width = self.width; CGFloat size_height = self.height; [self startAnimateView_x:origin_x _y:origin_y origin_width:size_width origin_height:size_height]; } break; } case XTTypeOfUpRight: { { self.backGoundView.frame = CGRectMake(self.origin.x, self.origin.y + Length, 0, 0); CGFloat origin_x = self.origin.x + Length2; CGFloat origin_y = self.origin.y + Length; CGFloat size_width = -self.width; CGFloat size_height = self.height; [self startAnimateView_x:origin_x _y:origin_y origin_width:size_width origin_height:size_height]; } break; } case XTTypeOfDownLeft: { { self.backGoundView.frame = CGRectMake(self.origin.x, self.origin.y - Length, 0, 0); CGFloat origin_x = self.origin.x - Length2; CGFloat origin_y = self.origin.y - Length; CGFloat size_width = self.width; CGFloat size_height = -self.height; [self startAnimateView_x:origin_x _y:origin_y origin_width:size_width origin_height:size_height]; } break; } case XTTypeOfDownCenter: { { self.backGoundView.frame = CGRectMake(self.origin.x, self.origin.y - Length, 0, 0); CGFloat origin_x = self.origin.x - self.width / 2; CGFloat origin_y = self.origin.y - Length; CGFloat size_width = self.width; CGFloat size_height = -self.height; [self startAnimateView_x:origin_x _y:origin_y origin_width:size_width origin_height:size_height]; } break; } case XTTypeOfDownRight: { { self.backGoundView.frame = CGRectMake(self.origin.x, self.origin.y - Length, 0, 0); CGFloat origin_x = self.origin.x-self.width + Length2; CGFloat origin_y = self.origin.y - Length; CGFloat size_width = self.width; CGFloat size_height = -self.height; [self startAnimateView_x:origin_x _y:origin_y origin_width:size_width origin_height:size_height]; } break; } case XTTypeOfLeftUp: { { self.backGoundView.frame = CGRectMake(self.origin.x + Length, self.origin.y, 0, 0); CGFloat origin_x = self.origin.x + Length; CGFloat origin_y = self.origin.y - Length2; CGFloat size_width = self.width; CGFloat size_height = self.height; [self startAnimateView_x:origin_x _y:origin_y origin_width:size_width origin_height:size_height]; } break; } case XTTypeOfLeftCenter: { { self.backGoundView.frame = CGRectMake(self.origin.x + Length, self.origin.y, 0, 0); CGFloat origin_x = self.origin.x + Length; CGFloat origin_y = self.origin.y - self.height / 2; CGFloat size_width = self.width; CGFloat size_height = self.height; [self startAnimateView_x:origin_x _y:origin_y origin_width:size_width origin_height:size_height]; } break; } case XTTypeOfLeftDown: { { self.backGoundView.frame = CGRectMake(self.origin.x + Length, self.origin.y, 0, 0); CGFloat origin_x = self.origin.x + Length; CGFloat origin_y = self.origin.y - self.height + Length2; CGFloat size_width = self.width; CGFloat size_height = self.height; [self startAnimateView_x:origin_x _y:origin_y origin_width:size_width origin_height:size_height]; } break; } case XTTypeOfRightUp: { { self.backGoundView.frame = CGRectMake(self.origin.x - Length, self.origin.y, 0, 0); CGFloat origin_x = self.origin.x - Length; CGFloat origin_y = self.origin.y - Length2; CGFloat size_width = -self.width; CGFloat size_height = self.height; [self startAnimateView_x:origin_x _y:origin_y origin_width:size_width origin_height:size_height]; } break; } case XTTypeOfRightCenter: { { self.backGoundView.frame = CGRectMake(self.origin.x - Length, self.origin.y, 0, 0); CGFloat origin_x = self.origin.x - Length; CGFloat origin_y = self.origin.y - self.height / 2; CGFloat size_width = -self.width; CGFloat size_height = self.height; [self startAnimateView_x:origin_x _y:origin_y origin_width:size_width origin_height:size_height]; } break; } case XTTypeOfRightDown: { { self.backGoundView.frame = CGRectMake(self.origin.x - Length, self.origin.y, 0, 0); CGFloat origin_x = self.origin.x - Length; CGFloat origin_y = self.origin.y - self.height + Length2; CGFloat size_width = -self.width; CGFloat size_height = self.height; [self startAnimateView_x:origin_x _y:origin_y origin_width:size_width origin_height:size_height]; } break; } } }
#pragma mark -
- (void)startAnimateView_x:(CGFloat) x _y:(CGFloat) y origin_width:(CGFloat) width origin_height:(CGFloat) height { [UIView animateWithDuration:0.25 animations:^{ self.backGoundView.frame = CGRectMake(x, y, width, height); }completion:^(BOOL finished) { NSArray *results = [self.backGoundView subviews]; for (UIView *view in results) { [view setHidden:NO]; } }]; }
点击空白处回收
#pragma mark - - (void)touchesBegan:(NSSet<UITouch *> *)touches withEvent:(UIEvent *)event { if (![[touches anyObject].view isEqual:self.backGoundView]) { [self dismiss]; } }
#pragma mark - - (void)dismiss { /** * 删除 在backGroundView 上的子控件 */ NSArray *results = [self.backGoundView subviews]; for (UIView *view in results) { [view removeFromSuperview]; } [UIView animateWithDuration:0.25 animations:^{ // self.backGoundView.frame = CGRectMake(self.origin.x, self.origin.y, 0, 0); } completion:^(BOOL finished) { // [self removeFromSuperview]; }]; }
内部的tableview
#pragma mark - - (UITableView *)tableView { if (!_tableView) { _tableView = [[UITableView alloc] initWithFrame:CGRectMake(0, 0, self.backGoundView.frame.size.width - 5, self.backGoundView.frame.size.height) style:UITableViewStylePlain]; _tableView.dataSource = self; _tableView.backgroundColor = [UIColor clearColor]; _tableView.delegate = self; } return _tableView; } #pragma mark - - (NSInteger)tableView:(UITableView *)tableView numberOfRowsInSection:(NSInteger)section { return self.dataArray.count; } #pragma mark - - (CGFloat)tableView:(UITableView *)tableView heightForRowAtIndexPath:(NSIndexPath *)indexPath { if (self.row_height == 0) { return 44; }else{ return self.row_height; } } #pragma mark - - (UITableViewCell *)tableView:(UITableView *)tableView cellForRowAtIndexPath:(NSIndexPath *)indexPath { static NSString *cellIdentifier = @"cellIdentifier2"; UITableViewCell *cell = [tableView dequeueReusableCellWithIdentifier:cellIdentifier]; if (!cell) { cell = [[UITableViewCell alloc] initWithStyle:UITableViewCellStyleSubtitle reuseIdentifier:cellIdentifier]; } cell.backgroundColor = [UIColor clearColor]; cell.imageView.image = [UIImage imageNamed:self.images[indexPath.row]]; cell.textLabel.text = self.dataArray[indexPath.row]; cell.textLabel.font = [UIFont systemFontOfSize:self.fontSize]; cell.textLabel.textColor = self.titleTextColor; return cell; } // 想要实现点击进行其他操作, 这里用到了协议 - (void)tableView:(UITableView *)tableView didSelectRowAtIndexPath:(NSIndexPath *)indexPath { if (self.delegate && [self.delegate respondsToSelector:@selector(selectIndexPathRow:)]) { [self.delegate selectIndexPathRow:indexPath.row]; } }
##在.h文件还要声明一份协议
@protocol selectIndexPathDelegate <NSObject> - (void)selectIndexPathRow:(NSInteger )index; @end
使用
@interface ViewController ()<selectIndexPathDelegate>
##你可以在btn的点击方法里这样写
// 支持多种类型 /** XTTypeOfUpLeft, // 上左 XTTypeOfUpCenter, // 上中 XTTypeOfUpRight, // 上右 XTTypeOfDownLeft, // 下左 XTTypeOfDownCenter, // 下中 XTTypeOfDownRight, // 下右 XTTypeOfLeftUp, // 左上 XTTypeOfLeftCenter, // 左中 XTTypeOfLeftDown, // 左下 XTTypeOfRightUp, // 右上 XTTypeOfRightCenter,// 右中 XTTypeOfRightDown, // 右下 */ CGPoint point = CGPointMake(_customBtn.center.x,_customBtn.frame.origin.y + 64); XTPopView *view1 = [[XTPopView alloc] initWithOrigin:point Width:130 Height:40 * 4 Type:XTTypeOfUpRight Color:[UIColor colorWithRed:0.2737 green:0.2737 blue:0.2737 alpha:1.0]]; view1.dataArray = @[@"发起群聊",@"添加朋友", @"扫一扫", @"收付款"]; view1.images = @[@"发起群聊",@"添加朋友", @"扫一扫", @"付款"]; view1.fontSize = 13; view1.row_height = 40; view1.titleTextColor = [UIColor whiteColor]; view1.delegate = self; [view1 popView];
##想要使用点击方法 只要实现协议的方法就可以了
- (void)selectIndexPathRow:(NSInteger)index { switch (index) { case 0: { NSLog(@"Click 0 ......"); } break; case 1: { NSLog(@"Clikc 1 ......"); } break; case 2: { NSLog(@"Clikc 2 ......"); } break; case 3: { NSLog(@"Clikc 3 ......"); } break; default: break; } }
总结
以上就是基于IOS实现带箭头的view的全部内容,希望对大家开发IOS能有所帮助。
【基于IOS实现带箭头的view】相关文章: