UITableView用来以表格的形式显示数据。关于UITableView,我们应该注意:
(1)UITableView用来显示表格的可见部分,UITableViewCell用来显示表格的一行。
(2)UITableView并不负责存储表格中的数据,而是仅仅存储足够的数据使得可以画出当前可见部分。
(3)UITableView从UITableViewDelegate协议获取配置信息,从UITableViewDataSource协议获得数据信息。
(4)所有的UITableView实现时实际上只有一列,但是我们可以通过向UITableViewCell中添加子视图,使得它看起来有好几列。
(5)UITableView有两种风格:
① Grouped:每一组看起来像是圆矩形;
② Plain:这是默认风格,可以修改成Indexed风格。
UITableViewCell使用实例
在下边的小例子中,我们将先实现显示一列数据,然后在每行添加图像,之后再看看UITableViewCell的四种分别是什么样的。最后再进行其他操作,比如设置缩进、修改字体大小和行高等。
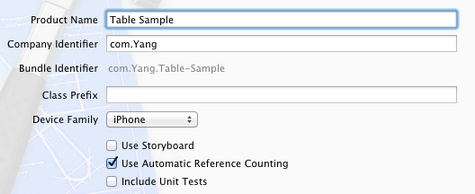
1、运行Xcode 4.2,新建一个Single View Application,名称为Table Sample:
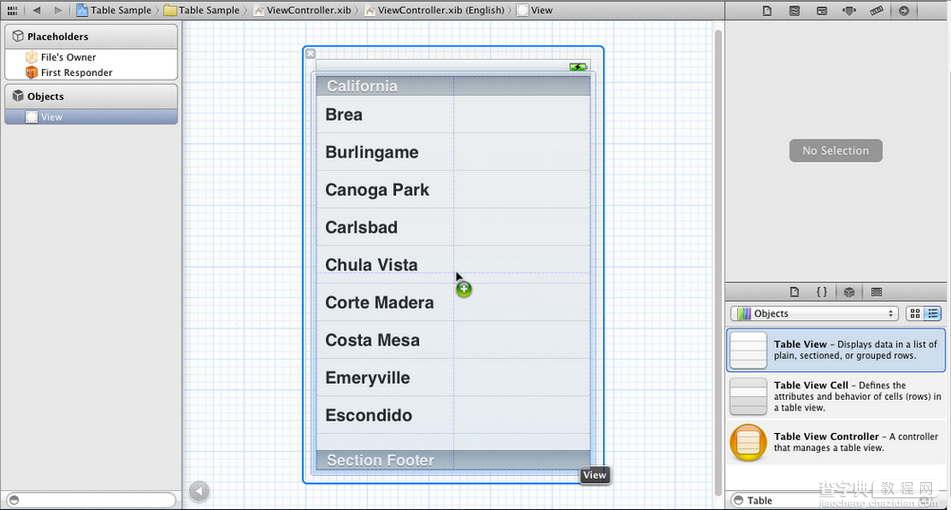
2、单击ViewController.xib,使用Interface Builder给视图添加一个UITableView控件,并使其覆盖整个视图:
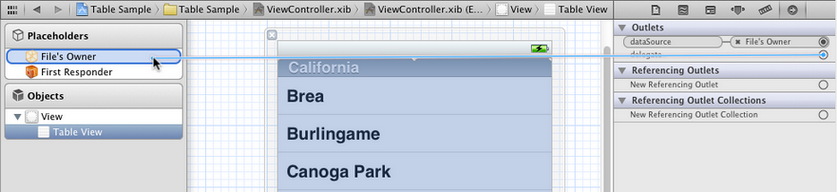
3、选中新添加的UITableView控件,打开Connection Inspector,找到delegate和datasource,从它们右边的圆圈拉线到File's Owner图标:
4、单击ViewController.h,在其中添加代码:
复制代码 代码如下:
#import <UIKit/UIKit.h>
@interface ViewController : UIViewController<UITableViewDelegate, UITableViewDataSource>
@property (strong, nonatomic) NSArray *listData;
@end
5、单击ViewController.m,在其中添加代码:
5.1 在@implementation后面添加代码:
复制代码 代码如下:
@synthesize listData;
5.2 在viewDidLoad方法中添加代码:
复制代码 代码如下:
- (void)viewDidLoad
{
[super viewDidLoad];
// Do any additional setup after loading the view, typically from a nib.
NSArray *array = [[NSArray alloc] initWithObjects:@"Tree", @"Flower",
@"Grass", @"Fence", @"House", @"Table", @"Chair",
@"Book", @"Swing" , nil];
self.listData = array;
}
5.3 在viewDidUnload方法中添加代码:
复制代码 代码如下:
- (void)viewDidUnload
{
[super viewDidUnload];
// Release any retained subviews of the main view.
// e.g. self.myOutlet = nil;
self.listData = nil;
}
5.4 在@end之前添加代码:
复制代码 代码如下:
#pragma mark -
#pragma mark Table View Data Source Methods
//返回行数
- (NSInteger)tableView:(UITableView *)tableView
numberOfRowsInSection:(NSInteger)section {
return [self.listData count];
}
//新建某一行并返回
- (UITableViewCell *)tableView:(UITableView *)tableView
cellForRowAtIndexPath:(NSIndexPath *)indexPath {
static NSString *TableSampleIdentifier = @"TableSampleIdentifier";
UITableViewCell *cell = [tableView dequeueReusableCellWithIdentifier:
TableSampleIdentifier];
if (cell == nil) {
cell = [[UITableViewCell alloc]
initWithStyle:UITableViewCellStyleDefault
reuseIdentifier:TableSampleIdentifier];
}
NSUInteger row = [indexPath row];
cell.textLabel.text = [listData objectAtIndex:row];
return cell;
}
上面的第二个方法中,
复制代码 代码如下:
UITableViewCell *cell = [tableView dequeueReusableCellWithIdentifier: TableSampleIdentifier];
这个语句根据标识符TableSampleIdentifier寻找当前可以重用的UITableViewCell。当某行滑出当前可见区域后,我们重用它所对应的UITableViewCell对象,那么就可以节省内存和时间。
如果执行词语后,cell为nil,那我们再创建一个,并设置去标识符为TableSampleIdentifier:
复制代码 代码如下:
cell = [[UITableViewCell alloc] initWithStyle:UITableViewCellStyleDefault reuseIdentifier:TableSampleIdentifier];
这里UITableViewCellStyleDefault是表示UITableViewCell风格的常数,除此之外,还有其他风格,后面将会用到。
注意参数(NSIndexPath *)indexPath,它将行号row和部分号section合并了,通过[indexPath row];获取行号。之后给cell设置其文本:
复制代码 代码如下:
cell.textLabel.text = [listData objectAtIndex: row];
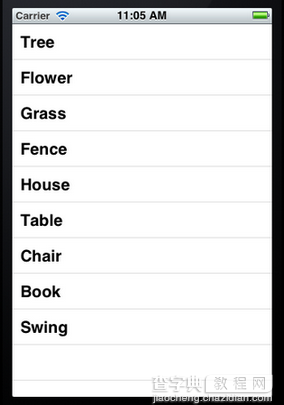
6、运行一下:
7、给每一行添加图片:
7.1 将图片资源添加到工程:拖到工程中,前面的文章有提到。
7.2 在cellForRowAtIndexPath方法的return语句之前添加代码:
复制代码 代码如下:
UIImage *image = [UIImage imageNamed:@"blue.png"];
cell.imageView.image = image;
UIImage *highLighedImage = [UIImage imageNamed:@"yellow.png"];
cell.imageView.highlighedImage = highLighedImage;
7.3 运行,效果如下:
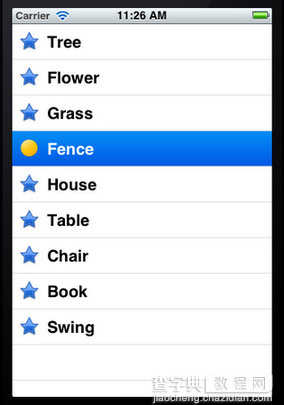
可以看到,每行左边都出现一张图片。当选中某行,其图片改变。
8、设置行的风格:
表示UITableViewCell风格的常量有:
复制代码 代码如下:
UITableViewCellStyleDefault
UITableViewCellStyleSubtitle
UITableViewCellStyleValue1
UITableViewCellStyleValue2
这几种风格的区别主要体现在Image、Text Label以及Detail Text Label。
为了体现风格,在cellForRowAtIndexPath方法的return语句之前添加代码:
复制代码 代码如下:
cell.detailTextLabel.text = @"Detail Text";
然后将
复制代码 代码如下:
cell = [[UITableViewCell alloc] initWithStyle:UITableViewCellStyleDefault reuseIdentifier:TableSampleIdentifier];
中的UITableViewCellStyleDefault依次换成上面提到的四个风格常量,并运行,效果分别如下:
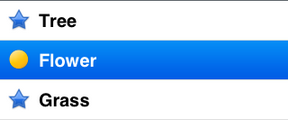
UITableViewCellStyleDefault
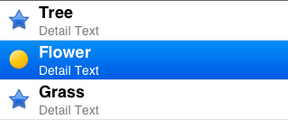
UITableViewCellStyleSubtitle
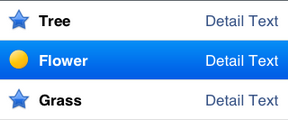
UITableViewCellStyleValue1
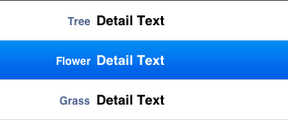
UITableViewCellStyleValue2
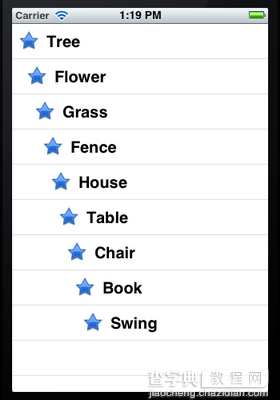
9、设置缩进:
将所有行的风格改回UITableViewCellStyleDefault,然后在@end之前添加代码如下:
复制代码 代码如下:
#pragma mark Table Delegate Methods
- (NSInteger)tableView:(UITableView *)tableView indentationLevelForRowAtIndexPath:(NSIndexPath *)indexPath {
NSUInteger row = [indexPath row];
return row;
}
这里将第row行缩进row,如下图所示:
10、操纵行选择:
在@end之前添加代码:
复制代码 代码如下:
- (NSIndexPath *)tableView:(UITableView *)tableView willSelectRowAtIndexPath:(NSIndexPath *)indexPath {
NSUInteger row = [indexPath row];
if (row%2 == 0) {
return nil;
}
return indexPath;
}
上面的方法在选择某行之前执行,我们可以在这个方法中添加我们想要的操作。这里,我们实现的是,如果选择的行号(从0开始计)是偶数,则取消选择。
在@end之前添加代码:
复制代码 代码如下:
- (void)tableView:(UITableView *)tableView didSelectRowAtIndexPath:(NSIndexPath *)indexPath {
NSUInteger row = [indexPath row];
NSString *rowValue = [listData objectAtIndex:row];
NSString *message = [[NSString alloc] initWithFormat:
@"You selected %@", rowValue];
UIAlertView *alert = [[UIAlertView alloc]
initWithTitle:@"Row Selected!"
message:message
delegate:nil
cancelButtonTitle:@"Yes I Did"
otherButtonTitles:nil];
[alert show];
[tableView deselectRowAtIndexPath:indexPath animated:YES];
}
当选择某行之后,就弹出一个Alert,用来显示我们所做的选择。
运行一下,你会发现第0、2等行无法选择。选择奇数行时会弹出提示:
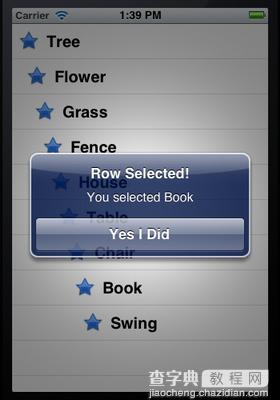
而且关闭提示框后,选择的那行也被取消了选择,用的语句
复制代码 代码如下:
[tableView deselectRowAtIndexPath:indexPath animated:YES];
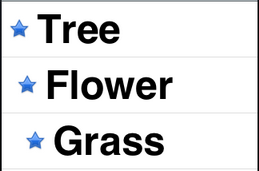
11、设置字体大小和表格行高:
11.1 在cellForRowAtIndexPath方法中的return之前添加代码,用于设置字体和大小:
复制代码 代码如下:
cell.textLabel.font = [UIFont boldSystemFontOfSize:50];
11.2 在@end之前添加代码,用于设置行高:
复制代码 代码如下:
- (CGFloat)tableView:(UITableView *)tableView heightForRowAtIndexPath:(NSIndexPath *)indexPath {
return 70;
}
运行,看看效果:
可任意自定义的UITableViewCell
UITableView的强大更多程度上来自于可以任意自定义UITableViewCell单元格。通常,UITableView中的Cell是动态的,在使用过程中,会创建一个Cell池,根据每个cell的高度(即tableView:heightForRowAtIndexPath:返回值),以及屏幕高度计算屏幕中可显示几个cell。而进行自定义TableViewCell无非是采用代码实现或采用IB编辑nib文件来实现两种方式,本文主要收集代码的方式实现各种cell自定义。
1.如何动态调整Cell高度
复制代码 代码如下:
- (UITableViewCell *)tableView:(UITableView *)tableView cellForRowAtIndexPath:(NSIndexPath *)indexPath {
static NSString *CellIdentifier = @"Cell";
UITableViewCell *cell = [tableView dequeueReusableCellWithIdentifier:CellIdentifier];
if (cell == nil) {
cell = [[[UITableViewCell alloc] initWithFrame:CGRectZero reuseIdentifier:CellIdentifier] autorelease];
UILabel *label = [[UILabel alloc] initWithFrame:CGRectZero];
label.tag = 1;
label.lineBreakMode = UILineBreakModeWordWrap;
label.highlightedTextColor = [UIColor whiteColor];
label.numberOfLines = 0;
label.opaque = NO; // 选中Opaque表示视图后面的任何内容都不应该绘制
label.backgroundColor = [UIColor clearColor];
[cell.contentView addSubview:label];
[label release];
}
UILabel *label = (UILabel *)[cell viewWithTag:1];
NSString *text;
text = [textArray objectAtIndex:indexPath.row];
CGRect cellFrame = [cell frame];
cellFrame.origin = CGPointMake(0, 0);
label.text = text;
CGRect rect = CGRectInset(cellFrame, 2, 2);
label.frame = rect;
[label sizeToFit];
if (label.frame.size.height > 46) {
cellFrame.size.height = 50 + label.frame.size.height - 46;
}
else {
cellFrame.size.height = 50;
}
[cell setFrame:cellFrame];
return cell;
}
- (CGFloat)tableView:(UITableView *)tableView heightForRowAtIndexPath:(NSIndexPath *)indexPath
{
UITableViewCell *cell = [self tableView:tableView cellForRowAtIndexPath:indexPath];
return cell.frame.size.height;
}
2.如何用图片自定义Table Separeator分割线
一般地,利用类似[tableView setSeparatorColor:[UIColor redColor]];语句即可修改cell中间分割线的颜色。那又如何用一个图片作为分割线背景呢?可以尝试如下:
方法一:
先设置cell separatorColor为clear,然后把图片做的分割线添加到自定义的custom cell上。
方法二:
在cell里添加一个像素的imageView后将图片载入进,之后设置tableView.separatorStyle = UITableViewCellSeparatorStyleNone
3.自定义首行Cell与其上面导航栏间距
复制代码 代码如下:
tableView.tableHeaderView = [[[UIView alloc] initWithFrame:CGRectMake(0,0,5,20)] autorelease];
4.自定义UITableViewCell的accessory样式
默认的accessoryType属性有四种取值:UITableViewCellAccessoryNone、UITableViewCellAccessoryDisclosureIndicator、UITableViewCellAccessoryDetailDisclosureButton、UITableViewCellAccessoryCheckmark。如果想使用自定义附件按钮的其他样式,则需使用UITableView的accessoryView属性来指定。
复制代码 代码如下:
UIButton *button;
if(isEditableOrNot) {
UIImage *image = [UIImage imageNamed:@"delete.png"];
button = [UIButton buttonWithType:UIButtonTypeCustom];
CGRect frame = CGRectMake(0.0,0.0,image.size.width,image.size.height);
button.frame = frame;
[button setBackgroundImage:image forState:UIControlStateNormal];
button.backgroundColor = [UIColor clearColor];
cell.accessoryView = button;
}else{
button = [UIButton buttonWithType:UIButtonTypeCustom];
button.backgroundColor = [UIColor clearColor];
cell.accessoryView = button;
}
以上代码仅仅是定义了附件按钮两种状态下的样式,问题是现在这个自定义附件按钮的事件仍不可用。即事件还无法传递到UITableViewDelegate的accessoryButtonTappedForRowWithIndexPath方法上。当我们在上述代码中在加入以下语句:
复制代码 代码如下:[button addTarget:self action:@selector(btnClicked:event:) forControlEvents:UIControlEventTouchUpInside];
后,虽然可以捕捉到每个附件按钮的点击事件,但我们还无法进行区别到底是哪一行的附件按钮发生了点击动作!因为addTarget:方法最多允许传递两个参数:target和event,这两个参数都有各自的用途了(target指向事件委托对象,event指向所发生的事件)。看来只依靠Cocoa框架已经无法做到了。
但我们还是可以利用event参数,在自定义的btnClicked方法中判断出事件发生在UITableView的哪一个cell上。因为UITableView有一个很关键的方法indexPathForRowAtPoint,可以根据触摸发生的位置,返回触摸发生在哪一个cell的indexPath。而且通过event对象,正好也可以获得每个触摸在视图中的位置。
复制代码 代码如下:
// 检查用户点击按钮时的位置,并转发事件到对应的accessory tapped事件
- (void)btnClicked:(id)sender event:(id)event
{
NSSet *touches = [event allTouches];
UITouch *touch = [touches anyObject];
CGPoint currentTouchPosition = [touch locationInView:self.tableView];
NSIndexPath *indexPath = [self.tableView indexPathForRowAtPoint:currentTouchPosition];
if(indexPath != nil)
{
[self tableView:self.tableView accessoryButtonTappedForRowWithIndexPath:indexPath];
}
}
这样,UITableView的accessoryButtonTappedForRowWithIndexPath方法会被触发,并且获得一个indexPath参数。通过这个indexPath参数,我们即可区分到底哪一行的附件按钮发生了触摸事件。
复制代码 代码如下:
- (void)tableView:(UITableView *)tableView accessoryButtonTappedForRowWithIndexPath:(NSIndexPath *)indexPath
{
int *idx = indexPath.row;
//这里加入自己的逻辑
}
【iOS App开发中使用及自定义UITableViewCell的教程】相关文章:
★ iOS开发中使用Quartz2D绘制上下文栈和矩阵的方法
★ 详解iOS开发中使用storyboard创建导航控制器的方法
★ iOS自定义UICollectionViewFlowLayout实现图片浏览效果
★ iOS应用开发中导航栏按钮UIBarButtonItem的添加教程
★ iOS App中UILabel的自定义及在Auto Layout中的使用
★ iOS应用开发中UIScrollView滚动视图的基本用法总结
★ iOS开发中的ViewController转场切换效果实现简介
★ iOS开发中使用Picker View实现一个点菜应用的UI示例