最近做项目,碰到一种双向滑动条,自己实现了一下,随便写一下思路,方便以后开发,避免重复写代码,以后粘贴就行了。封装了一下,代码如下:
#import <UIKit/UIKit.h> typedef NSString* (^HLDoubleSlideViewSwitchStrBock)(CGFloat count); @interface HLDoubleSlideView : UIView @property(nonatomic,assign)CGFloat maxValue; @property(nonatomic,assign)CGFloat minValue; @property(nonatomic,assign)CGFloat currentLeftValue; @property(nonatomic,assign)CGFloat currentRightValue; //格式化显示文本 @property(nonatomic,copy)HLDoubleSlideViewSwitchStrBock block; @end
源文件如下:
#import "HLDoubleSlideView.h" #import "UIView+Add.h" @interface HLDoubleSlideView ()<UIGestureRecognizerDelegate> @property(nonatomic,strong)UIImageView *leftImageView; @property(nonatomic,strong)UIImageView *rightImageView; @property(nonatomic,strong)UILabel *leftLabel; @property(nonatomic,strong)UILabel *rightLabel; @property(nonatomic,strong)UIButton *leftBtn; @property(nonatomic,strong)UIButton *rightBtn; @property(nonatomic,assign)CGFloat leftBtnOrgx; @property(nonatomic,assign)CGFloat rightBtnOrgx; @end @implementation HLDoubleSlideView -(id)init { if (self = [super init]) { [self setupUI]; } return self; } -(void)setupUI { _leftImageView = [[UIImageView alloc] init]; _leftImageView.image = [UIImage imageNamed:@"progressImage"]; _leftImageView.frame = CGRectMake(0, 5, 60, 40); [self addSubview:_leftImageView]; _leftLabel = [[UILabel alloc] initWithFrame:_leftImageView.bounds]; _leftLabel.backgroundColor = [UIColor clearColor]; _leftLabel.font = [UIFont systemFontOfSize:13]; _leftLabel.textAlignment = NSTextAlignmentCenter; _leftLabel.textColor = [UIColor whiteColor]; [_leftImageView addSubview:_leftLabel]; _rightImageView = [[UIImageView alloc] init]; _rightImageView.image = [UIImage imageNamed:@"progressImage"]; _rightImageView.frame = CGRectMake(0, 5, 60, 40); [self addSubview:_rightImageView]; _rightLabel = [[UILabel alloc] initWithFrame:_rightImageView.bounds]; _rightLabel.backgroundColor = [UIColor clearColor]; _rightLabel.font = [UIFont systemFontOfSize:13]; _rightLabel.textAlignment = NSTextAlignmentCenter; _rightLabel.textColor = [UIColor whiteColor]; [_rightImageView addSubview:_rightLabel]; _leftBtn = [UIButton buttonWithType:UIButtonTypeCustom]; _leftBtn.frame = CGRectMake(0, 50, 20,20); _leftBtn.backgroundColor = [UIColor blueColor]; _leftBtn.layer.cornerRadius = 10; [self addSubview:_leftBtn]; UIPanGestureRecognizer *panGesture = [[UIPanGestureRecognizer alloc] initWithTarget:self action:@selector(tapGestureAction:)]; panGesture.delegate = self; [_leftBtn addGestureRecognizer:panGesture]; _leftImageView.centerX = _leftBtn.centerX; _rightBtn = [UIButton buttonWithType:UIButtonTypeCustom]; _rightBtn.backgroundColor = [UIColor blueColor]; _rightBtn.frame = CGRectMake(240, 50, 20, 20); _rightBtn.layer.cornerRadius = 10; panGesture = [[UIPanGestureRecognizer alloc] initWithTarget:self action:@selector(tapGestureAction:)]; panGesture.delegate = self; [_rightBtn addGestureRecognizer:panGesture]; _rightImageView.centerX = _rightBtn.centerX; [self addSubview:_rightBtn]; } - (BOOL)gestureRecognizerShouldBegin:(UIGestureRecognizer *)gestureRecognizer { return YES; } -(UIView*)hitTest:(CGPoint)point withEvent:(UIEvent *)event { NSLog(@"doubleView hitTest"); return [super hitTest:point withEvent:event]; } -(void)touchesBegan:(NSSet<UITouch *> *)touches withEvent:(UIEvent *)event { NSLog(@"began"); [super touchesBegan:touches withEvent:event]; } -(void)touchesMoved:(NSSet<UITouch *> *)touches withEvent:(UIEvent *)event { NSLog(@"move"); [super touchesMoved:touches withEvent:event]; } -(void)layoutSubviews { CGFloat centenX = (_currentLeftValue - _minValue) * (self.bounds.size.width - 20)/(_maxValue - _minValue) + 10; _leftBtn.centerX = centenX; if (_currentLeftValue != 0) { CGFloat centenX = (_currentRightValue - _minValue) * (self.bounds.size.width - 20) / (_maxValue - _minValue) + 10; _rightBtn.centerX = centenX; } else { _rightBtn.centerX = self.bounds.size.width - 10; } _leftImageView.centerX = _leftBtn.centerX; _rightImageView.centerX = _rightBtn.centerX; if (_block) { _leftLabel.text = _block(_currentLeftValue); _rightLabel.text = _block(_currentRightValue); } } -(void)tapGestureAction:(UIPanGestureRecognizer*)panGesture { UIView *vw = panGesture.view; CGPoint transPoint = [panGesture translationInView:self]; NSLog(@"x:%lf,y:%lf",transPoint.x,transPoint.y); switch (panGesture.state) { case UIGestureRecognizerStateBegan: { if ([vw isEqual:_leftBtn]) { _leftBtnOrgx = _leftBtn.orgX; NSLog(@"拖拽左边按钮"); } else if([vw isEqual:_rightBtn]) { _rightBtnOrgx = _rightBtn.orgX; NSLog(@"拖拽右边按钮"); } } break; case UIGestureRecognizerStateChanged: { if ([vw isEqual:_leftBtn]) { CGFloat orginX = _leftBtn.orgX; _leftBtn.orgX = _leftBtnOrgx + transPoint.x; if (_leftBtn.orgX < 0) { _leftBtn.orgX = 0; } else if(_leftBtn.orgX >= _rightBtn.orgX - 20) { _leftBtn.orgX = orginX; } _leftImageView.centerX = _leftBtn.centerX; } else if([vw isEqual:_rightBtn]) { CGFloat orginX = _rightBtn.orgX; _rightBtn.orgX = _rightBtnOrgx + transPoint.x; if (_rightBtn.orgX >= self.bounds.size.width - 20) { _rightBtn.orgX = self.bounds.size.width - 20; } else if(_rightBtn.orgX <= _leftBtn.orgX + 20) { _rightBtn.orgX = orginX; } _rightImageView.centerX = _rightBtn.centerX; } } break; case UIGestureRecognizerStateEnded: { } break; default: break; } _currentLeftValue = _minValue + (_maxValue - _minValue) * ((_leftBtn.centerX - 10) / (self.bounds.size.width - 20)); _currentRightValue = _minValue + (_maxValue - _minValue) * ((_rightBtn.centerX - 10) / (self.bounds.size.width - 20)); if (_block) { _leftLabel.text = _block(_currentLeftValue); _rightLabel.text = _block(_currentRightValue); } NSLog(@"leftValue:%lf,rightValue:%lf",_currentLeftValue,_currentRightValue); [self setNeedsDisplay]; } -(void)setCurrentLeftValue:(CGFloat)currentLeftValue { _currentLeftValue = currentLeftValue; CGFloat centenX = (currentLeftValue - _minValue) * (self.bounds.size.width - 20)/(_maxValue - _minValue) + 10; _leftBtn.centerX = centenX; [self setNeedsDisplay]; } -(void)setCurrentRightValue:(CGFloat)currentRightValue { _currentRightValue = currentRightValue; CGFloat centenX = (_currentRightValue - _minValue) * (self.bounds.size.width - 20) / (_maxValue - _minValue) + 10; _rightBtn.centerX = centenX; [self setNeedsDisplay]; } -(void)drawRect:(CGRect)rect { CGContextRef context = UIGraphicsGetCurrentContext(); CGContextSetLineCap(context, kCGLineCapRound); CGContextSetLineWidth(context, 3); [[UIColor grayColor] setStroke]; CGContextMoveToPoint(context, 0, 60); CGContextAddLineToPoint(context, self.bounds.size.width, 60); CGContextStrokePath(context); [[UIColor redColor] setStroke]; CGContextMoveToPoint(context, _leftBtn.orgX + 10, 60); CGContextAddLineToPoint(context, _rightBtn.orgX,60); CGContextStrokePath(context); } @end
使用如下:
HLDoubleSlideView *doubleSlideView = [[HLDoubleSlideView alloc] init]; doubleSlideView.backgroundColor = [UIColor whiteColor];//HLColor(244, 244, 244); doubleSlideView.minValue = 1000; doubleSlideView.maxValue = 10000; doubleSlideView.block = ^NSString*(CGFloat count) { return [NSString stringWithFormat:@"%.0f元",count]; }; [self.view addSubview:doubleSlideView]; doubleSlideView.frame = CGRectMake(60, 64, 250, 80); doubleSlideView.currentLeftValue = 1200; doubleSlideView.currentRightValue = 10000;
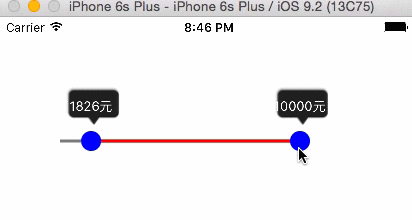
运行结果如下:
demo:https://github.com/jiangtaidi/HLDoubleSlideView.git
以上就是本文的全部内容,希望对大家的学习有所帮助。
【iOS实现双向滑动条效果】相关文章: