一、程序实现要求
1.要求
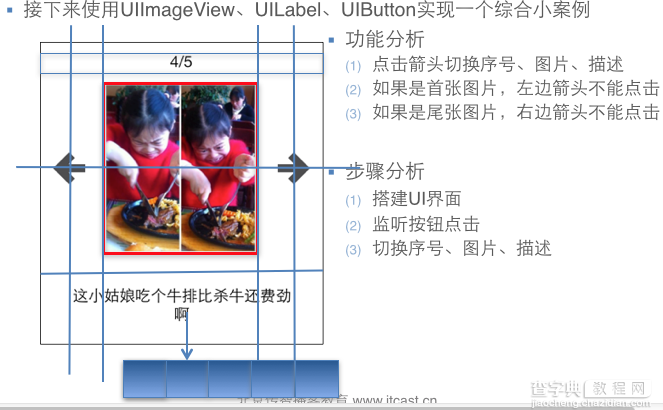
2. 界面分析
(1) 需要读取或修改属性的控件需要设置属性
序号标签 图片 图片描述 左边按钮 右边按钮
(2) 需要监听响应事件的对象,需要添加监听方法
左边按钮 右边按钮
二、实现基本功能的程序
复制代码 代码如下:
//
// YYViewController.m
// 03-图片浏览器初步
//
// Created by apple on 14-5-21.
// Copyright (c) 2014年 itcase. All rights reserved.
//
#import "YYViewController.h"
#define POTOIMGW 200
#define POTOIMGH 300
#define POTOIMGX 60
#define POTOIMGY 50
@interface YYViewController ()
//变量声明!
@property(nonatomic,strong)UILabel *firstlab;
@property(nonatomic,strong)UILabel *lastlab;
@property(nonatomic,strong)UIImageView *icon;
@property(nonatomic,strong)UIButton *leftbtn;
@property(nonatomic,strong)UIButton *rightbtn;
-(void)change;
@property(nonatomic ,assign)int i;
@end
@implementation YYViewController
- (void)viewDidLoad
{
[super viewDidLoad];
self.i=0;
//创建一个用来显示序号的lable控件
UILabel *headlab=[[UILabel alloc]initWithFrame:CGRectMake(20, 10, 300, 30)];
// [headlab setText:@"1/5"];
[headlab setTextAlignment:NSTextAlignmentCenter];
[headlab setTextColor:[UIColor blackColor]];
[self.view addSubview:headlab];
self.firstlab=headlab;
//创建一个装载图片的控件
UIImageView *potoimg=[[UIImageView alloc]initWithFrame:CGRectMake(POTOIMGX, POTOIMGY, POTOIMGW, POTOIMGH)];
UIImage *image=[UIImage imageNamed:@"biaoqingdi"];
potoimg.image=image;
[self.view addSubview:potoimg];
self.icon=potoimg;
//创建最下边的描述图片的lable控件
UILabel *desclab=[[UILabel alloc]initWithFrame:CGRectMake(20, 400, 300, 30)];
// [desclab setText:@"表情弱爆了!"];
[desclab setTextAlignment:NSTextAlignmentCenter];
[self.view addSubview:desclab];
self.lastlab=desclab;
//创建两个方向键按钮
//设置为自定义类型
//1.使用类创建对象
UIButton *leftbtn=[UIButton buttonWithType:UIButtonTypeCustom];
//2.设置对象的属性(不要忘记设置坐标)
leftbtn.frame=CGRectMake(0, self.view.center.y, 40, 40);
[leftbtn setBackgroundImage:[UIImage imageNamed:@"left_normal"] forState:UIControlStateNormal];
[leftbtn setBackgroundImage:[UIImage imageNamed:@"left_highlighted"] forState:UIControlStateHighlighted];
//3.提交对象到视图
[self.view addSubview:leftbtn];
self.leftbtn=leftbtn;
[leftbtn addTarget:self action:@selector(leftclick:) forControlEvents:UIControlEventTouchUpInside];
UIButton *rightbtn=[UIButton buttonWithType:UIButtonTypeCustom];
rightbtn.frame=CGRectMake(POTOIMGX+POTOIMGW+10, self.view.center.y, 40, 40);
[rightbtn setBackgroundImage:[UIImage imageNamed:@"right_normal"] forState:UIControlStateNormal];
[rightbtn setBackgroundImage:[UIImage imageNamed:@"right_highlighted"] forState:UIControlStateHighlighted];
[self.view addSubview:rightbtn];
self.rightbtn=rightbtn;
[rightbtn addTarget:self action:@selector(rightclick:) forControlEvents:UIControlEventTouchUpInside];
//这是一个初始化方法,调用change可以完成初始化的工作
[self change];
}
-(void)change
{
[self.firstlab setText:[NSString stringWithFormat:@"%d/5",self.i+1]];
switch (self.i) {
case 0:
self.lastlab.text=@"什么表情都弱爆了!";
self.icon.image=[UIImage imageNamed:@"biaoqingdi"];
break;
case 1:
self.lastlab.text=@"病例";
self.icon.image=[UIImage imageNamed:@"bingli"];
break;
case 2:
self.lastlab.text=@"王八";
self.icon.image=[UIImage imageNamed:@"wangba"];
break;
case 3:
self.lastlab.text=@"吃牛扒";
self.icon.image=[UIImage imageNamed:@"chiniupa"];
break;
case 4:
self.lastlab.text=@"蛋疼!";
self.icon.image=[UIImage imageNamed:@"danteng"];
break;
}
//控制按钮的点击,如果为5则右键失效,如果为1,则左键失效
self.leftbtn.enabled=(self.i!=0);
self.rightbtn.enabled=(self.i!=4);
}
//向右按键
-(void)rightclick:(UIButton *)btn
{
self.i++;
[self change];
//NSLog(@"点我了");
}
-(void)leftclick:(UIButton *)btn
{
self.i--;
[self change];
}
- (void)didReceiveMemoryWarning
{
[super didReceiveMemoryWarning];
// Dispose of any resources that can be recreated.
}
@end
三、程序优化
复制代码 代码如下:
//
// YYViewController.m
// 03-图片浏览器初步
//
// Created by apple on 14-5-21.
// Copyright (c) 2014年 itcase. All rights reserved.
//
#import "YYViewController.h"
#define POTOIMGW 200
#define POTOIMGH 300
#define POTOIMGX 60
#define POTOIMGY 50
@interface YYViewController ()
//变量声明!
@property(nonatomic,strong)UILabel *firstlab;
@property(nonatomic,strong)UILabel *lastlab;
@property(nonatomic,strong)UIImageView *icon;
@property(nonatomic,strong)UIButton *leftbtn;
@property(nonatomic,strong)UIButton *rightbtn;
@property(nonatomic,strong)NSArray *array;
-(void)change;
@property(nonatomic ,assign)int i;
@end
复制代码 代码如下:
@implementation YYViewController
- (void)viewDidLoad
{
[super viewDidLoad];
self.i=0;
//创建一个用来显示序号的lable控件
UILabel *headlab=[[UILabel alloc]initWithFrame:CGRectMake(20, 10, 300, 30)];
// [headlab setText:@"1/5"];
[headlab setTextAlignment:NSTextAlignmentCenter];
[headlab setTextColor:[UIColor blackColor]];
[self.view addSubview:headlab];
self.firstlab=headlab;
//创建一个装载图片的控件
UIImageView *potoimg=[[UIImageView alloc]initWithFrame:CGRectMake(POTOIMGX, POTOIMGY, POTOIMGW, POTOIMGH)];
UIImage *image=[UIImage imageNamed:@"biaoqingdi"];
potoimg.image=image;
[self.view addSubview:potoimg];
self.icon=potoimg;
//创建最下边的描述图片的lable控件
UILabel *desclab=[[UILabel alloc]initWithFrame:CGRectMake(20, 400, 300, 30)];
// [desclab setText:@"表情弱爆了!"];
[desclab setTextAlignment:NSTextAlignmentCenter];
[self.view addSubview:desclab];
self.lastlab=desclab;
//创建两个方向键按钮
//设置为自定义类型
//1.使用类创建对象
UIButton *leftbtn=[UIButton buttonWithType:UIButtonTypeCustom];
//2.设置对象的属性(不要忘记设置坐标)
leftbtn.frame=CGRectMake(0, self.view.center.y, 40, 40);
[leftbtn setBackgroundImage:[UIImage imageNamed:@"left_normal"] forState:UIControlStateNormal];
[leftbtn setBackgroundImage:[UIImage imageNamed:@"left_highlighted"] forState:UIControlStateHighlighted];
//3.提交对象到视图
[self.view addSubview:leftbtn];
self.leftbtn=leftbtn;
[leftbtn addTarget:self action:@selector(leftclick:) forControlEvents:UIControlEventTouchUpInside];
UIButton *rightbtn=[UIButton buttonWithType:UIButtonTypeCustom];
rightbtn.frame=CGRectMake(POTOIMGX+POTOIMGW+10, self.view.center.y, 40, 40);
[rightbtn setBackgroundImage:[UIImage imageNamed:@"right_normal"] forState:UIControlStateNormal];
[rightbtn setBackgroundImage:[UIImage imageNamed:@"right_highlighted"] forState:UIControlStateHighlighted];
[self.view addSubview:rightbtn];
self.rightbtn=rightbtn;
[rightbtn addTarget:self action:@selector(rightclick:) forControlEvents:UIControlEventTouchUpInside];
//放在这里的话,只会创建一次,但是这个部分和[self change];部分有很严格的顺序要求,并不人性化,可以考虑使用懒加载特性
// NSDictionary *dict1=@{@"name": @"biaoqingdi",@"desc":@"什么表情都弱爆了!"};
// NSDictionary *dict2=@{@"name": @"bingli",@"desc":@"病例"};
// NSDictionary *dict3=@{@"name": @"wangba",@"desc":@"乌龟"};
// NSDictionary *dict4=@{@"name": @"chiniupa",@"desc":@"吃牛扒"};
// NSDictionary *dict5=@{@"name": @"danteng",@"desc":@"蛋疼"};
//
// self.array=@[dict1,dict2,dict3,dict4,dict5];
//这是一个初始化方法,调用change可以完成初始化的工作
[self change];
}
-(void)change
{
//每次调用都需要创建?有没有什么解决办法?
// NSDictionary *dict1=@{@"name": @"biaoqingdi",@"desc":@"什么表情都弱爆了!"};
// NSDictionary *dict2=@{@"name": @"bingli",@"desc":@"病例"};
// NSDictionary *dict3=@{@"name": @"wangba",@"desc":@"乌龟"};
// NSDictionary *dict4=@{@"name": @"chiniupa",@"desc":@"吃牛扒"};
// NSDictionary *dict5=@{@"name": @"danteng",@"desc":@"蛋疼"};
//
// NSArray *array=@[dict1,dict2,dict3,dict4,dict5];
//设置照片
//先根据self.i取出数组中的元素,再取出元素(字典)中键值对应的值
// self.icon.image=[UIImage imageNamed:array[self.i][@"name"]];
// self.lastlab.text=array[self.i][@"desc"];
// NSLog(@"%@",array[self.i][@"desc"]);
self.icon.image=[UIImage imageNamed:self.array[self.i][@"name"]];
self.lastlab.text=self.array[self.i][@"desc"];
[self.firstlab setText:[NSString stringWithFormat:@"%d/5",self.i+1]];
// switch (self.i) {
// case 0:
// self.lastlab.text=@"什么表情都弱爆了!";
// self.icon.image=[UIImage imageNamed:@"biaoqingdi"];
// break;
// case 1:
// self.lastlab.text=@"病例";
// self.icon.image=[UIImage imageNamed:@"bingli"];
// break;
// case 2:
// self.lastlab.text=@"王八";
// self.icon.image=[UIImage imageNamed:@"wangba"];
// break;
// case 3:
// self.lastlab.text=@"吃牛扒";
// self.icon.image=[UIImage imageNamed:@"chiniupa"];
// break;
// case 4:
// self.lastlab.text=@"蛋疼!";
// self.icon.image=[UIImage imageNamed:@"danteng"];
// break;
// }
//控制按钮的点击,如果为5则右键失效,如果为1,则左键失效
self.leftbtn.enabled=(self.i!=0);
self.rightbtn.enabled=(self.i!=4);
}
//array的get方法
-(NSArray *)array
{
NSLog(@"需要获取数组");
//只实例化一次
if (_array==nil) {
NSLog(@"实例化数组");
NSDictionary *dict1=@{@"name": @"biaoqingdi",@"desc":@"什么表情都弱爆了!"};
NSDictionary *dict2=@{@"name": @"bingli",@"desc":@"病例"};
NSDictionary *dict3=@{@"name": @"wangba",@"desc":@"乌龟"};
NSDictionary *dict4=@{@"name": @"chiniupa",@"desc":@"吃牛扒"};
NSDictionary *dict5=@{@"name": @"danteng",@"desc":@"蛋疼"};
_array=@[dict1,dict2,dict3,dict4,dict5];
}
// NSDictionary *dict1=@{@"name": @"biaoqingdi",@"desc":@"什么表情都弱爆了!"};
// NSDictionary *dict2=@{@"name": @"bingli",@"desc":@"病例"};
// NSDictionary *dict3=@{@"name": @"wangba",@"desc":@"乌龟"};
// NSDictionary *dict4=@{@"name": @"chiniupa",@"desc":@"吃牛扒"};
// NSDictionary *dict5=@{@"name": @"danteng",@"desc":@"蛋疼"};
// _array=@[dict1,dict2,dict3,dict4,dict5];
return _array;
}
//向右按键
-(void)rightclick:(UIButton *)btn
{
self.i++;
[self change];
}
//向左按键
-(void)leftclick:(UIButton *)btn
{
self.i--;
[self change];
}
- (void)didReceiveMemoryWarning
{
[super didReceiveMemoryWarning];
}
@end
说明:
1> 定义控件属性,注意:属性必须是strong的,示例代码如下:
复制代码 代码如下:
@property (nonatomic, strong) UIImageView *icon;
2> 在属性的getter方法中实现懒加载,示例代码如下:
复制代码 代码如下:
- (UIImageView *)icon
{
if (!_icon) {
// 计算位置参数
CGFloat imageW = 200;
CGFloat imageX = (320 - imageW) / 2;
CGFloat imageH = 200;
CGFloat imageY = 80;
// 实例化图像视图
_icon = [[UIImageView alloc] initWithFrame:CGRectMake(imageX, imageY, imageW, imageH)];
// 将图像视图添加到主视图
[self.view addSubview:_icon];
}
return _icon;
}
四、使用plist文件
(1)使用Plist文件的目的:将数据与代码分离
(2)加载方法:
复制代码 代码如下:
NSString *path = [[NSBundle mainBundle] pathForResource:@"ImageData" ofType:@"plist"];
_imageList = [NSArray arrayWithContentsOfFile:path];
提示:通常在方法中出现File字眼,通常需要传递文件的全路径作为参数
(3)代码示例
复制代码 代码如下:
//
// YYViewController.m
// 03-图片浏览器初步
//
// Created by apple on 14-5-21.
// Copyright (c) 2014年 itcase. All rights reserved.
//
#import "YYViewController.h"
#define POTOIMGW 200
#define POTOIMGH 300
#define POTOIMGX 60
#define POTOIMGY 50
@interface YYViewController ()
//变量声明!
@property(nonatomic,strong)UILabel *firstlab;
@property(nonatomic,strong)UILabel *lastlab;
@property(nonatomic,strong)UIImageView *icon;
@property(nonatomic,strong)UIButton *leftbtn;
@property(nonatomic,strong)UIButton *rightbtn;
@property(nonatomic,strong)NSArray *array;
-(void)change;
@property(nonatomic ,assign)int i;
@end
复制代码 代码如下:
@implementation YYViewController
- (void)viewDidLoad
{
[super viewDidLoad];
self.i=0;
//创建一个用来显示序号的lable控件
UILabel *headlab=[[UILabel alloc]initWithFrame:CGRectMake(20, 10, 300, 30)];
// [headlab setText:@"1/5"];
[headlab setTextAlignment:NSTextAlignmentCenter];
[headlab setTextColor:[UIColor blackColor]];
[self.view addSubview:headlab];
self.firstlab=headlab;
//创建一个装载图片的控件
UIImageView *potoimg=[[UIImageView alloc]initWithFrame:CGRectMake(POTOIMGX, POTOIMGY, POTOIMGW, POTOIMGH)];
UIImage *image=[UIImage imageNamed:@"biaoqingdi"];
potoimg.image=image;
[self.view addSubview:potoimg];
self.icon=potoimg;
//创建最下边的描述图片的lable控件
UILabel *desclab=[[UILabel alloc]initWithFrame:CGRectMake(20, 400, 300, 30)];
// [desclab setText:@"表情弱爆了!"];
[desclab setTextAlignment:NSTextAlignmentCenter];
[self.view addSubview:desclab];
self.lastlab=desclab;
//创建两个方向键按钮
//设置为自定义类型
//1.使用类创建对象
UIButton *leftbtn=[UIButton buttonWithType:UIButtonTypeCustom];
//2.设置对象的属性(不要忘记设置坐标)
leftbtn.frame=CGRectMake(0, self.view.center.y, 40, 40);
[leftbtn setBackgroundImage:[UIImage imageNamed:@"left_normal"] forState:UIControlStateNormal];
[leftbtn setBackgroundImage:[UIImage imageNamed:@"left_highlighted"] forState:UIControlStateHighlighted];
//3.提交对象到视图
[self.view addSubview:leftbtn];
self.leftbtn=leftbtn;
[leftbtn addTarget:self action:@selector(leftclick:) forControlEvents:UIControlEventTouchUpInside];
UIButton *rightbtn=[UIButton buttonWithType:UIButtonTypeCustom];
rightbtn.frame=CGRectMake(POTOIMGX+POTOIMGW+10, self.view.center.y, 40, 40);
[rightbtn setBackgroundImage:[UIImage imageNamed:@"right_normal"] forState:UIControlStateNormal];
[rightbtn setBackgroundImage:[UIImage imageNamed:@"right_highlighted"] forState:UIControlStateHighlighted];
[self.view addSubview:rightbtn];
self.rightbtn=rightbtn;
[rightbtn addTarget:self action:@selector(rightclick:) forControlEvents:UIControlEventTouchUpInside];
[self change];
}
-(void)change
{
self.icon.image=[UIImage imageNamed:self.array[self.i][@"name"]];
self.lastlab.text=self.array[self.i][@"desc"];
[self.firstlab setText:[NSString stringWithFormat:@"%d/5",self.i+1]];
self.leftbtn.enabled=(self.i!=0);
self.rightbtn.enabled=(self.i!=4);
}
//array的get方法
-(NSArray *)array
{
NSLog(@"需要获取数组");
//只实例化一次
if (_array==nil) {
NSString *path=[[NSBundle mainBundle] pathForResource:@"data" ofType:@"plist"];
//数组的数据从文件获取
// _array=[NSArray arrayWithContentsOfFile:path];
_array=[[NSArray alloc]initWithContentsOfFile:path];
//打印查看包的位置
NSLog(@"%@",path);
NSLog(@"实例化数组");
}
return _array;
}
//向右按键
-(void)rightclick:(UIButton *)btn
{
self.i++;
[self change];
}
//向左按键
-(void)leftclick:(UIButton *)btn
{
self.i--;
[self change];
}
- (void)didReceiveMemoryWarning
{
[super didReceiveMemoryWarning];
}
@end
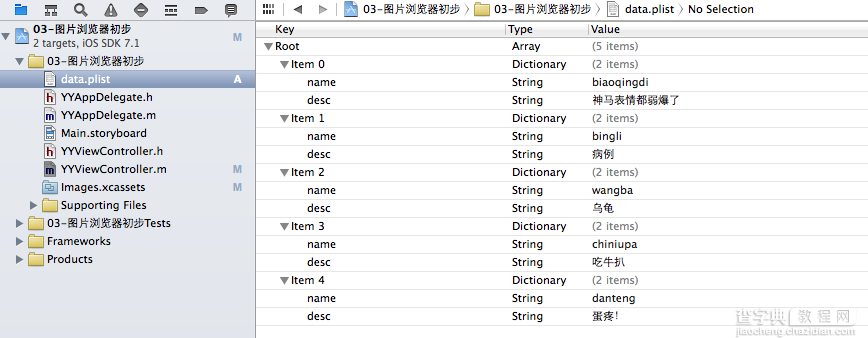
(4)plist文件
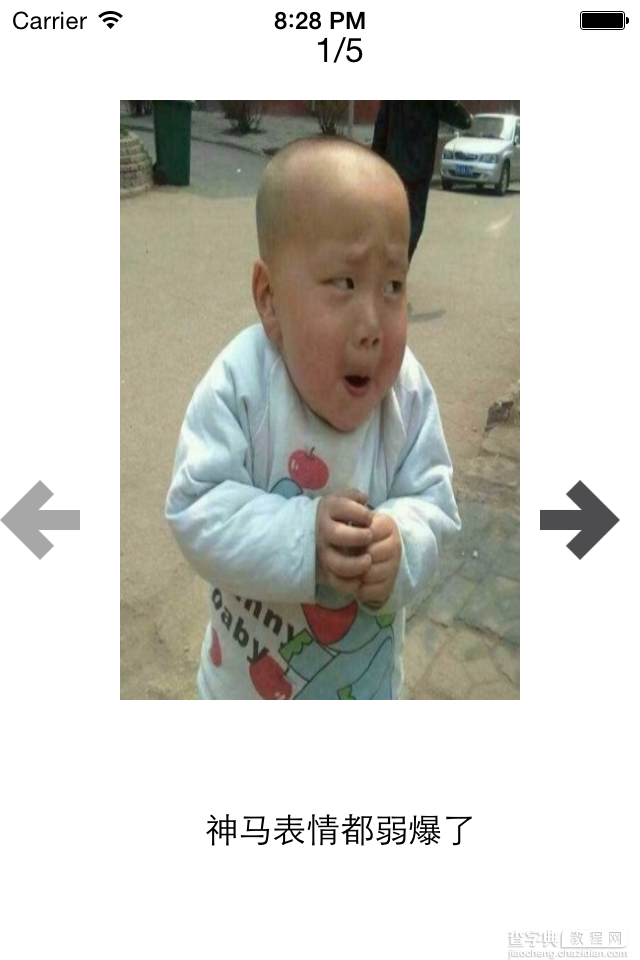
(5)实现效果
五、补充
开发思路:
1.完成基本功能
2.考虑性能
(1)(初始化操作,可以直接调用change进行)
(2)因为要控制序号和图片两个变量,所以考虑使用字典代替掉switch
(3)每次点击,字典都需要创建一次,效率地下,可以考虑创建的这部分拿到初始化方法中去,这样就只需要创建一次就ok了。
(4)考虑缺点(对代码的顺序要求极其严格)
(5)懒加载(需要的时候才加载,那么什么时候是需要的时候,及调用get方法的时候)
(6)每次都来一下?效率低下—》只有第一次调用get方法时为空,此时实例化并建立数组,其他时候直接返回成员变量(仅仅执行一次)
注意点:
1.方法的调用堆栈(顺序)。
2.使用plist:让数据的操作更加灵活,把数据弄到外面去,解除耦合性,让耦合性不要太强。实际上是一个xml,是苹果定义的一种特殊格式的xml。
3.bundle-包(只读)
【iOS开发中实现一个简单的图片浏览器的实例讲解】相关文章:
★ iOS自定义UICollectionViewFlowLayout实现图片浏览效果
★ 在iOS开发的Quartz2D使用中实现图片剪切和截屏功能
★ iOS多线程应用开发中自定义NSOperation类的实例解析
★ iOS中UIActivityIndicatorView的用法及齿轮等待动画实例