本文提供了实现IOS实现输入验证码、密码按位分割的一种思路,分享给大家供大家参考,希望与大家共同交流。
一、实现思路
1、思路描述
自定义一个view,继承自UIView 在view中添加子控件textField,backgroundImageView,label 将验证码/密码的内容绘制到label的指定区域(计算得到),所以label要自定义,在drawRect方法中绘制验证码 使用一个属性secureTextEntry,来控制显示验证码(显示真实的数字)或密码(显示圆点)
2、视图中的子控件
textField:只负责弹出键盘,获取键盘输入的数据;不用于演示键盘输入的内容,实际是隐藏的 backgroundImageView:显示实现分割效果的背景图片 label:显示验证码或密码的内容
3、控件之间的关系
如图:
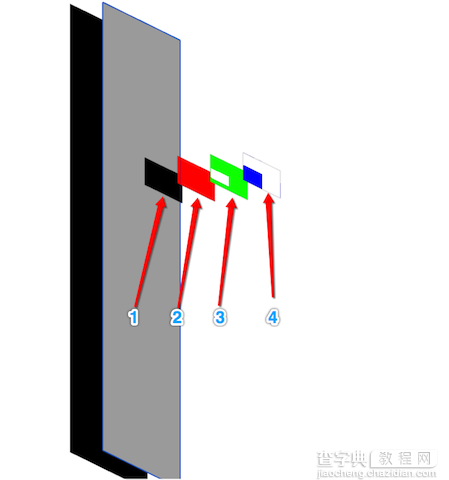
编号“1”:父视图(vertificationCodeInputView) 编号“2”:子视图(textField) 编号“3”:子视图(backgroundImageView) 编号“4”:子视图(label) 图片来源于Xcode的调试工具
层级关系
label用于显示验证码的内容,必须在最上边
backgroundImageView显示背景图片,所以必须在label的后边,且可以显示出来
二、实现效果
密码输入效果
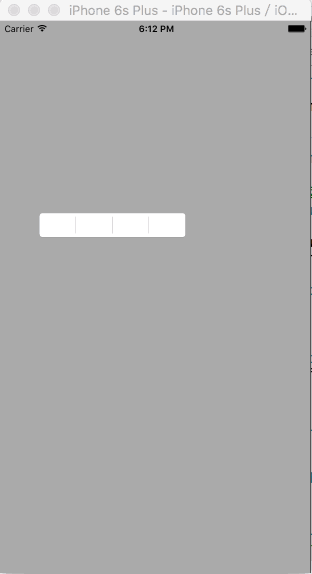
验证码输入效果
三、实现步骤
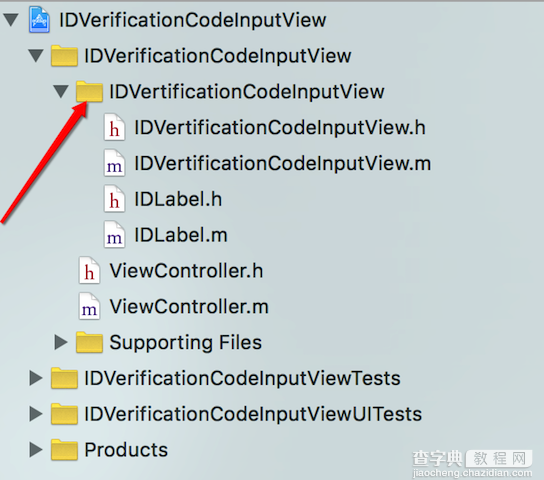
代码结构
如图:
1、IDVertificationCodeInputView(编号“1”视图)的的属性
公有属性(vertificationCodeInputView的相关属性)
@interface IDVertificationCodeInputView : UIView /**背景图片*/ @property (nonatomic, copy) NSString *backgroudImageName; /**验证码/密码的位数*/ @property (nonatomic, assign) NSInteger numberOfVertificationCode; /**控制验证码/密码是否密文显示*/ @property (nonatomic, assign) bool secureTextEntry; /**验证码/密码内容,可以通过该属性拿到验证码/密码输入框中验证码/密码的内容*/ @property (nonatomic, copy) NSString *vertificationCode; @end
私有属性(vertificationCodeInputView的子控件)
@interface IDVertificationCodeInputView () <UITextFieldDelegate> /**用于获取键盘输入的内容,实际不显示*/ @property (nonatomic, strong) UITextField *textField; /**验证码/密码输入框的背景图片*/ @property (nonatomic, strong) UIImageView *backgroundImageView; /**实际用于显示验证码/密码的label*/ @property (nonatomic, strong) IDLabel *label; @end
2、IDLabel(编号“4”视图)的属性
公有属性
@interface IDLabel : UILabel /**验证码/密码的位数*/ @property (nonatomic, assign) NSInteger numberOfVertificationCode; /**控制验证码/密码是否密文显示*/ @property (nonatomic, assign) bool secureTextEntry; @end
3、业务逻辑
vertificationCodeInputView的初始化
设置验证码/密码的默认位数(4位),添加textField和label
- (instancetype)initWithFrame:(CGRect)frame { if (self = [super initWithFrame:frame]) { // 设置透明背景色,保证vertificationCodeInputView显示的frame为backgroundImageView的frame self.backgroundColor = [UIColor clearColor]; // 设置验证码/密码的位数默认为四位 self.numberOfVertificationCode = 4; /* 调出键盘的textField */ self.textField = [[UITextField alloc] initWithFrame:self.bounds]; // 隐藏textField,通过点击IDVertificationCodeInputView使其成为第一响应者,来弹出键盘 self.textField.hidden = YES; self.textField.keyboardType = UIKeyboardTypeNumberPad; self.textField.delegate = self; // 将textField放到最后边 [self insertSubview:self.textField atIndex:0]; /* 添加用于显示验证码/密码的label */ self.label = [[IDLabel alloc] initWithFrame:self.bounds]; self.label.numberOfVertificationCode = self.numberOfVertificationCode; self.label.secureTextEntry = self.secureTextEntry; self.label.font = self.textField.font; [self addSubview:self.label]; } return self; } 若设置了背景图片,需要将backgroundImageView添加进vertificationCodeInputView
- (void)setBackgroudImageName:(NSString *)backgroudImageName { _backgroudImageName = backgroudImageName; // 若用户设置了背景图片,则添加背景图片 self.backgroundImageView = [[UIImageView alloc] initWithFrame:self.bounds]; self.backgroundImageView.image = [UIImage imageNamed:self.backgroudImageName]; // 将背景图片插入到label的后边,避免遮挡验证码/密码的显示 [self insertSubview:self.backgroundImageView belowSubview:self.label]; } 若设置了验证码/密码的位数,和是否密文显示,则需要保持label中相应属性与vertificationCodeInputView中一致
- (void)setNumberOfVertificationCode:(NSInteger)numberOfVertificationCode { _numberOfVertificationCode = numberOfVertificationCode; // 保持label的验证码/密码位数与IDVertificationCodeInputView一致,此时label一定已经被创建 self.label.numberOfVertificationCode = _numberOfVertificationCode; } - (void)setSecureTextEntry:(bool)secureTextEntry { _secureTextEntry = secureTextEntry; self.label.secureTextEntry = _secureTextEntry; }
4、弹出键盘,并接收键盘输入的字符
弹出键盘
- (void)touchesBegan:(NSSet<UITouch *> *)touches withEvent:(UIEvent *)event { [self.textField becomeFirstResponder]; }
接收键盘输入的字符
- (BOOL)textField:(UITextField *)textField shouldChangeCharactersInRange:(NSRange)range replacementString:(NSString *)string { // 判断是不是“删除”字符 if (string.length != 0) {// 不是“删除”字符 // 判断验证码/密码的位数是否达到预定的位数 if (textField.text.length < self.numberOfVertificationCode) { self.label.text = [textField.text stringByAppendingString:string]; self.vertificationCode = self.label.text; return YES; } else { return NO; } } else { // 是“删除”字符 self.label.text = [textField.text substringToIndex:textField.text.length - 1]; self.vertificationCode = self.label.text; return YES; } }
5、绘制验证码/密码(IDLabel)
手动调用drawRect方法
//重写setText方法,当text改变时手动调用drawRect方法,将text的内容按指定的格式绘制到label上 - (void)setText:(NSString *)text { [super setText:text]; // 手动调用drawRect方法 [self setNeedsDisplay]; }
绘制验证码/密码
// 按照指定的格式绘制验证码/密码 - (void)drawRect:(CGRect)rect { //计算每位验证码/密码的所在区域的宽和高 float width = rect.size.width / (float)self.numberOfVertificationCode;; float height = rect.size.height; // 将每位验证码/密码绘制到指定区域 for (int i = 0; i < self.text.length; i++) { // 计算每位验证码/密码的绘制区域 CGRect tempRect = CGRectMake(i * width, 0, width, height); if (self.secureTextEntry) { // 密码,显示圆点 UIImage *dotImage = [UIImage imageNamed:@"dot"]; // 计算圆点的绘制区域 CGPoint securityDotDrawStartPoint = CGPointMake(width * i + (width - dotImage.size.width) / 2.0, (tempRect.size.height - dotImage.size.height) / 2.0); // 绘制圆点 [dotImage drawAtPoint:securityDotDrawStartPoint]; } else { // 验证码,显示数字 // 遍历验证码/密码的每个字符 NSString *charecterString = [NSString stringWithFormat:@"%c", [self.text characterAtIndex:i]]; // 设置验证码/密码的现实属性 NSMutableDictionary *attributes = [[NSMutableDictionary alloc] init]; attributes[NSFontAttributeName] = self.font; // 计算每位验证码/密码的绘制起点(为了使验证码/密码位于tempRect的中部,不应该从tempRect的重点开始绘制) // 计算每位验证码/密码的在指定样式下的size CGSize characterSize = [charecterString sizeWithAttributes:attributes]; CGPoint vertificationCodeDrawStartPoint = CGPointMake(width * i + (width - characterSize.width) / 2.0, (tempRect.size.height - characterSize.height) / 2.0); // 绘制验证码/密码 [charecterString drawAtPoint:vertificationCodeDrawStartPoint withAttributes:attributes]; } } }
6、使用示例
在控制器中创建,并设置vertificationCodeInputView相关属性
- (void)viewDidLoad { [super viewDidLoad]; self.view.backgroundColor = [UIColor lightGrayColor]; self.vertificationCodeInputView = [[IDVertificationCodeInputView alloc] initWithFrame:CGRectMake(50, 250, 200, 45)]; self.vertificationCodeInputView.backgroudImageName = @"1"; // 验证码(显示数字) self.vertificationCodeInputView.secureTextEntry = NO; //self.vertificationCodeInputView.secureTextEntry = YES; [self.view addSubview:self.vertificationCodeInputView]; }
点击屏幕,打印验证码的内容
- (void)touchesBegan:(NSSet<UITouch *> *)touches withEvent:(UIEvent *)event { NSLog(@"%@", self.vertificationCodeInputView.vertificationCode); }
以上就是本文的全部内容,希望对大家的学习有所帮助。
【IOS实现输入验证码、密码按位分割(二)】相关文章: