碎片化效果图

遮罩视图
在UIView中有一个maskView属性,这个属性是我们今天实现动画的最重要的变量。这个属性在iOS8之后开始使用,用来表示视图的遮罩。什么是遮罩呢?我想了很久都没有找到合适的比喻来介绍这个。简单来说,一个UIView的对象,可以通过设置alpha来改变这个视图的透明度,遮罩的实现效果也是一样的。唯一的差别在于前者是通过修改0~1之间的值来改变透明效果,作为遮罩的视图对象的backgroundColor、alpha、transform等等属性都会影响到被遮盖的视图的透明效果。
例如下面这段代码:
UIView * viewContainer = [[UIView alloc] initWithFrame: CGRectMake(0, 0, 200, 200)]; viewContainer.backgroundColor = [UIColor blueColor]; UIView * contentView = [[UIView alloc] initWithFrame: CGRectMake(20, 20, 160, 160)]; contentView.backgroundColor = [UIColor redColor]; [viewContainer addSubview: contentView]; UIView * maskView = [[UIView alloc] initWithFrame: CGRectMake(100, 100, 35, 80)]; maskView.backgroundColor = [UIColor yellowColor]; contentView.maskView = maskView;
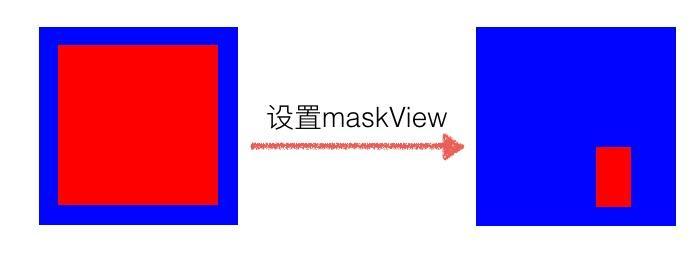
遮罩视图决定了视图的显示内容
上面的代码小小的改动一下,我们分别修改一下maskView和contentView的透明度,看看在遮罩透明度改变之后红色的视图会发生什么变化:
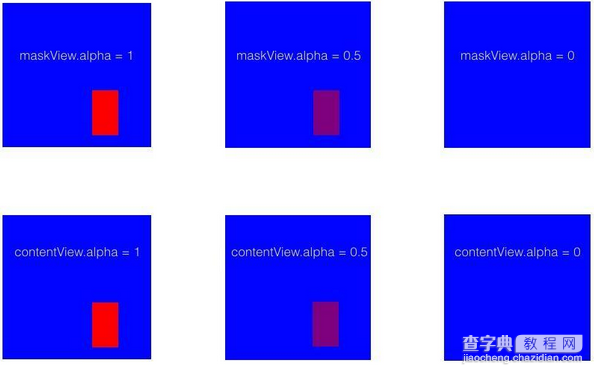
修改透明度.png
通过实验我们可以看到修改视图自身的透明度或者修改maskView的透明度达成的效果是一样的。换句话说,遮盖视图对于视图自身的影响直接决定在透明度和显示尺寸这两个可视的属性。
那么,遮盖视图除了alpha属性外,还有什么属性影响了视图本身的显示效果呢?
颜色
上面的透明度效果得出了一个结论。视图本身的显示效果取决于maskView的透明程度。在颜色不含透明空间的时候,视图是不存在透明效果的。但是假设我们设置遮罩视图的颜色透明度时:
maskView.backgroundColor = [UIColor colorWithWhite: 1 alpha: 0.5]; //任意颜色
显示的效果跟直接设置alpha = 0.5的效果是一样的。在绘制像素到屏幕上中可以获知颜色渲染和alpha属性存在的关联
maskView的子视图
maskView.backgroundColor = [UIColor clearColor]; UIView * sub1 = [[UIView alloc] initWithFrame: CGRectMake(0, 0, 20, 34)]; sub1.backgroundColor = [UIColor blackColor]; UIView * sub2 = [[UIView alloc] initWithFrame: CGRectMake(15, 18, 33, 40)]; sub2.backgroundColor = [UIColor blackColor]; [maskView addSubview: sub1]; [maskView addSubview: sub2];
要了解maskView的子视图对遮罩效果的影响,我们需要排除遮罩视图自身的干扰,因此maskView的背景颜色要设置成透明色
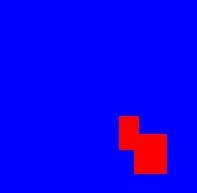
子视图对于遮罩的影响
可以看到,在遮罩自身透明的情况下,子视图也可以实现部分遮罩视图的效果。因此如果我们改变这些子视图的透明度的时候,遮罩效果也同样会发生改变
动画实现
回到上面展示的动画效果,我们可以看到图片被分割成多个长方形的小块逐渐消失。其中,垂直方向分为上下两份,横向大概有15份左右。因此我们需要现在maskView上面添加2*15个子视图,均匀分布。为了保证在动画的时候我们能依次实现子视图的隐藏,我们需要给子视图加上标识:
UIView * maskView = [[UIView alloc] initWithFrame: contentView.bounds]; const NSInteger horizontalCount = 15; const NSInteger verticalCount = 2; const CGFloat fadeWidth = CGRectGetWidth(maskView.frame) / horizontalCount; const CGFloat fadeHeight = CGRectGetHeight(maskView.frame) / verticalCount; for (NSInteger line = 0; line < horizontalCount; line ++) { for (NSInteger row = 0; row < verticalCount; row++) { CGRect frame = CGRectMake(line*fadeWidth, row*fadeHeight, fadeWidth, fadeHeight); UIView * fadeView = [[UIView alloc] initWithFrame: frame]; fadeView.tag = [self viewTag: line*verticalCount+row]; fadeView.backgroundColor = [UIColor whiteColor]; [maskView addSubview: fadeView]; } } contentView.maskView = maskView;
那么在动画开始的时候,我们需要依次遍历maskView上面的所有子视图,并且让他们依次执行动画:
for (NSInteger line = 0; line < horizontalCount; line ++) { for (NSInteger row = 0; row < verticalCount; row++) { NSInteger idx = line*verticalCount+row; UIView * fadeView = [contentView.maskView viewWithTag: [self viewWithTag: idx]; [UIView animateWithDuration: fadeDuration delay: interval*idx options: UIViewAnimationOptionCurveLinear animations: ^{ fadeView.alpha = 0; } completion: nil]; } }
我们在实现动画的同时,都应该考虑如何把动画封装出来方便以后复用。上面的碎片化动画完全可以作为UIView的category进行封装,以此来降低入侵性,实现低耦合的要求:
#define LXDMAXDURATION 1.2 #define LXDMINDURATION .2 #define LXDMULTIPLED .25 @interface UIView (LXDFadeAnimation) /*! * @brief 视图是否隐藏 */ @property (nonatomic, assign, readonly) BOOL isFade; /*! * @brief 是否处在动画中 */ @property (nonatomic, assign, readonly) BOOL isFading; /*! * @brief 垂直方块个数。默认为3 */ @property (nonatomic, assign) NSInteger verticalCount; /*! * @brief 水平方块个数。默认为18 */ @property (nonatomic, assign) NSInteger horizontalCount; /*! * @brief 方块动画之间的间隔0.2~1.2。默认0.7 */ @property (nonatomic, assign) NSTimeInterval intervalDuration; /*! * @brief 每个方块隐藏的动画时间0.05~0.3,最多为动画时长的25%。默认为0.175 */ @property (nonatomic, assign) NSTimeInterval fadeAnimationDuration; - (void)configurateWithVerticalCount: (NSInteger)verticalCount horizontalCount: (NSInteger)horizontalCount interval: (NSTimeInterval)interval duration: (NSTimeInterval)duration; - (void)reverseWithComplete: (void(^)(void))complete; - (void)animateFadeWithComplete: (void(^)(void))complete; - (void)reverseWithoutAnimate; @end
在iOS中,在category中声明的所有属性编译器都不会自动绑定getter和setter方法,这意味着我们需要重写这两种方法,而且还不能使用下划线+变量名的方式直接访问变量。因此我们需要导入objc/runtime.h文件使用动态时提供的objc_associateObject机制来为视图动态增加属性:
- (BOOL)isFade { return [objc_getAssociatedObject(self, kIsFadeKey) boolValue]; } // other getAssociatedObject method - (void)setIsFade: (BOOL)isFade { objc_setAssociatedObject(self, kIsFadeKey, @(isFade), OBJC_ASSOCIATION_RETAIN_NONATOMIC); } // other setAssociatedObject method
有了碎片化隐藏视图的动画,同样需要一个还原的动画效果:
NSInteger fadeCount = self.verticalCount * self.horizontalCount; for (NSInteger idx = fadeCount - 1; idx >= 0; idx--) { UIView * subview = [self.maskView viewWithTag: [self subViewTag: idx]]; [UIView animateWithDuration: self.fadeAnimationDuration delay: self.intervalDuration * (fadeCount - 1 - idx) options: UIViewAnimationOptionCurveLinear animations: ^{ subview.alpha = 1; } completion: nil]; }
现在我们还要考虑一个问题:假设用户点击某张图片的时候就根据视图是否隐藏状态来开始隐藏/显示的动画,当用户多次点击的时候,我们应该判断是否已经处在动画状态,如果是,那么不继续执行动画代码。另外,在动画开始之前,我们需要把标识动画状态的isFading设为YES,但是由于每个方块隐藏都存在一个动画,动画的结束时间应该怎么判断呢?已知fadeView的个数是count,那么当最后一个方块隐藏即是第count个动画完成的时候,整个碎片化动画就结束了。所以我们需要借助一个临时变量来记录:
__block NSInteger timeCount = 0; //...... [UIView animateWithDuration: self.fadeAnimationDuration delay: self.intervalDuration * (fadeCount - 1 - idx) options: UIViewAnimationOptionCurveLinear animations: ^{ subview.alpha = 1; } completion: ^(BOOL finished) { if (++timeCount == fadeCount) { self.isFade = NO; self.isFading = NO; if (complete) { complete(); } } }]; //......
得到动画结束的时间后,我们就可以增加一个block提供给调用者在动画结束时进行其他的处理。
轮播碎片动画
在知道了碎片动画的实现之后,我要做一个酷炫的广告轮播页。同样采用category的方式来实现。现在放上效果图:

广告轮播页
那么实现一个广告页轮播需要哪些步骤呢?
1、在当前动画的图片下面插入一个UIImageView来展示下一张图片。如果可以,尽量复用这个imageView
2、添加UIPageControl来标识图片的下标
因此我提供了一个接口传入图片数组执行动画:
// 获取动态绑定临时展示的UIImageView - (UIImageView *)associateTempBannerWithImage: (UIImage *)image { UIImageView * tempBanner = objc_getAssociatedObject(self, kTempImageKey); if (!tempBanner) { tempBanner = [[UIImageView alloc] initWithFrame: self.frame]; objc_setAssociatedObject(self, kTempImageKey, tempBanner, OBJC_ASSOCIATION_RETAIN_NONATOMIC); [self.superview insertSubview: tempBanner belowSubview: self]; } tempBanner.image = image; return tempBanner; }
此外,pageControl一开始我加在执行动画的imageView上面,但是在动画执行到一半的时候,pageControl也会随着局部隐藏动画隐藏起来。因此根据imageView当前的坐标重新计算出合适的尺寸范围:
- (void)associatePageControlWithCurrentIdx: (NSInteger)idx { UIPageControl * pageControl = objc_getAssociatedObject(self, kPageControlKey); if (!pageControl) { pageControl = [[UIPageControl alloc] initWithFrame: CGRectMake(self.frame.origin.x, CGRectGetHeight(self.frame) - 37 + self.frame.origin.y, CGRectGetWidth(self.frame), 37)]; [self.superview addSubview: pageControl]; pageControl.numberOfPages = self.bannerImages.count; objc_setAssociatedObject(self, kPageControlKey, pageControl, OBJC_ASSOCIATION_RETAIN_NONATOMIC); } pageControl.currentPage = idx; }
由于每次图片碎片化动画执行完成之后,都需要再次执行相同的碎片动画代码。而动画结束是通过block执行,即我们需要在block中嵌套使用同一个block,因此首先我们需要把这段执行代码声明成一个block变量。另外,需要一个声明一个idx在每次碎片动画完成的时候更新图片,用__block修饰来让我们在回调中修改这个值:
- (void)fadeBanner NSParameterAssert(self.superview); UIImageView * tempBanner = [self associateTempBannerWithImage: [UIImage imageNamed: self.bannerImages[1]]]; self.stop = NO; __block NSInteger idx = 0; __weak typeof(self) weakSelf = self; [self associatePageControlWithCurrentIdx: idx]; void (^complete)() = ^{ NSInteger updateIndex = [weakSelf updateImageWithCurrentIndex: ++idx tempBanner: tempBanner]; idx = updateIndex; [weakSelf associatePageControlWithCurrentIdx: idx]; }; // 保存block并执行动画 objc_setAssociatedObject(self, kCompleteBlockKey, complete, OBJC_ASSOCIATION_COPY_NONATOMIC); [self animateFadeWithComplete: ^{ if (!self.stop) { complete(); } }]; } // 更新展示的图片,并且返回下一次要展示的图片下标 - (NSInteger)updateImageWithCurrentIndex: (NSInteger)idx tempBanner: (UIImageView *)tempBanner { if (idx >= self.bannerImages.count) { idx = 0; } self.image = [UIImage imageNamed: self.bannerImages[idx]]; [self reverseWithoutAnimate]; NSInteger nextIdx = idx + 1; if (nextIdx >= self.bannerImages.count) { nextIdx = 0; } tempBanner.image = [UIImage imageNamed: self.bannerImages[nextIdx]]; [self animateFadeWithComplete: ^{ if (!self.stop) { void (^complete)() = objc_getAssociatedObject(self, kCompleteBlockKey); complete(); } }]; return idx; }
代码中需要注意的是,我在上面使用objc_Associate的机制保存了这个完成回调的block,这个是必要的。假设你不喜欢把更新图片的代码封装出来,直接把这一步骤放到上面的complete声明中,依旧还是要动态保存起来,否则这个block执行到第三次图片碎片的时候就会被释放从而导致崩溃
别忘了在每次图片切换完成之后,将所有的子视图遮罩还原,并且更新图片显示
- (void)reverseWithoutAnimate { if (self.isFading) { NSLog(@"It's animating!"); return; } for (UIView * subview in self.maskView.subviews) { subview.alpha = 1; } }
总结
以上就是关于IOS实现碎片化动画的全部内容,希望本文的内容对大家开发IOS动画的时候能有所帮助。
【IOS实现碎片化动画详解】相关文章: