每一个IOS程序都有一个UIWindow,在我们通过模板简历工程的时候,xcode会自动帮我们生成一个window,然后让它变成keyWindow并显示出来。这一切都来的那么自然,以至于我们大部分时候都忽略了自己也是可以创建UIWindow对象。
通常在我们需要自定义UIAlertView的时候(IOS 5.0以前AlertView的背景样式等都不能换)我们可以使用UIWindow来实现(设置windowLevel为Alert级别),网上有很多例子,这里就不详细说了。
一、UIWindowLevel
我们都知道UIWindow有三个层级,分别是Normal,StatusBar,Alert。打印输出他们三个这三个层级的值我们发现从左到右依次是0,1000,2000,也就是说Normal级别是最低的,StatusBar处于中等水平,Alert级别最高。而通常我们的程序的界面都是处于Normal这个级别上的,系统顶部的状态栏应该是处于StatusBar级别,UIActionSheet和UIAlertView这些通常都是用来中断正常流程,提醒用户等操作,因此位于Alert级别。
上一篇文章中我也提到了一个猜想,既然三个级别的值之间相差1000,而且我们细心的话查看UIWindow的头文件就会发现有一个实例变量_windowSublevel,那我们就可以定义很多中间级别的Window。例如可以自定义比系统UIAlertView级别低一点儿的window。于是写了一个小demo,通过打印发现系统的UIAlertView的级别是1996,而与此同时UIActionSheet的级别是2001,这样也验证了subLevel的确存在。
复制代码 代码如下:
UIAlertView *alertView = [[UIAlertView alloc] initWithTitle:@"Alert View"
message:@"Hello Wolrd, i'm AlertView!!!"
delegate:nil
cancelButtonTitle:@"OK"
otherButtonTitles:@"Cancel", nil];
[alertView show];
[alertView release];
UIActionSheet *actionSheet = [[UIActionSheet alloc] initWithTitle:@"ActionSheet"
delegate:nil
cancelButtonTitle:@"Cancel"
destructiveButtonTitle:@"Don't do that!"
otherButtonTitles:@"Hello Wolrd", nil];
[actionSheet showInView:self.view];
[actionSheet release];
下面是程序运行截图:
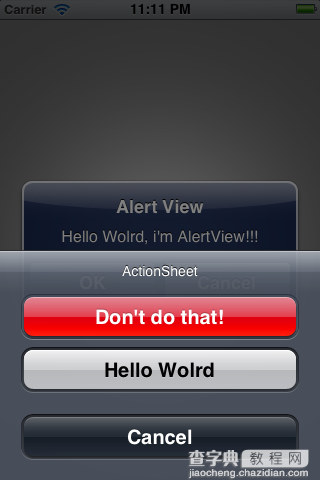
根据window显示级别优先的原则,级别高的会显示在上面,级别低的在下面,我们程序正常显示的view位于最底层,至于具体怎样获取UIAlertView和UIActionSheet的level,我会在下面第二部分keyWindow中介绍并给出相应的代码。
UIWindow在显示的时候会根据UIWindowLevel进行排序的,即Level高的将排在所有Level比他低的层级的前面。下面我们来看UIWindowLevel的定义:
复制代码 代码如下:
const UIWindowLevel UIWindowLevelNormal;
const UIWindowLevel UIWindowLevelAlert;
const UIWindowLevel UIWindowLevelStatusBar;
typedef CGFloat UIWindowLevel;
IOS系统中定义了三个window层级,其中每一个层级又可以分好多子层级(从UIWindow的头文件中可以看到成员变量CGFloat _windowSublevel;),不过系统并没有把则个属性开出来。UIWindow的默认级别是UIWindowLevelNormal,我们打印输出这三个level的值分别如下:
2012-03-27 22:46:08.752 UIViewSample[395:f803] Normal window level: 0.000000 2012-03-27 22:46:08.754 UIViewSample[395:f803] Alert window level: 2000.000000 2012-03-27 22:46:08.755 UIViewSample[395:f803] Status window level: 1000.000000
这样印证了他们级别的高低顺序从小到大为Normal < StatusBar < Alert,下面请看小的测试代码:
复制代码 代码如下:
- (BOOL)application:(UIApplication *)application didFinishLaunchingWithOptions:(NSDictionary *)launchOptions
{
self.window = [[[UIWindow alloc] initWithFrame:[[UIScreen mainScreen] bounds]] autorelease];
self.window.backgroundColor = [UIColor yellowColor];
[self.window makeKeyAndVisible];
UIWindow *normalWindow = [[UIWindow alloc] initWithFrame:[[UIScreen mainScreen] bounds]];
normalWindow.backgroundColor = [UIColor blueColor];
normalWindow.windowLevel = UIWindowLevelNormal;
[normalWindow makeKeyAndVisible];
CGRect windowRect = CGRectMake(50,
50,
[[UIScreen mainScreen] bounds].size.width - 100,
[[UIScreen mainScreen] bounds].size.height - 100);
UIWindow *alertLevelWindow = [[UIWindow alloc] initWithFrame:windowRect];
alertLevelWindow.windowLevel = UIWindowLevelAlert;
alertLevelWindow.backgroundColor = [UIColor redColor];
[alertLevelWindow makeKeyAndVisible];
UIWindow *statusLevelWindow = [[UIWindow alloc] initWithFrame:CGRectMake(0, 50, 320, 20)];
statusLevelWindow.windowLevel = UIWindowLevelStatusBar;
statusLevelWindow.backgroundColor = [UIColor blackColor];
[statusLevelWindow makeKeyAndVisible];
NSLog(@"Normal window level: %f", UIWindowLevelNormal);
NSLog(@"Alert window level: %f", UIWindowLevelAlert);
NSLog(@"Status window level: %f", UIWindowLevelStatusBar);
return YES;
}
运行结果如下图:
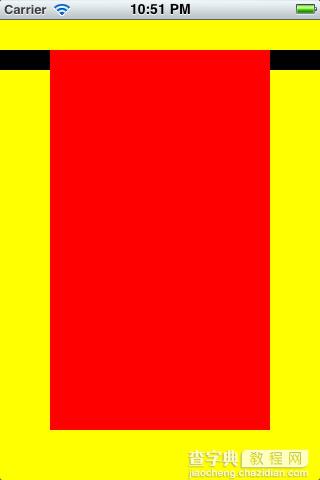
我们可以注意到两点:
1)我们生成的normalWindow虽然是在第一个默认的window之后调用makeKeyAndVisible,但是仍然没有显示出来。这说明当Level层级相同的时候,只有第一个设置为KeyWindow的显示出来,后面同级的再设置KeyWindow也不会显示。
2)statusLevelWindow在alertLevelWindow之后调用makeKeyAndVisible,仍然只是显示在alertLevelWindow的下方。这说明UIWindow在显示的时候是不管KeyWindow是谁,都是Level优先的,即Level最高的始终显示在最前面。
二、KeyWindow
什么是keyWindow,官方文档中是这样解释的"The key window is the one that is designated to receive keyboard and other non-touch related events. Only one window at a time may be the key window." 翻译过来就是说,keyWindow是指定的用来接收键盘以及非触摸类的消息,而且程序中每一个时刻只能有一个window是keyWindow。
下面我们写个简单的例子看看非keyWindow能不能接受键盘消息和触摸消息,程序中我们在view中添加一个UITextField,然后新建一个alert级别的window,然后通过makeKeyAndVisible让它变成keyWindow并显示出来。代码如下:
复制代码 代码如下:
- (BOOL)application:(UIApplication *)application didFinishLaunchingWithOptions:(NSDictionary *)launchOptions
{
self.window = [[[UIWindow alloc] initWithFrame:[[UIScreen mainScreen] bounds]] autorelease];
// Override point for customization after application launch.
self.viewController = [[[SvUIWindowViewController alloc] initWithNibName:@"SvUIWindowViewController" bundle:nil] autorelease];
self.window.rootViewController = self.viewController;
[self.window makeKeyAndVisible];
UIWindow *window1 = [[UIWindow alloc] initWithFrame:CGRectMake(0, 80, 320, 320)];
window1.backgroundColor = [UIColor redColor];
window1.windowLevel = UIWindowLevelAlert;
[window1 makeKeyAndVisible];
return YES;
}
复制代码 代码如下:
- (void)viewDidLoad
{
[super viewDidLoad];
// Do any additional setup after loading the view, typically from a nib.
[self registerObserver];
// add a textfield
UITextField *filed = [[UITextField alloc] initWithFrame:CGRectMake(0, 0, 320, 60)];
filed.placeholder = @"Input something here";
filed.clearsOnBeginEditing = YES;
filed.borderStyle = UITextBorderStyleRoundedRect;
[self.view addSubview:filed];
[filed release];
}
运行截图如下:
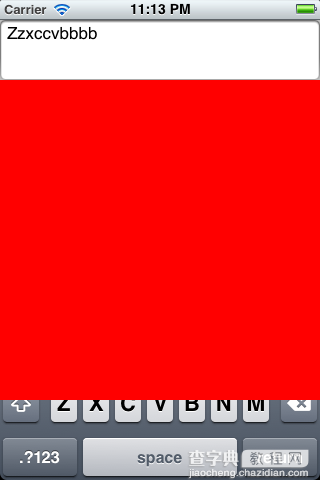
从图中可以看出,虽然我们自己新建了一个然后设置为keyWindow并显示,但是点击程序中默认window上添加的textField还是可以唤出键盘,而且还可以正常接受键盘输入,只是键盘被挡住了,说明非keyWindow也是可以接受键盘消息,这一点和文档上说的不太一样。
观察UIWindow的文档,我们可以发现里面有四个关于window变化的通知:
UIWindowDidBecomeVisibleNotification UIWindowDidBecomeHiddenNotification UIWindowDidBecomeKeyNotification UIWindowDidResignKeyNotification
这四个通知对象中的object都代表当前已显示(隐藏),已变成keyWindow(非keyWindow)的window对象,其中的userInfo则是空的。于是我们可以注册这个四个消息,再打印信息来观察keyWindow的变化以及window的显示,隐藏的变动。
代码如下:
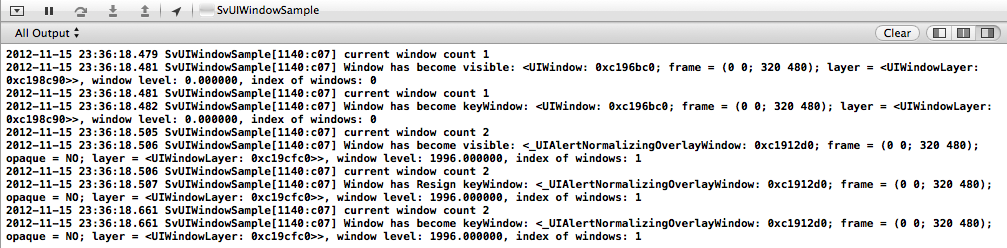
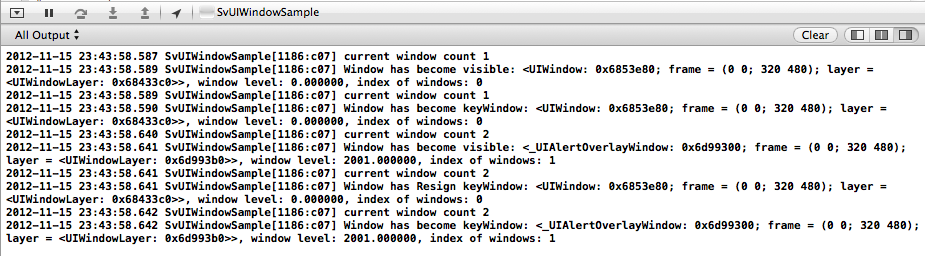
根据打印的信息我们可以看出流程如下:
1、程序默认的window先显示出来
2、默认的window再变成keyWindow
3、AlertView的window显示出来
4、默认的window变成非keyWindow
5、最终AlertView的window变成keyWindow
总体来说就是“要想当老大(keyWindow),先从小弟(非keyWindow)开始混起” 而且根据打印的信息我们同事可以知道默认的window的level是0,即normal级别;AlertView的window的level是1996,比Alert级别稍微低了一点儿。
b、当我们打开viewDidAppear中“[self presentActionSheet];”的时候,控制台输出如下:
keyWindow的变化和window的显示和上面的流程一样,同时我们可以看出ActionSheet的window的level是2001。
c、接着上一步,我们点击弹出ActionSheet的cancel的时候,控制台输出如下:

我们看出流程如下:
1、首先ActionSheet的window变成非keyWindow
2、程序默认的window变成keyWindow
3、ActionSheet的window在隐藏掉
总体就是“想隐居幕后可以,但得先交出权利”。
【详解iOS设计中的UIWindow使用】相关文章:
★ iOS应用开发中StoryBoard搭建UI界面的基本使用讲解
★ iOS开发中UITableview控件的基本使用及性能优化方法