一、验证码的产生
1、如何在模板中添加一个验证码
在X2中验证码的模板部分独立为一个模板文件(template/default/common/seccheck.htm),供各个地方调用。
在模板中可以添加如下代码来调用验证码模板部分:
<>
<>
<>
解释下这三句话:
第一句的意思为,我要开启验证码,即 $seccodecheck
变量
必须为真,就表示当前页面要开启验证码。
第二句的意思为,给要显示出来的验证码设置一个显示的模板格式,$sectpl 这个变量对应的就是模板,设置 $sectpl 可以让验证码的显示与当前页面的格式更好的结合。从示例的模板代码中可以看出,只有 <sec> 不属于 HMTL 标准代码,而且出现了 3 次,这 3 次分别代表:“验证码”文字、验证码输入框、验证码图片,如下图所示:
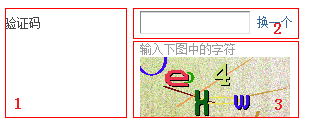
这样就可以把验证码不同的部分合理的安放在您的页面中了。
第三句的意思为,将独立的验证码模板合并到当前页面中,与当前页面的模板一同输出。
在模板中添加上如上的代码后,刷新页面就可以看到验证码部分了。
2、验证码的生成流程
(以X2默认设置的“英文图片验证码”为例)
1)刚出现的验证码会默认执行一段 JS 代码
<script type="text/javascript" reload="1">updateseccode('SQq29j20');</script>
执 行的 JS 主要就是执行了 updateseccode 这个函数,直接点击验证码图片执行的也是这个函数。函数中的 'SQq29j20' 是当前页面验证码的唯一字符串 idhash,他是由是否为Ajax请求、session id、自增数字组成,此处不必深究其含义。
2)updateseccode 函数在 static/js/common.js 中
function updateseccode(idhash, play) {
$F('_updateseccode', arguments);
}
通过上面代码可以看到,updateseccode 又调用了 _updateseccode 私有函数,_updateseccode 函数在 static/js/common_extra.js 文件中
function _updateseccode(idhash, play) {
if(isUndefined(play)) {
if($('seccode_' + idhash)) {
$('seccodeverify_' + idhash).value = '';
if(secST['code_' + idhash]) {
clearTimeout(secST['code_' + idhash]);
}
$('checkseccodeverify_' + idhash).innerHTML = '<img src="'+ IMGDIR + '/none.gif" width="16" height="16" />';
ajaxget('misc.php?mod=seccode&action=update&idhash=' + idhash, 'seccode_' + idhash, null, '', '', function() {
secST['code_' + idhash] = setTimeout(function() {$('seccode_' + idhash).innerHTML = '<span>刷新验证码</span>';}, 180000);
});
}
} else {
eval('window.document.seccodeplayer_' + idhash + '.SetVariable("isPlay", "1")');
}
}
这段 JS 代码有两个含义:
一是通过 ajaxget 请求了 misc.php?mod=seccode&action=update&idhash=xxxx 这样一个地址
二是设定了一个
定时器
,从显示了验证码开始,3分钟后自动将验证码图片换为“刷新验证码”的文字,点击该文字就执行 updateseccode 这个函数,重新更新验证码。由此可以看出,此种方式可以很好的解决验证码过期的问题。
3)找到通过 ajaxget 请求的程序 source/module/misc/misc_seccode.php
通过 url 中的 action=update 可以看出,应该查看 if($_G['gp_action'] == 'update') { …… } 中的一段
if($_G['gp_action'] == 'update') {
$message = '';
if($_G['setting']['seccodestatus']) {
$rand = random(5, 1);
$flashcode = '';
$idhash = isset($_G['gp_idhash']) ? $_G['gp_idhash'] : '';
$ani = $_G['setting']['seccodedata']['animator'] ? '_ani' : '';
if($_G['setting']['seccodedata']['type'] == 2) {
……
} elseif($_G['setting']['seccodedata']['type'] == 3) {
…...
} else {
$message = lang('core', 'seccode_image'.$ani.'_tips').'<img width="'.$_G['setting']['seccodedata']['width'].'" height="'.$_G['setting']['seccodedata']['height'].'" src="misc.php?mod=seccode&update='.$rand.'&idhash='.$idhash.'" />';
}
}
include template('common/header_ajax');
echo lang('message', $message, array('flashcode' => $flashcode, 'idhash' => $idhash));
include template('common/footer_ajax');
}
默 认设置的“英文图片验证码”的 $_G['setting']['seccodedata']['type'] 为 0,所以看 else 的部分。仔细看这里就是按照 ajax 的格式返回了一个验证码的图片,但是图片的 src 为 misc.php?mod=seccode&update=$rand&idhash=$idhash 这样一个动态链接,所以是通过这个链接动态生成的图片,此时又产生了一个新的请求。
4)找到通过图片链接请求的程序 source/module/misc/misc_seccode.php(和上面是同一个文件)
通过 url 可以看出,应该查看 if($_G['gp_action'] == 'update') { …… } else { …… } 中的一段
} else {
$refererhost = parse_url($_SERVER['HTTP_REFERER']);
$refererhost['host'] .= !empty($refererhost['port']) ? (':'.$refererhost['port']) : '';
if($_G['setting']['seccodedata']['type'] < 2 && ($refererhost['host'] != $_SERVER['HTTP_HOST'] || !$_G['setting']['seccodestatus']) || $_G['setting']['seccodedata']['type'] == 2 && !extension_loaded('ming') && $_POST['fromFlash'] != 1 || $_G['setting']['seccodedata']['type'] == 3 && $_GET['fromFlash'] != 1) {
exit('Access Denied');
}
$seccode = make_seccode($_G['gp_idhash']);
if(!$_G['setting']['nocacheheaders']) {
@header("Expires: -1");
@header("Cache-Control: no-store, private, post-check=0, pre-check=0, max-age=0", FALSE);
@header("Pragma: no-cache");
}
require_once libfile('class/seccode');
$code = new seccode();
$code->code = $seccode;
$code->type = $_G['setting']['seccodedata']['type'];
$code->width = $_G['setting']['seccodedata']['width'];
$code->height = $_G['setting']['seccodedata']['height'];
$code->background = $_G['setting']['seccodedata']['background'];
$code->adulterate = $_G['setting']['seccodedata']['adulterate'];
$code->ttf = $_G['setting']['seccodedata']['ttf'];
$code->angle = $_G['setting']['seccodedata']['angle'];
$code->warping = $_G['setting']['seccodedata']['warping'];
$code->scatter = $_G['setting']['seccodedata']['scatter'];
$code->color = $_G['setting']['seccodedata']['color'];
$code->size = $_G['setting']['seccodedata']['size'];
$code->shadow = $_G['setting']['seccodedata']['shadow'];
$code->animator = $_G['setting']['seccodedata']['animator'];
$code->fontpath = DISCUZ_ROOT.'./static/image/seccode/font/';
$code->datapath = DISCUZ_ROOT.'./static/image/seccode/';
$code->includepath = DISCUZ_ROOT.'./source/class/';
$code->display();
}
这部分开始是先做了一些安全性的验证,最后是根据给定的参数和由 make_seccode 生成的验证码字符串,生成验证码的图片,所以中间是重点。
make_seccode($_G['gp_idhash']) 这个函数传入了当前页面验证码的唯一字符串 idhash,生成了用于验证码的字符串。
5)make_seccode 函数在 source/function/function_seccode.php 文件
function make_seccode($idhash){
global $_G;
$seccode = random(6, 1);
$seccodeunits = '';
if($_G['setting']['seccodedata']['type'] == 1) {
$lang = lang('seccode');
$len = strtoupper(CHARSET) == 'GBK' ? 2 : 3;
$code = array(substr($seccode, 0, 3), substr($seccode, 3, 3));
$seccode = '';
for($i = 0; $i < 2; $i++) {
$seccode .= substr($lang['chn'], $code[$i] * $len, $len);
}
} elseif($_G['setting']['seccodedata']['type'] == 3) {
$s = sprintf('%04s', base_convert($seccode, 10, 20));
$seccodeunits = 'CEFHKLMNOPQRSTUVWXYZ';
} else {
$s = sprintf('%04s', base_convert($seccode, 10, 24));
$seccodeunits = 'BCEFGHJKMPQRTVWXY2346789';
}
if($seccodeunits) {
$seccode = '';
for($i = 0; $i < 4; $i++) {
$unit = ord($s{$i});
$seccode .= ($unit >= 0x30 && $unit <= 0x39) ? $seccodeunits[$unit - 0x30] : $seccodeunits[$unit - 0x57];
}
}
dsetcookie('seccode'.$idhash, authcode(strtoupper($seccode)."t".(TIMESTAMP - 180)."t".$idhash."t".FORMHASH, 'ENCODE', $_G['config']['security']['authkey']), 0, 1, true);
return $seccode;
}
从函数中可以看到,验证码 $seccode 首先来自一个6位的随机数字 random(6, 1) (此函数如何工作,最后讲解)。
默认设置的“英文图片验证码”的 $_G['setting']['seccodedata']['type'] 为 0,所以看 else 的部分。将 $seccode 的数字通过 base_convert 函数由 10
进制
转为 24 进制,然后设定可以在验证码出现的字符串
'BCEFGHJKMPQRTVWXY2346789'。
最后将 24 进制的验证码在 $seccodeunits 中取得真正的 4 位验证码字符串 $seccode ,最后将 $seccode 通过 authcode 加密函数进行加密,写入 cookie 中,并返回,cookie 的名字是 seccode 连上 $idhash 的值(例如:seccodeSQq29j20)。加密时使用的是在 config/config_global.php 中设置的 $_G['config']['security']['authkey'] 的值。
至此验证码及图片生成完毕,生成的验证码到目前为止只以加密的方式存在于 cookie 中。
二、验证码的验证
1、JS 方式的验证
1)这种验证就是在文本框中输入验证码后,及时的验证。
这个验证是由文本框的 onblur 失去焦点事件触发 checksec('code', 'SQq29j20') JS 函数进行验证的。
2)checksec 函数在 static/js/common.js 中
function checksec(type, idhash, showmsg, recall) {
$F('_checksec', arguments);
}
通过上面代码可以看到,checksec 又调用了 _checksec 私有函数,_checksec 函数在 static/js/common_extra.js 文件中
function _checksec(type, idhash, showmsg, recall) {
var showmsg = !showmsg ? 0 : showmsg;
var secverify = $('sec' + type + 'verify_' + idhash).value;
if(!secverify) {
return;
}
var x = new Ajax('XML', 'checksec' + type + 'verify_' + idhash);
x.loading = '';
$('checksec' + type + 'verify_' + idhash).innerHTML = '<img src="'+ IMGDIR + '/loading.gif" width="16" height="16" />';
x.get('misc.php?mod=sec' + type + '&action=check&inajax=1&&idhash=' + idhash + '&secverify=' + (BROWSER.ie && document.charset == 'utf-8' ? encodeURIComponent(secverify) : secverify), function(s){
var obj = $('checksec' + type + 'verify_' + idhash);
obj.style.display = '';
if(s.substr(0, 7) == 'succeed') {
obj.innerHTML = '<img src="'+ IMGDIR + '/check_right.gif" width="16" height="16" />';
if(showmsg) {
recall(1);
}
} else {
obj.innerHTML = '<img src="'+ IMGDIR + '/check_error.gif" width="16" height="16" />';
if(showmsg) {
if(type == 'code') {
showError('验证码错误,请重新填写');
} else if(type == 'qaa') {
showError('验证问答错误,请重新填写');
}
recall(0);
}
}
});
}
这 个函数首先验证下,输入框内填写的验证码的值 $('sec' + type + 'verify_' + idhash).value 是否存在(type 就是传入的 code)。然后通过 ajax 请求访问 misc.php?mod=seccode&action=check&inajax=1&&idhash=xxxx&secverify=xxxx 这样一个地址,这个地址会返回验证的结果字符串。如果返回结果的前 7 个字符是 succeed 则验证通过,显示对勾;否则提示“验证码错误,请重新填写”,并显示红叉。
3)找到通过 ajax 请求的程序 source/module/misc/misc_seccode.php
通过 url 中的 action=check 可以看出,应该查看 elseif($_G['gp_action'] == 'check') { …… } 中的一段
} elseif($_G['gp_action'] == 'check') {
include template('common/header_ajax');
echo check_seccode($_G['gp_secverify'], $_G['gp_idhash']) ? 'succeed' : 'invalid';
include template('common/footer_ajax');
} else {
这 里将通过 url 传入的 secverify 和 idhash 两个值传递给 check_seccode 函数,通过代码看到 check_seccode 返回布尔值,故结果为真,则通过验证,返回 succeed 字符串,结果为假,则验证失败,返回 invalid 字符串。
4)check_seccode 函数在 source/function/function_core.php 文件
function check_seccode($value, $idhash) {
global $_G;
if(!$_G['setting']['seccodestatus']) {
return true;
}
if(!isset($_G['cookie']['seccode'.$idhash])) {
return false;
}
list($checkvalue, $checktime, $checkidhash, $checkformhash) = explode("t", authcode($_G['cookie']['seccode'.$idhash], 'DECODE', $_G['config']['security']['authkey']));
return $checkvalue == strtoupper($value) && TIMESTAMP - 180 > $checktime && $checkidhash == $idhash && FORMHASH == $checkformhash;
}
此函数首先根据缓存中的设定验证验证码的开启状态,如果未开启,此处验证直接返回真,既然没有开启验证码自然如何验证均为真。
然后验证 cookie 中是否存在生成验证码时写入 cookie 的值(例如:seccodeSQq29j20),如果 cookie 没有此值,则此次验证失效,需要重新生成验证码,重新验证。
最后从 cookie 取出值,使用 $_G['config']['security']['authkey'] 加密串,通过 authcode 函数对值进行解密,解密后获取到验证码、生成时间、idhash、formhash 四个值。然后需要同时满足以下四个条件才可以通过验证:
- 输入的验证码等于解密出来的验证码
- 验证码的生成时间距当前时间小于 180 秒
- 传入的 idhash 等于解密出来的 idhash
- 当前系统生成的 formhash 等于解密出来的 formhash
至此通过 JS 方式的验证码验证完成。
2、PHP 方式的验证
1)这种方式就是在验证码所在的表单提交后,对输入的验证码进行的验证。
例如在修改用户密码时开启了验证码,则会在其处理的 PHP 程序中发现(source/include/spacecp/spacecp_profile.php)这样一句代码
submitcheck('passwordsubmit', 0, $seccodecheck, $secqaacheck)
submitcheck 函数就是对提交的表单进行验证的。
2)submitcheck 函数在 source/function/function_core.php 文件
function submitcheck($var, $allowget = 0, $seccodecheck = 0, $secqaacheck = 0) {
if(!getgpc($var)) {
return FALSE;
} else {
global $_G;
if($allowget || ($_SERVER['REQUEST_METHOD'] == 'POST' && !empty($_G['gp_formhash']) && $_G['gp_formhash'] == formhash() && empty($_SERVER['HTTP_X_FLASH_VERSION']) && (empty($_SERVER['HTTP_REFERER']) ||
preg_replace("/https?://([^:/]+).*/i", "1", $_SERVER['HTTP_REFERER']) == preg_replace("/([^:]+).*/", "1", $_SERVER['HTTP_HOST'])))) {
if(checkperm('seccode')) {
if($secqaacheck && !check_secqaa($_G['gp_secanswer'], $_G['gp_sechash'])) {
showmessage('submit_secqaa_invalid');
}
if($seccodecheck && !check_seccode($_G['gp_seccodeverify'], $_G['gp_sechash'])) {
showmessage('submit_seccode_invalid');
}
}
return TRUE;
} else {
showmessage('submit_invalid');
}
}
}
submitcheck 函数一般只填写前两个参数即可,第一个参数表示要验证的表单元素的名字,此表单元素不存在则验证失败;第二个参数表示是否允许通过 GET 方式提交的数据通过验证,0 为不允许,1 为允许,一般为 0 即可。
后两个参数用于表示提交的表单中是否需要对验证码和验证问答做验证,第三个参数 $seccodecheck 代表验证码,第四个参数 $secqaacheck 代表验证问答,参数值都是 0 为不验证,1 为验证。
所以如果需要在提交后验证验证码,则至少要填写 3 个参数,即 submitcheck('passwordsubmit', 0, 1) 。
进入函数中会现对提交表单的提交方式、formhash、访问来源 referer 等数据进行安全性验证,通过后则会调用 check_seccode 函数对提交过来的验证码进行验证了,根据 check_seccode 的返回值,来给予不同的提示。 check_seccode 函数如何工作的参看 JS 验证中的 4) 即可。
至此通过 PHP 方式的验证码验证完成。
三、随机数如何产生的
Discuz! X的随机数是通过 random 函数产生的,函数在 source/function/function_core.php 文件
function random($length, $numeric = 0) {
$seed = base_convert(md5(microtime().$_SERVER['DOCUMENT_ROOT']), 16, $numeric ? 10 : 35);
$seed = $numeric ? (str_replace('0', '', $seed).'012340567890') : ($seed.'zZ'.strtoupper($seed));
$hash = '';
$max = strlen($seed) - 1;
for($i = 0; $i < $length; $i++) {
$hash .= $seed{mt_rand(0, $max)};
}
return $hash;
}
此函数有两个参数,$length 表示要获取的随机数的位数,$numeric 表示是否要获取纯数字的随机数,取值 0 或 1。
函数首先使用 microtime 函数获取当前的微秒级时间戳字符串,然后在后面拼接上单前网站的根目录路径,然后进行 MD5 加密,获得 32 位长的字符串。之后对其进行转进制,如果要获取纯数字的随机数,则从 16 进制转为 10 进制,如果要获得数字和英文混杂的随机数,则从 16 进制转为 35 进制。之后再将转进制后获得的字符串,根据是否要获取纯数字随机数的区别,进行拼接。最后从拼接后的字符串中随机抽取随机数的第一位、第二位以此类推,直 至获取满足要求的随机数的位置为止。至此生成了随机数。
【Discuz! X2验证码的产生和验证及随机数产生探讨】相关文章:
★ Discuz-x系列教程 DX的css命名规则、缓存、加载机制
★ Discuz! X2.0 邮件发送返回错误信息的解决方法