HTML5 Canvas中提供了设置阴影的四个属性值分别为:
context.shadowColor = “red” 表示设置阴影颜色为红色
context.shadowOffsetX = 0表示阴影相对TEXT的水平距离,0表示两者水平位置重合
context.shadowOffsetY = 0表示阴影相对TEXT的垂直距离,0表示两者垂直位置重合
context.shadowBlur = 10 阴影模糊效果,值越大模糊越厉害。
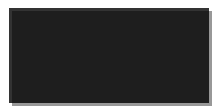
一个最简单的带有阴影的矩形代码如下:
context.shadowColor = "RGBA(127,127,127,1)";
context.shadowOffsetX = 3;
context.shadowOffsetY = 3;
context.shadowBlur = 0;
context.fillStyle = "RGBA(0, 0, 0, 0.8)";
context.fillRect(10, hh+10, 200,canvas.height/4-20);
效果如下:
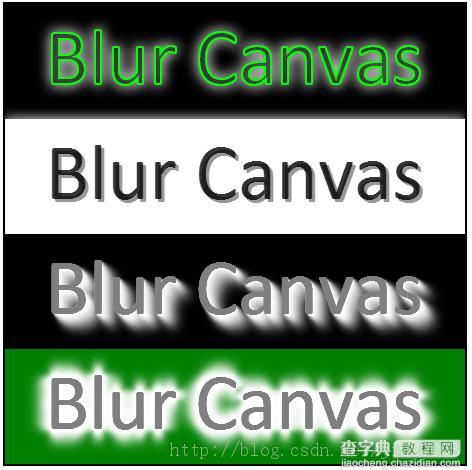
阴影文字:
只要设置shadowOffsetX与shadowOffsetY的值,当值都正数时,阴影相对文字的右下
方偏移。当值都为负数时,阴影相对文字的左上方偏移。
3D拉影效果:
在同一位置不断的重复绘制文字同时改变shadowOffsetX、shadowOffsetY、shadowBlur
的值,从小到大不断偏移不断增加,透明度也不断增加。就得到了拉影效果文字。
边缘模糊效果文字:
在3D拉影效果的基础上在四个方向重复,就得到了边缘羽化的文字效果。
运行效果:
序代码:
<!DOCTYPE html>
<html>
<head>
<meta http-equiv="X-UA-Compatible" content="chrome=IE8">
<meta http-equiv="Content-type" content="text/html;charset=UTF-8">
<title>Canvas Clip Demo</title>
<link href="default.css" rel="stylesheet" />
<script>
var ctx = null; // global variable 2d context
var imageTexture = null;
window.onload = function() {
var canvas = document.getElementById("text_canvas");
console.log(canvas.parentNode.clientWidth);
canvas.width = canvas.parentNode.clientWidth;
canvas.height = canvas.parentNode.clientHeight;
if (!canvas.getContext) {
console.log("Canvas not supported. Please install a HTML5 compatible browser.");
return;
}
var context = canvas.getContext('2d');
// section one - shadow and blur
context.fillStyle="black";
context.fillRect(0, 0, canvas.width, canvas.height/4);
context.font = '60pt Calibri';
context.shadowColor = "white";
context.shadowOffsetX = 0;
context.shadowOffsetY = 0;
context.shadowBlur = 20;
context.fillText("Blur Canvas", 40, 80);
context.strokeStyle = "RGBA(0, 255, 0, 1)";
context.lineWidth = 2;
context.strokeText("Blur Canvas", 40, 80);
// section two - shadow font
var hh = canvas.height/4;
context.fillStyle="white";
context.fillRect(0, hh, canvas.width, canvas.height/4);
context.font = '60pt Calibri';
context.shadowColor = "RGBA(127,127,127,1)";
context.shadowOffsetX = 3;
context.shadowOffsetY = 3;
context.shadowBlur = 0;
context.fillStyle = "RGBA(0, 0, 0, 0.8)";
context.fillText("Blur Canvas", 40, 80+hh);
// section three - down shadow effect
var hh = canvas.height/4 + hh;
context.fillStyle="black";
context.fillRect(0, hh, canvas.width, canvas.height/4);
for(var i = 0; i < 10; i++)
{
context.shadowColor = "RGBA(255, 255, 255," + ((10-i)/10) + ")";
context.shadowOffsetX = i*2;
context.shadowOffsetY = i*2;
context.shadowBlur = i*2;
context.fillStyle = "RGBA(127, 127, 127, 1)";
context.fillText("Blur Canvas", 40, 80+hh);
}
// section four - fade effect
var hh = canvas.height/4 + hh;
context.fillStyle="green";
context.fillRect(0, hh, canvas.width, canvas.height/4);
for(var i = 0; i < 10; i++)
{
context.shadowColor = "RGBA(255, 255, 255," + ((10-i)/10) + ")";
context.shadowOffsetX = 0;
context.shadowOffsetY = -i*2;
context.shadowBlur = i*2;
context.fillStyle = "RGBA(127, 127, 127, 1)";
context.fillText("Blur Canvas", 40, 80+hh);
}
for(var i = 0; i < 10; i++)
{
context.shadowColor = "RGBA(255, 255, 255," + ((10-i)/10) + ")";
context.shadowOffsetX = 0;
context.shadowOffsetY = i*2;
context.shadowBlur = i*2;
context.fillStyle = "RGBA(127, 127, 127, 1)";
context.fillText("Blur Canvas", 40, 80+hh);
}
for(var i = 0; i < 10; i++)
{
context.shadowColor = "RGBA(255, 255, 255," + ((10-i)/10) + ")";
context.shadowOffsetX = i*2;
context.shadowOffsetY = 0;
context.shadowBlur = i*2;
context.fillStyle = "RGBA(127, 127, 127, 1)";
context.fillText("Blur Canvas", 40, 80+hh);
}
for(var i = 0; i < 10; i++)
{
context.shadowColor = "RGBA(255, 255, 255," + ((10-i)/10) + ")";
context.shadowOffsetX = -i*2;
context.shadowOffsetY = 0;
context.shadowBlur = i*2;
context.fillStyle = "RGBA(127, 127, 127, 1)";
context.fillText("Blur Canvas", 40, 80+hh);
}
}
</script>
</head>
<body>
<h1>HTML5 Canvas Clip Demo - By Gloomy Fish</h1>
<pre>Fill And Stroke Clip</pre>
<div id="my_painter">
<canvas id="text_canvas"></canvas>
</div>
</body>
</html>
【HTML5 Canvas阴影使用方法实例演示】相关文章:
★ html5 Canvas绘制线条 closePath()实例代码
★ 使用HTML5 Canvas绘制直线或折线等线条的方法讲解
★ 使用HTML5 Canvas API中的clip()方法裁剪区域图像
★ HTML5 Canvas之测试浏览器是否支持Canvas的方法
★ 用HTML5 Canvas API中的clearRect()方法实现橡皮擦功能