在iOS开发过程中有的时候会需要用到渐变的颜色,这篇文章总结了三种方法来实现,有需要的朋友们下面来一起看看吧。
一、CAGradientLayer实现渐变
CAGradientLayer是CALayer的一个特殊子类,用于生成颜色渐变的图层,使用较为方便
下面介绍下它的相关属性:
colors 渐变的颜色
locations 渐变颜色的分割点
startPoint&endPoint 颜色渐变的方向,范围在(0,0)与(1.0,1.0)之间,如(0,0)(1.0,0)代表水平方向渐变,(0,0)(0,1.0)代表竖直方向渐变
CAGradientLayer *gradientLayer = [CAGradientLayer layer]; gradientLayer.colors = @[(__bridge id)[UIColor redColor].CGColor, (__bridge id)[UIColor yellowColor].CGColor, (__bridge id)[UIColor blueColor].CGColor]; gradientLayer.locations = @[@0.3, @0.5, @1.0]; gradientLayer.startPoint = CGPointMake(0, 0); gradientLayer.endPoint = CGPointMake(1.0, 0); gradientLayer.frame = CGRectMake(0, 100, 300, 100); [self.view.layer addSublayer:gradientLayer];
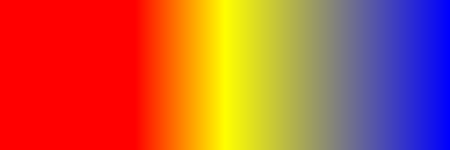
CAGradientLayer实现渐变标间简单直观,但存在一定的局限性,比如无法自定义整个渐变区域的形状,如环形、曲线形的渐变。
二、Core Graphics相关方法实现渐变
iOS Core Graphics中有两个方法用于绘制渐变颜色,CGContextDrawLinearGradient可以用于生成线性渐变,CGContextDrawRadialGradient用于生成圆半径方向颜色渐变。函数可以自定义path,无论是什么形状都可以,原理都是用来做Clip,所以需要在CGContextClip函数前调用CGContextAddPath函数把CGPathRef加入到Context中。
另外一个需要注意的地方是渐变的方向,方向是由两个点控制的,点的单位就是坐标。因此需要正确从CGPathRef中找到正确的点,方法当然有很多种看具体实现,本例中,我就是简单得通过调用CGPathGetBoundingBox函数,返回CGPathRef的矩形区域,然后根据这个矩形取两个点,读者可以根据自行需求修改具体代码。
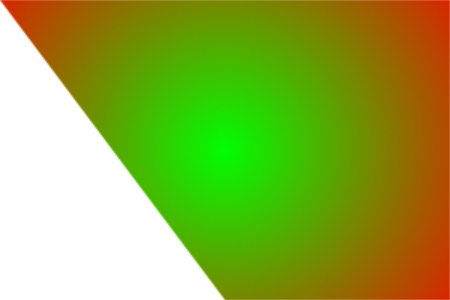
1-> 线性渐变
- (void)drawLinearGradient:(CGContextRef)context path:(CGPathRef)path startColor:(CGColorRef)startColor endColor:(CGColorRef)endColor { CGColorSpaceRef colorSpace = CGColorSpaceCreateDeviceRGB(); CGFloat locations[] = { 0.0, 1.0 }; NSArray *colors = @[(__bridge id) startColor, (__bridge id) endColor]; CGGradientRef gradient = CGGradientCreateWithColors(colorSpace, (__bridge CFArrayRef) colors, locations); CGRect pathRect = CGPathGetBoundingBox(path); //具体方向可根据需求修改 CGPoint startPoint = CGPointMake(CGRectGetMinX(pathRect), CGRectGetMidY(pathRect)); CGPoint endPoint = CGPointMake(CGRectGetMaxX(pathRect), CGRectGetMidY(pathRect)); CGContextSaveGState(context); CGContextAddPath(context, path); CGContextClip(context); CGContextDrawLinearGradient(context, gradient, startPoint, endPoint, 0); CGContextRestoreGState(context); CGGradientRelease(gradient); CGColorSpaceRelease(colorSpace); } - (void)viewDidLoad { [super viewDidLoad]; // Do any additional setup after loading the view. //创建CGContextRef UIGraphicsBeginImageContext(self.view.bounds.size); CGContextRef gc = UIGraphicsGetCurrentContext(); //创建CGMutablePathRef CGMutablePathRef path = CGPathCreateMutable(); //绘制Path CGRect rect = CGRectMake(0, 100, 300, 200); CGPathMoveToPoint(path, NULL, CGRectGetMinX(rect), CGRectGetMinY(rect)); CGPathAddLineToPoint(path, NULL, CGRectGetMidX(rect), CGRectGetMaxY(rect)); CGPathAddLineToPoint(path, NULL, CGRectGetWidth(rect), CGRectGetMaxY(rect)); CGPathCloseSubpath(path); //绘制渐变 [self drawLinearGradient:gc path:path startColor:[UIColor greenColor].CGColor endColor:[UIColor redColor].CGColor]; //注意释放CGMutablePathRef CGPathRelease(path); //从Context中获取图像,并显示在界面上 UIImage *img = UIGraphicsGetImageFromCurrentImageContext(); UIGraphicsEndImageContext(); UIImageView *imgView = [[UIImageView alloc] initWithImage:img]; [self.view addSubview:imgView]; }

2-> 圆半径方向渐变
- (void)drawRadialGradient:(CGContextRef)context path:(CGPathRef)path startColor:(CGColorRef)startColor endColor:(CGColorRef)endColor { CGColorSpaceRef colorSpace = CGColorSpaceCreateDeviceRGB(); CGFloat locations[] = { 0.0, 1.0 }; NSArray *colors = @[(__bridge id) startColor, (__bridge id) endColor]; CGGradientRef gradient = CGGradientCreateWithColors(colorSpace, (__bridge CFArrayRef) colors, locations); CGRect pathRect = CGPathGetBoundingBox(path); CGPoint center = CGPointMake(CGRectGetMidX(pathRect), CGRectGetMidY(pathRect)); CGFloat radius = MAX(pathRect.size.width / 2.0, pathRect.size.height / 2.0) * sqrt(2); CGContextSaveGState(context); CGContextAddPath(context, path); CGContextEOClip(context); CGContextDrawRadialGradient(context, gradient, center, 0, center, radius, 0); CGContextRestoreGState(context); CGGradientRelease(gradient); CGColorSpaceRelease(colorSpace); } - (void)viewDidLoad { [super viewDidLoad]; // Do any additional setup after loading the view. //创建CGContextRef UIGraphicsBeginImageContext(self.view.bounds.size); CGContextRef gc = UIGraphicsGetCurrentContext(); //创建CGMutablePathRef CGMutablePathRef path = CGPathCreateMutable(); //绘制Path CGRect rect = CGRectMake(0, 100, 300, 200); CGPathMoveToPoint(path, NULL, CGRectGetMinX(rect), CGRectGetMinY(rect)); CGPathAddLineToPoint(path, NULL, CGRectGetMidX(rect), CGRectGetMaxY(rect)); CGPathAddLineToPoint(path, NULL, CGRectGetWidth(rect), CGRectGetMaxY(rect)); CGPathAddLineToPoint(path, NULL, CGRectGetWidth(rect), CGRectGetMinY(rect)); CGPathCloseSubpath(path); //绘制渐变 [self drawRadialGradient:gc path:path startColor:[UIColor greenColor].CGColor endColor:[UIColor redColor].CGColor]; //注意释放CGMutablePathRef CGPathRelease(path); //从Context中获取图像,并显示在界面上 UIImage *img = UIGraphicsGetImageFromCurrentImageContext(); UIGraphicsEndImageContext(); UIImageView *imgView = [[UIImageView alloc] initWithImage:img]; [self.view addSubview:imgView]; }
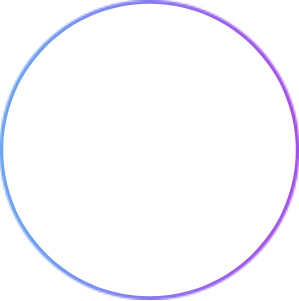
三、以CAShapeLayer作为layer的mask属性
CALayer的mask属性可以作为遮罩让layer显示mask遮住(非透明)的部分;CAShapeLayer为CALayer的子类,通过path属性可以生成不同的形状,将CAShapeLayer对象用作layer的mask属性的话,就可以生成不同形状的图层。
故生成颜色渐变有以下几个步骤:
1、生成一个imageView(也可以为layer),image的属性为颜色渐变的图片
2、生成一个CAShapeLayer对象,根据path属性指定所需的形状
3、将CAShapeLayer对象赋值给imageView的mask属性
- (void)viewDidLoad { [super viewDidLoad]; [self.view addSubview:self.firstCircle]; _firstCircle.frame = CGRectMake(0, 0, 200, 200); _firstCircle.center = CGPointMake(CGRectGetWidth(self.view.bounds) / 2.0, CGRectGetHeight(self.view.bounds) / 2.0); CGFloat firsCircleWidth = 5; self.firstCircleShapeLayer = [self generateShapeLayerWithLineWidth:firsCircleWidth]; _firstCircleShapeLayer.path = [self generateBezierPathWithCenter:CGPointMake(100, 100) radius:100].CGPath; _firstCircle.layer.mask = _firstCircleShapeLayer; } - (CAShapeLayer *)generateShapeLayerWithLineWidth:(CGFloat)lineWidth { CAShapeLayer *waveline = [CAShapeLayer layer]; waveline.lineCap = kCALineCapButt; waveline.lineJoin = kCALineJoinRound; waveline.strokeColor = [UIColor redColor].CGColor; waveline.fillColor = [[UIColor clearColor] CGColor]; waveline.lineWidth = lineWidth; waveline.backgroundColor = [UIColor clearColor].CGColor; return waveline; } - (UIBezierPath *)generateBezierPathWithCenter:(CGPoint)center radius:(CGFloat)radius { UIBezierPath *circlePath = [UIBezierPath bezierPathWithArcCenter:center radius:radius startAngle:0 endAngle:2*M_PI clockwise:NO]; return circlePath; } - (UIImageView *)firstCircle { if (!_firstCircle) { self.firstCircle = [[UIImageView alloc] initWithImage:[UIImage imageNamed:@"circleBackground"]]; _firstCircle.layer.masksToBounds = YES; _firstCircle.alpha = 1.0; } return _firstCircle; }
总结
以上就是这篇文章的全部内容了,希望本文的内容对各位iOS开发者们能有所帮助,如果有疑问大家可以留言交流。
【总结iOS实现渐变颜色的三种方法】相关文章:
★ iOS中修改UITextField占位符字体颜色的方法总结