截取UIImage指定大小区域
最近遇到这样的需求:从服务器获取到一张照片,只需要显示他的左半部分,或者中间部分等等。也就是截取UIImage指定大小区域。
UIImage扩展:
我的解决方案是对UIImage进行扩展。通过CGImageRef和CGImage完成截取,调用的方法是:CGImageCreateWithImageInRect。扩展类叫UIImage+Crop,具体代码如下:
UIImage+Crop.h
#import <UIKit/UIKit.h> typedef NS_ENUM(NSInteger, XYCropImageStyle){ XYCropImageStyleRight =0, // 右半部分 XYCropImageStyleCenter =1, // 中间部分 XYCropImageStyleLeft =2, // 左半部分 XYCropImageStyleRightOneOfThird =3, // 右侧三分之一部分 XYCropImageStyleCenterOneOfThird =4, // 中间三分之一部分 XYCropImageStyleLeftOneOfThird =5, // 左侧三分之一部分 XYCropImageStyleRightQuarter =6, // 右侧四分之一部分 XYCropImageStyleCenterRightQuarter =7, // 中间右侧四分之一部分 XYCropImageStyleCenterLeftQuarter =8, // 中间左侧四分之一部分 XYCropImageStyleLeftQuarter =9, // 左侧四分之一部分 }; @interface UIImage (Crop) - (UIImage *)imageByCroppingWithStyle:(XYCropImageStyle)style; @end UIImage+Crop.m #import "UIImage+Crop.h" @implementation UIImage (Crop) - (UIImage *)imageByCroppingWithStyle:(XYCropImageStyle)style { CGRect rect; switch (style) { case XYCropImageStyleLeft: rect = CGRectMake(0, 0, self.size.width/2, self.size.height); break; case XYCropImageStyleCenter: rect = CGRectMake(self.size.width/4, 0, self.size.width/2, self.size.height); break; case XYCropImageStyleRight: rect = CGRectMake(self.size.width/2, 0, self.size.width/2, self.size.height); break; case XYCropImageStyleLeftOneOfThird: rect = CGRectMake(0, 0, self.size.width/3, self.size.height); break; case XYCropImageStyleCenterOneOfThird: rect = CGRectMake(self.size.width/3, 0, self.size.width/3, self.size.height); break; case XYCropImageStyleRightOneOfThird: rect = CGRectMake(self.size.width/3*2, 0, self.size.width/3, self.size.height); break; case XYCropImageStyleLeftQuarter: rect = CGRectMake(0, 0, self.size.width/4, self.size.height); break; case XYCropImageStyleCenterLeftQuarter: rect = CGRectMake(self.size.width/4, 0, self.size.width/4, self.size.height); break; case XYCropImageStyleCenterRightQuarter: rect = CGRectMake(self.size.width/4*2, 0, self.size.width/4, self.size.height); break; case XYCropImageStyleRightQuarter: rect = CGRectMake(self.size.width/4*3, 0, self.size.width/4, self.size.height); break; default: break; } CGImageRef imageRef = self.CGImage; CGImageRef imagePartRef = CGImageCreateWithImageInRect(imageRef, rect); UIImage *cropImage = [UIImage imageWithCGImage:imagePartRef]; CGImageRelease(imagePartRef); return cropImage; }
实际运用:
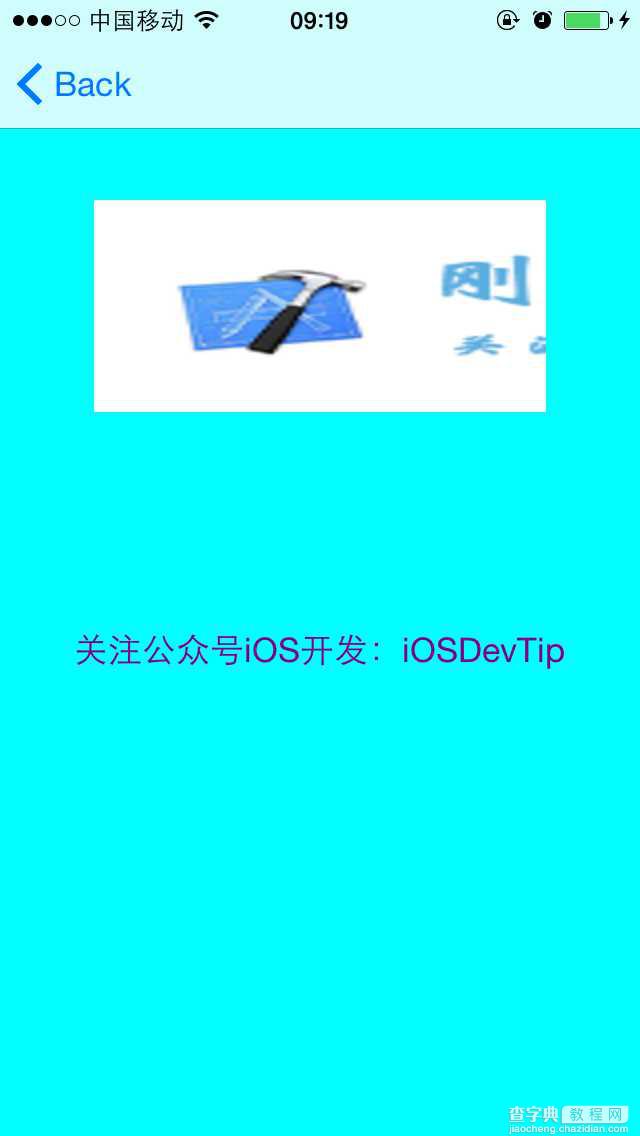
简单测试一下,看看有没有实现我们想要的效果。首先,先加载一个完整的UIImageView。这个应该不难。代码如下:
UIImageView *imgView = [[UIImageView alloc] init]; imgView.frame = CGRectMake((SCREEN.width - 226) / 2, 100, 226, 106); UIImage *image = [UIImage imageNamed:@"ganggang"]; imgView.image = image; [self.view addSubview:imgView];
运行一下:
要对UIImage进行裁剪,首先导入头文件:
#import "UIImage+Crop.h"
在上面UIImage *image = [UIImage imageNamed:@"ganggang"];这段代码之后加上下面这句:
image = [image imageByCroppingWithStyle:XYCropImageStyleLeft];
XYCropImageStyleLeft是截取照片的左半部分。效果如下:
截取成功,还可以截取其他区域的,只需要传入不同的XYCropImageStyle即可实现。
UIImage等比缩放
前面讲了截取UIImage指定大小区域,很方便的截取UIImage。今天要和大家分享的是UIImage的缩放。
两种缩放:
缩放到指定大小,也就是指定的size. 等比缩放。
1.缩放到指定大小
- (UIImage*)imageCompressWithSimple:(UIImage*)image scaledToSize:(CGSize)size { UIGraphicsBeginImageContext(size); [image drawInRect:CGRectMake(0,0,size.width,size.height)]; UIImage* newImage = UIGraphicsGetImageFromCurrentImageContext(); UIGraphicsEndImageContext(); return newImage; }
2.等比缩放
(1)通过缩放系数:
- (UIImage*)imageCompressWithSimple:(UIImage*)image scale:(float)scale { CGSize size = image.size; CGFloat width = size.width; CGFloat height = size.height; CGFloat scaledWidth = width * scale; CGFloat scaledHeight = height * scale; UIGraphicsBeginImageContext(size); // this will crop [image drawInRect:CGRectMake(0,0,scaledWidth,scaledHeight)]; UIImage* newImage= UIGraphicsGetImageFromCurrentImageContext(); UIGraphicsEndImageContext(); return newImage; }
scale是缩放系数 。
(2)通过计算得到缩放系数
- (UIImage*)imageByScalingAndCroppingForSize:(CGSize)targetSize { UIImage *sourceImage = [UIImage imageNamed:@"test.jpg"]; UIImage *newImage = nil; CGSize imageSize = sourceImage.size; CGFloat width = imageSize.width; CGFloat height = imageSize.height; CGFloat targetWidth = targetSize.width; CGFloat targetHeight = targetSize.height; CGFloat scaleFactor = 0.0; CGFloat scaledWidth = targetWidth; CGFloat scaledHeight = targetHeight; CGPoint thumbnailPoint = CGPointMake(0.0,0.0); if (CGSizeEqualToSize(imageSize, targetSize) == NO) { CGFloat widthFactor = targetWidth / width; CGFloat heightFactor = targetHeight / height; if (widthFactor > heightFactor) scaleFactor = widthFactor; // scale to fit height else scaleFactor = heightFactor; // scale to fit width scaledWidth= width * scaleFactor; scaledHeight = height * scaleFactor; // center the image if (widthFactor > heightFactor) { thumbnailPoint.y = (targetHeight - scaledHeight) * 0.5; } else if (widthFactor < heightFactor) { thumbnailPoint.x = (targetWidth - scaledWidth) * 0.5; } } UIGraphicsBeginImageContext(targetSize); // this will crop CGRect thumbnailRect = CGRectZero; thumbnailRect.origin = thumbnailPoint; thumbnailRect.size.width= scaledWidth; thumbnailRect.size.height = scaledHeight; [sourceImage drawInRect:thumbnailRect]; newImage = UIGraphicsGetImageFromCurrentImageContext(); if(newImage == nil) NSLog(@"could not scale image"); //pop the context to get back to the default UIGraphicsEndImageContext(); return newImage; }
【iOS应用开发中对UIImage进行截取和缩放的方法详解】相关文章:
★ iOS多线程应用开发中自定义NSOperation类的实例解析
★ iOS App开发中Masonry布局框架的基本用法解析
★ iOS应用开发中UITableView的分割线的一些设置技巧