经过学习,已经对Android程序的开发流程有了个大体的了解,为了提高我们的学习兴趣,在这一节我们将编写一个简单的基站定位程序。现在LBS(Location Based Service,基于位置的服务)移动应用相当流行(如:微信,切客,嘀咕,街旁等),基站定位是这类程序用到的关键性技术之一,我们来揭开它的神秘面纱吧。
在这一节里,我们会接触到事件、TelephonyManager、HTTP通信、JSON的使用等知识点。
在Android操作系统下,基站定位其实很简单,先说一下实现流程:
调用SDK中的API(TelephonyManager)获得MCC、MNC、LAC、CID等信息,然后通过google的API获得所在位置的经纬度,最后再通过google map的API获得实际的地理位置。(google真牛!)
有同学会问:MNC、MCC、LAC、CID都是些什么东西?google又怎么通过这些东西就获得经纬度了呢?
我们一起来学习一下:
MCC,Mobile Country Code,移动国家代码(中国的为460);
MNC,Mobile Network Code,移动网络号码(中国移动为00,中国联通为01);
LAC,Location Area Code,位置区域码;
CID,Cell Identity,基站编号,是个16位的数据(范围是0到65535)。
了解了这几个名词的意思,相信有些朋友已经知道后面的事了:google存储了这些信息,直接查询就能得到经纬度了。(至于google怎么得到移动、联通的基站信息,这就不得而知了,反正google免费提供接口,直接调用就是)
下面开始动手。
一、设置界面
我们在上一节的程序的基础上进行开发,在DemoActivity的界面上实现这个功能。
首先我们将DemoActivity使用的布局修改一下:
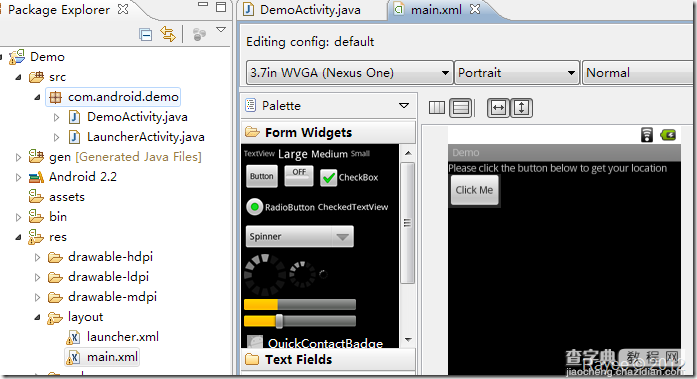
第1行为TextView,显示提示文字;第2行为一个Button,触发事件;第3行、第4行分别显示基站信息和地理位置(现在为空,看不到)。
layout/main.xml文件内容如下:
<"1.0" encoding="utf-8"?> <LinearLayout xmlns:android="http://schemas.android.com/apk/res/android" android:layout_width="fill_parent" android:layout_height="fill_parent" android:orientation="vertical" > <TextView android:layout_width="fill_parent" android:layout_height="wrap_content" android:text="Please click the button below to get your location" /> <Button android:id="@+id/button1" android:layout_width="wrap_content" android:layout_height="wrap_content" android:text="Click Me" /> <TextView android:id="@+id/cellText" android:layout_width="wrap_content" android:layout_height="wrap_content" android:text="" /> <TextView android:id="@+id/lacationText" android:layout_width="wrap_content" android:layout_height="wrap_content" android:text="" /> </LinearLayout>
接下来我们打开DemoActivity.java编写代码。
二、为按钮绑定事件
我们在Activity创建时绑定事件,将以下代码添加到setContentView(R.layout.main);后:
/** 为按钮绑定事件 */ Button btnGetLocation = (Button)findViewById(R.id.button1); btnGetLocation.setOnClickListener(new OnClickListener() { @Override public void onClick(View arg0) { // TODO Auto-generated method stub onBtnClick(); } });
同时还需要在头部import相关组件:
import android.view.View; import android.widget.Button; import android.view.View.OnClickListener;
我们来分析一下这段代码:
首先我们通过findViewById(R.id.button1)找到按钮这个对象,前面加(Button)表示显示的转换为Button对象;
然后设置按钮点击事件的监听器,参数为OnClickListener对象,再重载这个类的onClick方法,调用onBtnClick方法(这个方法得由我们自己去写,他在点击按钮时被调用)。
好了,调用方法写好了,我们来写实现(调用后需要做什么事)。动手编码之前先在脑中整理好思路,养成好习惯。
我们需要在DemoActivty类中添加如下私有方法:
我们需要刚刚提到的onBtnClick回调方法,被调用时实现取得基站信息、获取经纬度、获取地理位置、显示的功能。但是很显然,全部揉到一个方法里面并不是个好主意,我们将它分割为几个方法;
添加获取基站信息的方法getCellInfo,返回基站信息; 添加获取经纬度的方法getItude,传入基站信息,返回经纬度; 添加获取地理位置的方法getLocation,传入经纬度,返回地理位置; 添加显示结果的方法showResult,传入得到的信息在界面上显示出来。
好了,先将方法添上,完整代码如下:
package com.android.demo; import android.R.bool; import android.R.integer; import android.app.Activity; import android.os.Bundle; import android.view.View; import android.widget.Button; import android.view.View.OnClickListener; public class DemoActivity extends Activity { /** Called when the activity is first created. */ @Override public void onCreate(Bundle savedInstanceState) { super.onCreate(savedInstanceState); setContentView(R.layout.main); /** 为按钮绑定事件 */ Button btnGetLocation = (Button)findViewById(R.id.button1); btnGetLocation.setOnClickListener(new OnClickListener() { @Override public void onClick(View arg0) { // TODO Auto-generated method stub onBtnClick(); } }); } /** 基站信息结构体 */ public class SCell{ public int MCC; public int MNC; public int LAC; public int CID; } /** 经纬度信息结构体 */ public class SItude{ public String latitude; public String longitude; } /** 按钮点击回调函数 */ private void onBtnClick(){ } /** 获取基站信息 */ private SCell getCellInfo(){ } /** 获取经纬度 */ private SItude getItude(SCell cell){ } /** 获取地理位置 */ private String getLocation(SItude itude){ } /** 显示结果 */ private void showResult(SCell cell, String location){ } }
现在在onBtnClick方法中编码,依次调用后面几个方法,代码如下:
/** 按钮点击回调函数 */ private void onBtnClick(){ /** 弹出一个等待状态的框 */ ProgressDialog mProgressDialog = new ProgressDialog(this); mProgressDialog.setMessage("正在获取中..."); mProgressDialog.setProgressStyle(ProgressDialog.STYLE_SPINNER); mProgressDialog.show(); try { /** 获取基站数据 */ SCell cell = getCellInfo(); /** 根据基站数据获取经纬度 */ SItude itude = getItude(cell); /** 获取地理位置 */ String location = getLocation(itude); /** 显示结果 */ showResult(cell, location); /** 关闭对话框 */ mProgressDialog.dismiss(); }catch (Exception e) { /** 关闭对话框 */ mProgressDialog.dismiss(); /** 显示错误 */ TextView cellText = (TextView)findViewById(R.id.cellText); cellText.setText(e.getMessage()); } }
按钮相关的工作就完成了,接下来编写获取基站信息的方法。
三、获取基站信息
获取基站信息我们需要调用SDK提供的API中的TelephonyManager,需要在文件头部引入:
import android.telephony.TelephonyManager; import android.telephony.gsm.GsmCellLocation;
完整代码为:
/** * 获取基站信息 * * @throws Exception */ private SCell getCellInfo() throws Exception { SCell cell = new SCell(); /** 调用API获取基站信息 */ TelephonyManager mTelNet = (TelephonyManager) getSystemService(Context.TELEPHONY_SERVICE); GsmCellLocation location = (GsmCellLocation) mTelNet.getCellLocation(); if (location == null) throw new Exception("获取基站信息失败"); String operator = mTelNet.getNetworkOperator(); int mcc = Integer.parseInt(operator.substring(0, 3)); int mnc = Integer.parseInt(operator.substring(3)); int cid = location.getCid(); int lac = location.getLac(); /** 将获得的数据放到结构体中 */ cell.MCC = mcc; cell.MNC = mnc; cell.LAC = lac; cell.CID = cid; return cell; }
如果获得的位置信息为null将抛出错误,不再继续执行。最后将获取的基站信息封装为结构体返回。
四、获取经纬度
在这一步,我们需要采用HTTP调用google的API以获取基站所在的经纬度。
Android作为一款互联网手机,联网的功能必不可少。Android提供了多个接口供我们使用,这里我们使用DefaultHttpClient。
完整的方法代码如下:
/** * 获取经纬度 * * @throws Exception */ private SItude getItude(SCell cell) throws Exception { SItude itude = new SItude(); /** 采用Android默认的HttpClient */ HttpClient client = new DefaultHttpClient(); /** 采用POST方法 */ HttpPost post = new HttpPost("http://www.google.com/loc/json"); try { /** 构造POST的JSON数据 */ JSONObject holder = new JSONObject(); holder.put("version", "1.1.0"); holder.put("host", "maps.google.com"); holder.put("address_language", "zh_CN"); holder.put("request_address", true); holder.put("radio_type", "gsm"); holder.put("carrier", "HTC"); JSONObject tower = new JSONObject(); tower.put("mobile_country_code", cell.MCC); tower.put("mobile_network_code", cell.MNC); tower.put("cell_id", cell.CID); tower.put("location_area_code", cell.LAC); JSONArray towerarray = new JSONArray(); towerarray.put(tower); holder.put("cell_towers", towerarray); StringEntity query = new StringEntity(holder.toString()); post.setEntity(query); /** 发出POST数据并获取返回数据 */ HttpResponse response = client.execute(post); HttpEntity entity = response.getEntity(); BufferedReader buffReader = new BufferedReader(new InputStreamReader(entity.getContent())); StringBuffer strBuff = new StringBuffer(); String result = null; while ((result = buffReader.readLine()) != null) { strBuff.append(result); } /** 解析返回的JSON数据获得经纬度 */ JSONObject json = new JSONObject(strBuff.toString()); JSONObject subjosn = new JSONObject(json.getString("location")); itude.latitude = subjosn.getString("latitude"); itude.longitude = subjosn.getString("longitude"); Log.i("Itude", itude.latitude + itude.longitude); } catch (Exception e) { Log.e(e.getMessage(), e.toString()); throw new Exception("获取经纬度出现错误:"+e.getMessage()); } finally{ post.abort(); client = null; } return itude; }
在这里采用POST方法将JSON数据发送到googleAPI,google返回JSON数据,我们得到数据后解析,得到经纬度信息。
五、获取物理位置
得到经纬度后,我们将之转换为物理地址。
我们仍然使用DefaultHttpClient来调用google地图的API,获得物理信息,不过在这里我们使用GET方法。
完整的方法代码如下:
/** * 获取地理位置 * * @throws Exception */ private String getLocation(SItude itude) throws Exception { String resultString = ""; /** 这里采用get方法,直接将参数加到URL上 */ String urlString = String.format("http://maps.google.cn/maps/geo?key=abcdefg&q=%s,%s", itude.latitude, itude.longitude); Log.i("URL", urlString); /** 新建HttpClient */ HttpClient client = new DefaultHttpClient(); /** 采用GET方法 */ HttpGet get = new HttpGet(urlString); try { /** 发起GET请求并获得返回数据 */ HttpResponse response = client.execute(get); HttpEntity entity = response.getEntity(); BufferedReader buffReader = new BufferedReader(new InputStreamReader(entity.getContent())); StringBuffer strBuff = new StringBuffer(); String result = null; while ((result = buffReader.readLine()) != null) { strBuff.append(result); } resultString = strBuff.toString(); /** 解析JSON数据,获得物理地址 */ if (resultString != null && resultString.length() > 0) { JSONObject jsonobject = new JSONObject(resultString); JSONArray jsonArray = new JSONArray(jsonobject.get("Placemark").toString()); resultString = ""; for (int i = 0; i < jsonArray.length(); i++) { resultString = jsonArray.getJSONObject(i).getString("address"); } } } catch (Exception e) { throw new Exception("获取物理位置出现错误:" + e.getMessage()); } finally { get.abort(); client = null; } return resultString; }
GET方法就比POST方法简单多了,得到的数据同样为JSON格式,解析一下得到物理地址。
六、显示结果
好了,我们已经得到我们想要的信息了,我们把它显示出来,方法代码如下:
/** 显示结果 */ private void showResult(SCell cell, String location) { TextView cellText = (TextView) findViewById(R.id.cellText); cellText.setText(String.format("基站信息:mcc:%d, mnc:%d, lac:%d, cid:%d", cell.MCC, cell.MNC, cell.LAC, cell.CID)); TextView locationText = (TextView) findViewById(R.id.lacationText); locationText.setText("物理位置:" + location); }
七、运行程序
我们的编码工作已经完成了。在上面的代码中有些地方需要的引入代码没有提到,下面把完整的代码贴出来:
package com.android.demo; import java.io.BufferedReader; import java.io.InputStreamReader; import org.apache.http.HttpEntity; import org.apache.http.HttpResponse; import org.apache.http.client.HttpClient; import org.apache.http.client.methods.HttpGet; import org.apache.http.client.methods.HttpPost; import org.apache.http.entity.StringEntity; import org.apache.http.impl.client.DefaultHttpClient; import org.json.JSONArray; import org.json.JSONObject; import android.app.Activity; import android.app.ProgressDialog; import android.content.Context; import android.os.Bundle; import android.telephony.TelephonyManager; import android.telephony.gsm.GsmCellLocation; import android.util.Log; import android.view.View; import android.widget.Button; import android.widget.TextView; import android.view.View.OnClickListener; public class DemoActivity extends Activity { /** Called when the activity is first created. */ @Override public void onCreate(Bundle savedInstanceState) { super.onCreate(savedInstanceState); setContentView(R.layout.main); /** 为按钮绑定事件 */ Button btnGetLocation = (Button) findViewById(R.id.button1); btnGetLocation.setOnClickListener(new OnClickListener() { @Override public void onClick(View arg0) { // TODO Auto-generated method stub onBtnClick(); } }); } /** 基站信息结构体 */ public class SCell{ public int MCC; public int MNC; public int LAC; public int CID; } /** 经纬度信息结构体 */ public class SItude{ public String latitude; public String longitude; } /** 按钮点击回调函数 */ private void onBtnClick() { /** 弹出一个等待状态的框 */ ProgressDialog mProgressDialog = new ProgressDialog(this); mProgressDialog.setMessage("正在获取中..."); mProgressDialog.setProgressStyle(ProgressDialog.STYLE_SPINNER); mProgressDialog.show(); try { /** 获取基站数据 */ SCell cell = getCellInfo(); /** 根据基站数据获取经纬度 */ SItude itude = getItude(cell); /** 获取地理位置 */ String location = getLocation(itude); /** 显示结果 */ showResult(cell, location); /** 关闭对话框 */ mProgressDialog.dismiss(); } catch (Exception e) { /** 关闭对话框 */ mProgressDialog.dismiss(); /** 显示错误 */ TextView cellText = (TextView) findViewById(R.id.cellText); cellText.setText(e.getMessage()); Log.e("Error", e.getMessage()); } } /** * 获取基站信息 * * @throws Exception */ private SCell getCellInfo() throws Exception { SCell cell = new SCell(); /** 调用API获取基站信息 */ TelephonyManager mTelNet = (TelephonyManager) getSystemService(Context.TELEPHONY_SERVICE); GsmCellLocation location = (GsmCellLocation) mTelNet.getCellLocation(); if (location == null) throw new Exception("获取基站信息失败"); String operator = mTelNet.getNetworkOperator(); int mcc = Integer.parseInt(operator.substring(0, 3)); int mnc = Integer.parseInt(operator.substring(3)); int cid = location.getCid(); int lac = location.getLac(); /** 将获得的数据放到结构体中 */ cell.MCC = mcc; cell.MNC = mnc; cell.LAC = lac; cell.CID = cid; return cell; } /** * 获取经纬度 * * @throws Exception */ private SItude getItude(SCell cell) throws Exception { SItude itude = new SItude(); /** 采用Android默认的HttpClient */ HttpClient client = new DefaultHttpClient(); /** 采用POST方法 */ HttpPost post = new HttpPost("http://www.google.com/loc/json"); try { /** 构造POST的JSON数据 */ JSONObject holder = new JSONObject(); holder.put("version", "1.1.0"); holder.put("host", "maps.google.com"); holder.put("address_language", "zh_CN"); holder.put("request_address", true); holder.put("radio_type", "gsm"); holder.put("carrier", "HTC"); JSONObject tower = new JSONObject(); tower.put("mobile_country_code", cell.MCC); tower.put("mobile_network_code", cell.MNC); tower.put("cell_id", cell.CID); tower.put("location_area_code", cell.LAC); JSONArray towerarray = new JSONArray(); towerarray.put(tower); holder.put("cell_towers", towerarray); StringEntity query = new StringEntity(holder.toString()); post.setEntity(query); /** 发出POST数据并获取返回数据 */ HttpResponse response = client.execute(post); HttpEntity entity = response.getEntity(); BufferedReader buffReader = new BufferedReader(new InputStreamReader(entity.getContent())); StringBuffer strBuff = new StringBuffer(); String result = null; while ((result = buffReader.readLine()) != null) { strBuff.append(result); } /** 解析返回的JSON数据获得经纬度 */ JSONObject json = new JSONObject(strBuff.toString()); JSONObject subjosn = new JSONObject(json.getString("location")); itude.latitude = subjosn.getString("latitude"); itude.longitude = subjosn.getString("longitude"); Log.i("Itude", itude.latitude + itude.longitude); } catch (Exception e) { Log.e(e.getMessage(), e.toString()); throw new Exception("获取经纬度出现错误:"+e.getMessage()); } finally{ post.abort(); client = null; } return itude; } /** * 获取地理位置 * * @throws Exception */ private String getLocation(SItude itude) throws Exception { String resultString = ""; /** 这里采用get方法,直接将参数加到URL上 */ String urlString = String.format("http://maps.google.cn/maps/geo?key=abcdefg&q=%s,%s", itude.latitude, itude.longitude); Log.i("URL", urlString); /** 新建HttpClient */ HttpClient client = new DefaultHttpClient(); /** 采用GET方法 */ HttpGet get = new HttpGet(urlString); try { /** 发起GET请求并获得返回数据 */ HttpResponse response = client.execute(get); HttpEntity entity = response.getEntity(); BufferedReader buffReader = new BufferedReader(new InputStreamReader(entity.getContent())); StringBuffer strBuff = new StringBuffer(); String result = null; while ((result = buffReader.readLine()) != null) { strBuff.append(result); } resultString = strBuff.toString(); /** 解析JSON数据,获得物理地址 */ if (resultString != null && resultString.length() > 0) { JSONObject jsonobject = new JSONObject(resultString); JSONArray jsonArray = new JSONArray(jsonobject.get("Placemark").toString()); resultString = ""; for (int i = 0; i < jsonArray.length(); i++) { resultString = jsonArray.getJSONObject(i).getString("address"); } } } catch (Exception e) { throw new Exception("获取物理位置出现错误:" + e.getMessage()); } finally { get.abort(); client = null; } return resultString; } /** 显示结果 */ private void showResult(SCell cell, String location) { TextView cellText = (TextView) findViewById(R.id.cellText); cellText.setText(String.format("基站信息:mcc:%d, mnc:%d, lac:%d, cid:%d", cell.MCC, cell.MNC, cell.LAC, cell.CID)); TextView locationText = (TextView) findViewById(R.id.lacationText); locationText.setText("物理位置:" + location); } }
我们连上手机在手机上运行程序看看。
不出意外的话程序运行起来了,自动跳转到了主界面。点击“Click Me”,出错了!
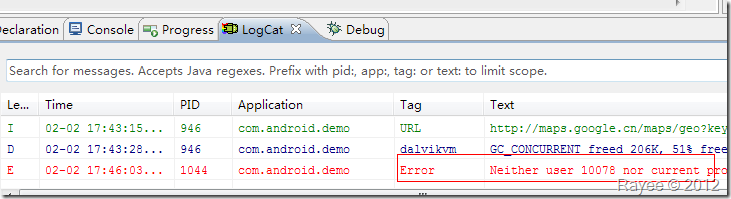
详细的错误信息为:Neither user 10078 nor current process has android.permission.ACCESS_COARSE_LOCATION.
原来是没有权限,经过前面的学习,我们知道Android在应用的安全上下了一番功夫,要用一些特殊功能必须先报告,安装应用的时候列给用户看,必须要得到用户的允许。这里我们用了获取基站信息的功能,涉及到用户的隐私了,所以我们必须申明一下。
打开AndroidManifest.xml配置文件,在里面添加相应的配置信息:
<uses-permission android:name="android.permission.ACCESS_FINE_LOCATION"></uses-permission>
我们继续把网络连接的权限申明也加上:
<uses-permission android:name="android.permission.INTERNET"></uses-permission>
再编译运行看看(点击“Click Me”后程序会卡住,等待一段时间才有反应,取决于网络情况):
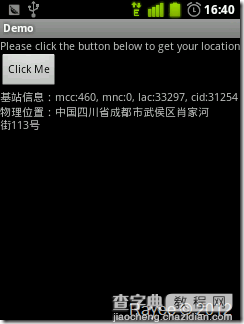
成功啦!
可能有的同学还是出现错误,没有成功:
█ 提示“www.google.com…”什么的错误
请确认你的手机能访问互联网,调用google的API是必须联网的。
█ 提示获取不到基站信息
你确定你是在手机上测试的吗?模拟器可不行哦。或者你的手机使用的CMDA网络?这个例子只支持GSM网络…
█ 获取不到经纬度
很有可能你中奖了,你所在的基站还没纳入google的数据库…(话说我之前也遇到过,怎么查就是查不出经纬度来,返回数据为空)
█ 获取到的地理地址不正确
这个可能程序出错了,可能google出错了?
其实google map API返回的数据中还包含了很多其他信息,我们可以用来开发一些更有趣的功能,如制作我们专属的地图软件、足迹记录软件等,充分发挥你的创造力:)
八、总结
这个程序基本实现了基站定位功能,但还有很多问题,如:点击了按钮后界面会卡住(访问网络时阻塞了进程)、未对异常进一步处理、不兼容CMDA网络等。
另外这个程序的精度也不够,获得的位置实际上是基站的物理位置,与人所在的位置还有一定差距。在城市里面,一般采用密集型的小功率基站,精度一般在几百米范围内,而在郊区常为大功率基站,密度很小,精度一般在几千米以上。
想要取得更高的精度需要通过一些其他的算法来实现,如果大家有兴趣的话我们可以一起来研究一下,再专门写篇笔记。
可见写一段程序和做一个实际的产品是有很大差别的。
结尾
这一节基本实现了最简单的基站定位,只是作为学习的例子,远远达不到产品的要求,请大家见谅。
我们进一步熟悉了JAVA编码,之前没怎么接触JAVA看起来有点吃力的同学建议找点JAVA基础的书来看看。
以上就是本文的全部内容,希望对大家的学习有所帮助,也希望大家多多支持查字典教程网。
【Android开发笔记之简单基站定位程序的实现】相关文章:
★ iOS程序开发之使用PlaceholderImageView实现优雅的图片加载效果
★ 详解iOS开发中UItableview控件的数据刷新功能的实现