翻译说明: 为了让大家更能理解这个教程,我并不翻译其中一些命令,这样可以让一些初学者 ( 不是很熟悉 maya nurbs 建模命令 ) 更快找到这些命令。另:我的英文不好,所以在翻译的时候会有一些不足之处,如果有让你发笑的地方,请你给我提醒,我将更改过来 , 我的 email: chinacache@163.com.
希望可以和大家一同进步!
create tire pattern
open your maya, from top view, create these curves (fig 1), and move them to 6 of y-axis (go up). remember...you must use closed curves. and of course... you could create another tire pattern. :)
打开 maya, 切换到前视窗 , 创建如 (fig 1) 一样的曲线,并将它在 y 轴向上移动 6 个单位 . 记住 : 曲线必须是闭合的 . 另外,你也可以创建你自己喜欢的曲线样式 .
then from front view, create a nurbs cylinder (radius 5, sections 12, spans 6), rotate it to 90%26deg;, name this cylinder master_ tire (fig 2).
回到前视窗,创建一个 nurbs 圆柱体 (radius 5,sections 12,spans 6), 旋转 90 度,将其命名为 master_tire (fig 2).
fig 1
tire detail
from side view,selectthese outer cv%26#39;s (fig 3) and scale them smaller (fig 4). note : use center pivot axis to scale.
切换到侧视窗中,选择外沿的 CV 点 (fig 3) 将它们拉伸如 (fig 4). 注意 : 使用中心黄点来拉伸 .
fig 3
Now duplicate this master_ tire and name the new one master_ copy , then hide master_ tire (select Master_tire then hit CTRL-H)
复制一条 master_tire 曲面 , 将其命名为 master_copy, 将 master_tire 隐藏起来 ( 选择 master_tire 曲面按 Ctrl+H 组合键 ).
Go to top view, rescale and adjust your curves to this position (Fig 5) (donoverlap the master_copy body), and then Shift-select master_copy and edit nurbs project curve on surface .
Note : you must do this projection from top view.
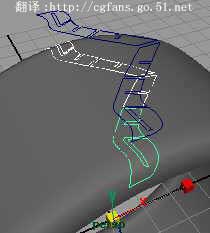
Then from persp view you will have these new projection curves (Fig 6)
切换到顶视窗 , 将你的曲线重新拉伸缩放到如 (fig 5)( 不要超过 master_copy) ,然后按 Shift 键点选 master_copy ,选择 edit nurbs project curve on surface 命令将曲线投影到曲面上 .
记住 : 你必须在顶视窗中投影 .
回到透视窗你将得到一些投影的曲线 (fig 6).
fig 5
with the new projection curves still selected, go to menu surfaces extrude option box ,selectdistance and enter -0.15 on extrude length , output geometry to nurbs (fig 7), then hit extrude, then from pers bottom view you will see this these extruded objects (fig 8)
当新投影的曲线仍然被选择的时候,到 surfacesextrudeoption box , 将 style 设为 distance , extrude length 设为 -0.15. output geometry 设为 nurbs (fig 7), 设定好后点击 extrude , 我们将得到如 (fig 8) 所示
fig 7
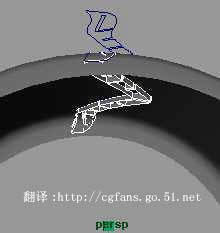
now from persp view top,selectmaster_copy, go to edit nurbs and trim tool, you will see that white trim areas,selectevery top of the inner surface (see cyan and yellow points in fig 9), and then press enter, you will have these new nurbs objects (fig 10)
回到透视窗,选择 master_copy 将使用 edit nurbstrim tool, 选择你要保留的区域 (fig 9) ,并 trim 它,我们可以是到新的 nurbs 曲面 .(fig 10)
fig 9
from front view, delete bottom extruded objects (fig 11), we don%26#39;t need them anymore.
next, from side view,selectall of these objects (fig 12), then duplicate them.
回到前视窗 , 将下面的曲面删除掉 (fig 11), 我们不需要它 .
切换到侧视窗 , 选择所有的物体 (fig 12), 复制它们 .
fig 11
then move these duplicated objects to about 1.5 of y axis (fig 13), and delete bottom extruded objects (fig 14)
将复制出来的物体在 y 轴上移动 1.5 的距离 (fig 13), 然后删除掉下面的物体 (fig 14)
fig 13
select back all of duplicated objects, then put them back to 0 of y axis (fig 15)
选择所有复制出来的物体,将其在 y 轴上移回原位,即回归 0(fig 15).
fig 15
the reason i copied and deleted the original object is i don%26#39;t want to have any trim information anymore (it could slow down our modeling times).
我复制出新的物体并将原物体删除掉的原因是因为我不想在关于 trim 的历史记录在物体上 ( 这样做可以加速我们的时间 ).
next, with new duplicated of object still selected, go to edit duplicate option box , and apply these duplicate settings (fig 16), hit duplicate, then you will have these duplicated rotation objects (fig 17)
接下来 , 将所有物体选择,复制它们,复制的属性如 (fig 16), 我们可得到如 (fig 17) 所示的物体 .
fig 16
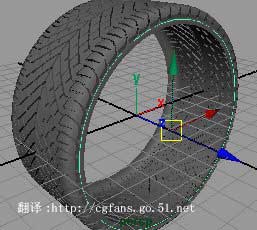
ok. 你是否还记得最初我们隐藏的圆柱体 ? 那一个命名为 master_tire 的曲面 ? 现在显示它 , 并将它在 xyz 方向上缩小到 0.977. 得到 (fig 23)
fig 23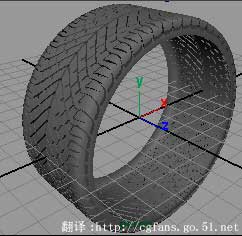
bump logo texturing
now from front view, create a nurbs spline with radius 4.45 , rotate it to 90%26deg; of x axis (fig 24), and move it to about 2.138 z axis (close to the master_tire cylinder outer side) (fig 25). note : this curve must be placed inside of the front of the master_tire , but not too far, it must be close enough.
现在回到前视窗当中,新建一个 nurbs 圆形曲线 , 半径为 4.45, 并在 x 轴上旋转 90 度 (fig 24), 在 z 轴方向上移动 2.138 的距离 ( 靠近 master_tire 圆柱体 )(fig 25). 记住 : 该曲线必须在 master_tire 曲面里,但是不要太远,接近一点 .)
fig 24
duplicate it then rescale it to about 0.87 (xyz) and move it to around 2.254 of z axis and then duplicate again, rescale it to about 0.754 (xyz) and move it to around 2.178 of z axis. now you have these three new curves right ? (fig 26) . nowselectthese 3 new curves (one by one) then go to surface loft . you%26#39;ll have this new surface (fig 27). note : you could still resizeortweak these 3 profile curves if you want to :)
复制那条曲线 , 并将新复制出来的曲线在 xyz 轴上缩小到 0.87, 在 z 轴方向上移动到 2.254 ; 再次复制一条新的曲线,并将其在 xyz 轴上缩小到 0.754, 在 z 轴方向上移动到 2.178 . 现在我们得到了三条曲线 (fig 26). 依次选择这三条曲线,并 surfaceloft , 我们 loft 出新曲面 (fig 27). 注意 : 你可以适当调整你的曲线到你喜欢的样子 .
fig 26

next, with this new surface still selected, go to edit duplicate option box and apply these duplicate settings (fig 28), hit duplicate, then you will have a new mirrored surface on the other side (fig 29)
选择 loft 出来的曲面,到 editduplicateoption box 里将其设置如 (fig 28), 设置好后复制 , 你将得到 (fig 29).
fig 28

后面的应该不用翻译了吧? - 关于渲染的,如果有那位需要的话,发 email 给我们 : chinacache@163.com, 我们会将它完成 . 谢谢 !!
now within your graphics editor, create this logo with an alpha channel (tga) like this sample , do whatever you like with the logo, but remember you must create a squared box for the logo resolution (i.e. 500x500or600x600) :)
from hypershade create a new lambert material with your alpha file as bump shader with 3d projection (fig 28). i used lambert cause i dont want to get too shiny on this tire; you could also create it with displacement if you want to. fig 28
now adjust your 3d placement attributes to fix the front inner tire (fig 29)
fig 29
you could delete all unused objects from hypergraph and also you could delete all history (if you want to), and you could also group all of these objects :)
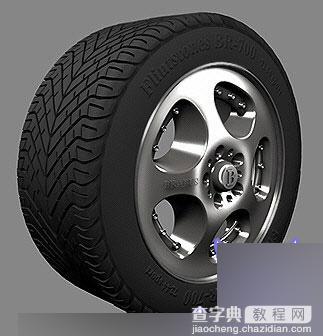
ok next,selecteditselectall by type nurbs surfaces , go to rendering module, go to render set nurbs tessellation then hit set and close. go to your render globals , set your anti-aliasing quality to production quality , resolution to about 640x480. now render it, then you will have this cute looking tire, of course you could create black rubber shader for this tire :)
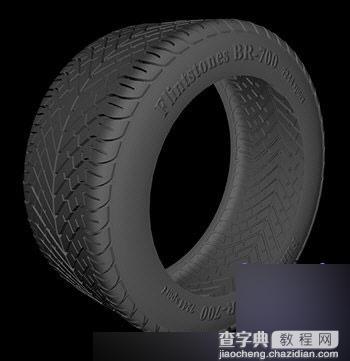
and yes...these are nurbs...so don%26#39;t be worried with a close/macro shot, even this close , they%26#39;re all smooth.
if you need a complete model with logo, please send me an email...sorry the file was too big for my bandwidth..:(
ok..this is it...i hope it helps....and have fun....:) (完)
教程结束,以上就是Maya Nurbs 建模命令制作汽车轮胎方法介绍,操作很简单的,希望这篇文章能对大家有所帮助!
【Maya Nurbs 建模命令制作汽车轮胎】相关文章: