OpenVPN在安全性上比PPTP,L2TP和IPsec都高,因为它通过三个证书的安全验证,实现了整个通信链路的完整加密。
安装步骤:
一、首先检查VPS上的tun设备是否可用,如果不可用需要联系客服打开,否则OpenVPN无法启用。
通过root用户登陆,执行
#cat /dev/net/tun
cat: /dev/net/tun: File descriptor in bad state
如果现实结果如上所示,则表示tun设备可用,其它则表示设备异常,无法安装OpenVPN。
二、下载安装所需软件包:
wget ftp://rpmfind.net/linux/epel/5/i386/pkcs11-helper-devel-1.07-2.el5.1.i386.rpm
wget ftp://rpmfind.net/linux/epel/5/i386/pkcs11-helper-1.07-2.el5.1.i386.rpm
wget http://www.oberhumer.com/opensource/lzo/download/lzo-2.04.tar.gz
wget http://swupdate.openvpn.net/community/releases/openvpn-2.1.4.tar.gz
三、使用yum安装程序所需开发包
yum install -y openssl openssl-devel automake pkgconfig iptables
四、安装OpenVPN服务端
1.安装pkcs11-helper RPM包
rpm -ivh pkcs11-helper-1.07-2.el5.1.i386.rpm
rpm -ivh pkcs11-helper-devel-1.07-2.el5.1.i386.rpm
2.安装 LZO
tar zxvf lzo-2.04.tar.gz
cd lzo-2.04/
./configure –prefix=/opt/lzo
make
make check
make install
cd ../
3.安装 OpenVPN
tar zxvf openvpn-2.1.4.tar.gz
cd openvpn-2.1.4
./configure –prefix=/opt/openvpn –with-lzo-headers=/opt/lzo/include –with-lzo-lib=/opt/lzo/lib –with-ssl-headers=/usr/include/openssl –with-ssl-lib=/usr/lib
make
make install
然后,下面就开始key证书文件的创建,总共需要创建三个,即ca,server key,client key。
4.生成证书Key
cp -r easy-rsa /opt/openvpn/
cd /opt/openvpn/easy-rsa/2.0/
vim export_new_var
export D=`pwd`
export KEY_CONFIG=$D/openssl.cnf
export KEY_DIR=$D/keys
export KEY_SIZE=1024
export KEY_COUNTRY=CN #国家
export KEY_PROVINCE=BJ #省份
export KEY_CITY=BJ #城市
export KEY_ORG=”btschina.com” #组织
export KEY_EMAIL=”root@btschina.com” #邮箱
source export_new_var
./clean-all
./build-ca
Generating a 1024 bit RSA private key
..++++++
………..++++++
writing new private key to ‘ca.key’
—–
You are about to be asked to enter information that will be incorporated
into your certificate request.
What you are about to enter is what is called a Distinguished Name or a DN.
There are quite a few fields but you can leave some blank
For some fields there will be a default value,
If you enter ‘.’, the field will be left blank.
—–
Country Name (2 letter code) [CN]:
State or Province Name (full name) [BJ]:
Locality Name (eg, city) [BJ]:
Organization Name (eg, company) [btschina.com]:
Organizational Unit Name (eg, section) []:btschina
Common Name (eg, your name or your server’s hostname) [btschina.com CA]:btschina
.com
Name []:btschina
Email Address [root@btschina.com]:
5.建立 server key
[root@centos 2.0]# ./build-key-server server
Generating a 1024 bit RSA private key
……………………….++++++
……….++++++
writing new private key to ‘server.key’
—–
You are about to be asked to enter information that will be incorporated
into your certificate request.
What you are about to enter is what is called a Distinguished Name or a DN.
There are quite a few fields but you can leave some blank
For some fields there will be a default value,
If you enter ‘.’, the field will be left blank.
—–
Country Name (2 letter code) [CN]:
State or Province Name (full name) [BJ]:
Locality Name (eg, city) [BJ]:
Organization Name (eg, company) [btschina.com]:
Organizational Unit Name (eg, section) []:btschina
Common Name (eg, your name or your server’s hostname) [server]:btschina.com
Name []:btschina
Email Address [root@btschina.com]:</p> <p>Please enter the following ‘extra’ attributes
to be sent with your certificate request
A challenge password []:123456
An optional company name []:btschina.com
Using configuration from /etc/openvpn/easy-rsa/2.0/openssl.cnf
Check that the request matches the signature
Signature ok
The Subject’s Distinguished Name is as follows
countryName :P RINTABLE:’CN’
stateOrProvinceName :P RINTABLE:’BJ’
localityName :P RINTABLE:’BJ’
organizationName :P RINTABLE:’btschina.com’
organizationalUnitName:PRINTABLE:’btschina’
commonName :P RINTABLE:’btschina.com’
name :P RINTABLE:’btschina’
emailAddress :IA5STRING:’root@btschina.com’
Certificate is to be certified until Apr 12 08:21:52 2021 GMT (3650 days)
Sign the certificate? [y/n]:y
6.生成客户端 key
[root@centos 2.0]# ./build-key client1
Generating a 1024 bit RSA private key
……………………………………………………………………..
………++++++
………………….++++++
writing new private key to ‘client1.key’
—–
You are about to be asked to enter information that will be incorporated
into your certificate request.
What you are about to enter is what is called a Distinguished Name or a DN.
There are quite a few fields but you can leave some blank
For some fields there will be a default value,
If you enter ‘.’, the field will be left blank.
—–
Country Name (2 letter code) [CN]:
State or Province Name (full name) [BJ]:
Locality Name (eg, city) [BJ]:
Organization Name (eg, company) [btschina.com]:
Organizational Unit Name (eg, section) []:btschina
Common Name (eg, your name or your server’s hostname) [client1]:
Name []:btschina
Email Address [root@btschina.com]:
Please enter the following ‘extra’ attributes
to be sent with your certificate request
A challenge password []:123456
An optional company name []:btschina.com
Using configuration from /etc/openvpn/easy-rsa/2.0/openssl.cnf
Check that the request matches the signature
Signature ok
The Subject’s Distinguished Name is as follows
countryName :P RINTABLE:’CN’
stateOrProvinceName :P RINTABLE:’BJ’
localityName :P RINTABLE:’BJ’
organizationName :P RINTABLE:’btschina.com’
organizationalUnitName:PRINTABLE:’btschina’
commonName :P RINTABLE:’client1′
name :P RINTABLE:’btschina’
emailAddress :IA5STRING:’root@btschina.com’
Certificate is to be certified until Apr 12 08:24:33 2021 GMT (3650 days)
Sign the certificate? [y/n]:y
1 out of 1 certificate requests certified, commit? [y/n]y
Write out database with 1 new entries
Data Base Updated
1 out of 1 certificate requests certified, commit? [y/n]y
Write out database with 1 new entries
Data Base Updated
如果想生成多个client key的话,重复以上步骤,修改client1为client2,client3……即可。
至此,所有的key都已经生成完毕,如果你想删除这些key,重新生成的话,执行以下命令。
source var
./clean-all
7.生成 Diffie Hellman 参数
./build-dh
8.将 keys 下的所有文件打包下载到本地
tar -cf keys.tar keys
9.创建服务端配置文件
vi /opt/openvpn/etc/server.conf
内容如下:
port 1194
proto udp
dev tun
ca /opt/openvpn/easy-rsa/2.0/keys/ca.crt
cert /opt/openvpn/easy-rsa/2.0/keys/server.crt
key /opt/openvpn/easy-rsa/2.0/keys/server.key
dh /opt/openvpn/easy-rsa/2.0/keys/dh1024.pem
server 10.10.20.0 255.255.255.0
client-to-client
keepalive 10 120
comp-lzo
persist-key
persist-tun
status /opt/openvpn/easy-rsa/2.0/keys/openvpn-status.log
verb 4
push “dhcp-option DNS 10.10.20.1″
push “dhcp-option DNS 8.8.8.8″
push “dhcp-option DNS 8.8.4.4″
10.创建客户端配置文件
vi /opt/openvpn/etc/client.conf
内容如下
client
dev tun
proto udp
remote 204.74.215.57 1194 #请换成自己ip
persist-key
persist-tun
ca /opt/openvpn/easy-rsa/2.0/keys/ca.crt
cert /opt/openvpn/easy-rsa/2.0/keys/client1.crt
key /opt/openvpn/easy-rsa/2.0/keys/client1.key
ns-cert-type server
comp-lzo
verb 3
redirect-gateway def1
route-method exe
route-delay 2
12.设置 OpenVPN 服务器 reboot后自动启动 openvpn
vi /etc/rc.local
加入:
/opt/openvpn/sbin/openvpn –config /opt/openvpn/etc/server.conf > /dev/null 2>&1 &
运行OpenVPN服务端
/opt/openvpn/sbin/openvpn –config /opt/openvpn/etc/server.conf > /dev/null 2>&1 &
检查服务端是否启动
执行
netstat -lnp
如果看到有 0.0.0.0:1194 则证明服务端已经成功启动。
五、防火墙规则设置
1.开放OpenVPN服务器端口
iptables -A INPUT -p udp -m state –state NEW -m udp –dport 1194 -j ACCEPT
2.启用NAT映射,实现共享上网
iptables -t nat -A POSTROUTING -s 10.10.20.0/255.255.255.0 -o eth0 -j MASQUERADE
3.开启数据转发
sysctl -w net.ipv4.ip_forward=1
六、OpenVPN GUI for Windows 客户端安装
1.下载并安装 .NET Framwork 3.5 SP1
由于OpenVPN客户端需要 .NET Framwork 3.5 SP1 以上的支持,所以很遗憾,我们不得不先安装它。
下载地址:http://www.microsoft.com/downloads/zh-cn/details.aspx?FamilyID=333325fd-ae52-4e35-b531-508d977d32a6&DisplayLang=zh-cn
2.下载并安装OpenVPN客户端
下载地址:http://swupdate.openvpn.net/downloads/openvpn-client.msi
3.创建客户端配置文件
进入程序目录,C:Program FilesOpenVPN TechnologiesOpenVPN Clientetcprofile
创建配置文件client.ovpn,内容如下:
client
dev tun
proto udp
remote 204.74.215.57 1194 #请换成自己ip
persist-key
persist-tun
ca ca.crt
cert client1.crt
key client1.key
ns-cert-type server
comp-lzo
verb 3
redirect-gateway def1
route-method exe
route-delay 2
4.将所需的证书等文件放入客户端目录
将之前压缩的keys.tar压缩文件解压,并将目录下的所有文件移动到目录:
C:Program FilesOpenVPN TechnologiesOpenVPN Clientetcprofile
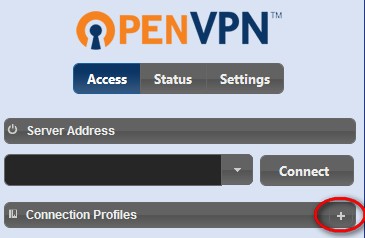
5.启动OpenVPN客户端
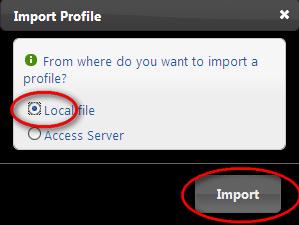
启动OpenVPN客户端软件,点击添加连接配置,选择本地文件导入,然后导入刚刚创建的client.ovpn文件。
如下图所示:
然后界面上会出现一个Client1选项,点击即可登录
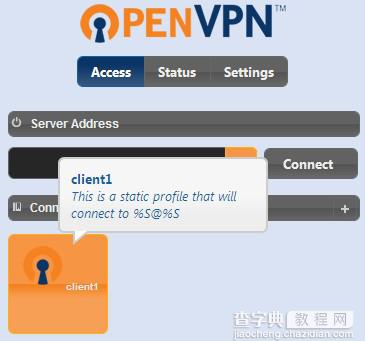
登录成功

至此,整个OpenVPN的安装过程就已经完成了,如果你也是国外的VPS主机的话,那就开始体验翻过GFW的快乐吧。
七、卸载OpenVPN
如果你觉得OpenVPN用起来太过于麻烦或其它原因想卸载OpenVPN,那么,请执行以下操作。
killall openvpn
rpm -e pkcs11-helper-1.07-2.el5.1.i386.rpm
rpm -e pkcs11-helper-devel-1.07-2.el5.1.i386.rpm
rm -rf /opt/lzo
rm -rf /opt/openvpn
【在Linux系统的VPS上安装配置OpenVPN的详细教程】相关文章:
★ Linux中编译安装Subversion(SVN)客户端的教程