最近在学习Canvas画图的方法,最近有时间做了个整理,如下:
1、基本用法
要使用<canvas>元素,必须先设置其width和height属性,指定可以绘图的区域大小,出现在开始后结束标签中的内容是后备信息,如果浏览器不支持<canvas>元素,就会显示这些信息。例如:
<canvas id="drawing" width="200" height="200">A Drawing of something</canvas>
使用toDataURL()方法,可以导出在<canvas>元素上绘制的图像。
var drawing=document.getElementById("drawing"); //确定浏览器支持<canvas>元素 if(drawing.getContext){ //取得绘图上下文对象的引用,“2d”是取得2D上下文对象 var context=drawing.getContext("2d"); //取得图像的数据URI var imgURI=drawing.toDataURL("image/png"); alert(imgURI); //显示图像 var image=document.createElement("img"); image.src=imgURI; document.body.appendChild(image); }
2、2D上下文
(1)、填充和描边
填充:用指定的样式填充图形;描边:就是只在图形的边缘画线。fillStyle和strokeStyle两个属性的值可以是字符串、渐变对象或模式对象。
var drawing=document.getElementById("drawing"); //确定浏览器支持<canvas>元素 if(drawing.getContext){ //取得绘图上下文对象的引用,“2d”是取得2D上下文对象 var context=drawing.getContext("2d");</span>
<span>//此程序由于没有图像,填充和描边不会显示 context.strokeStyle="#0000ff"; context.fillStyle="red"; }
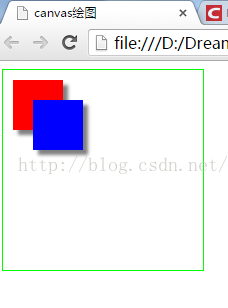
(2)、绘制矩形
矩形是唯一一种可以直接在2D上下文绘制的形状。与矩形有关的方法包括:fillRec()、strokeRect()和clearRect()。这三个方法都能接收4个参数:x坐标、y坐标、宽度和高度。
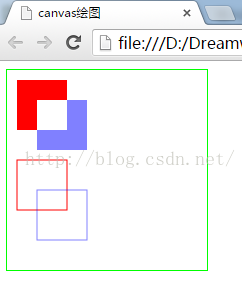
<!DOCTYPE html PUBLIC "-//W3C//DTD XHTML 1.0 Transitional//EN" "http://www.w3.org/TR/xhtml1/DTD/xhtml1-transitional.dtd"> <html xmlns="http://www.w3.org/1999/xhtml"> <head> <meta http-equiv="Content-Type" content="text/html; charset=utf-8" /> <title>canvas绘图</title> </head> <body> <canvas id="drawing" width="200" height="200">A Drawing of something</canvas> <script> var drawing=document.getElementById("drawing"); //确定浏览器支持<canvas>元素 if(drawing.getContext){ //取得绘图上下文对象的引用,“2d”是取得2D上下文对象 var context=drawing.getContext("2d"); //绘制红色矩形 context.fillStyle="red"; context.fillRect(10,10,50,50); //绘制半透明的蓝色矩形 context.fillStyle="rgba(0,0,255,0.5)"; context.fillRect(30,30,50,50); //绘制红色描边矩形 context.strokeStyle="red"; context.strokeRect(10,90,50,50); //绘制半透明的蓝色描边矩形 context.strokeStyle="rgba(0,0,255,0.5)"; context.strokeRect(30,120,50,50); //在两个矩形重叠的地方清除一个小矩形 context.clearRect(30,30,30,30); } </script> </body> </html>
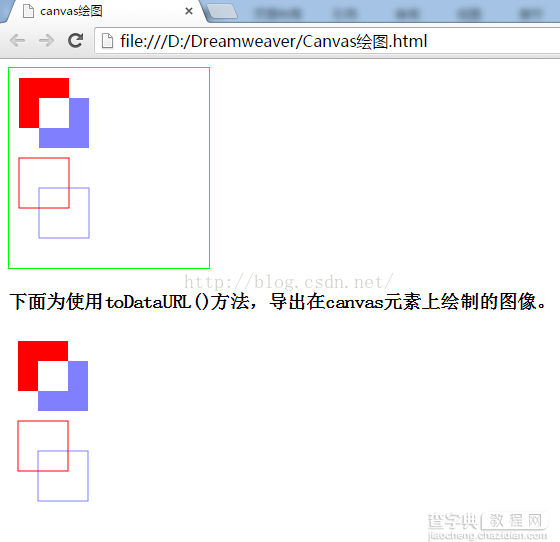
下面为使用toDataURL()方法,导出在canvas元素上绘制的图像程序如下:
<!DOCTYPE html PUBLIC "-//W3C//DTD XHTML 1.0 Transitional//EN" "http://www.w3.org/TR/xhtml1/DTD/xhtml1-transitional.dtd"> <html xmlns="http://www.w3.org/1999/xhtml"> <head> <meta http-equiv="Content-Type" content="text/html; charset=utf-8" /> <title>canvas绘图</title> </head> <body> <canvas id="drawing" width="200" height="200">A Drawing of something</canvas> <br /> <h3>下面为使用toDataURL()方法,导出在canvas元素上绘制的图像。</h3> <script> var drawing=document.getElementById("drawing"); //确定浏览器支持<canvas>元素 if(drawing.getContext){ //取得绘图上下文对象的引用,“2d”是取得2D上下文对象 var context=drawing.getContext("2d"); //绘制红色矩形 context.fillStyle="red"; context.fillRect(10,10,50,50); //绘制半透明的蓝色矩形 context.fillStyle="rgba(0,0,255,0.5)"; context.fillRect(30,30,50,50); //绘制红色描边矩形 context.strokeStyle="red"; context.strokeRect(10,90,50,50); //绘制半透明的蓝色描边矩形 context.strokeStyle="rgba(0,0,255,0.5)"; context.strokeRect(30,120,50,50); //在两个矩形重叠的地方清除一个小矩形 context.clearRect(30,30,30,30); //取得图像的数据URI var imgURI=drawing.toDataURL("image/png"); //显示图像 var image=document.createElement("img"); image.src=imgURI; document.body.appendChild(image); } </script> </body> </html>

(3)、绘制路径
要绘制路径,首先必须调用beginPath()方法,表示要开始绘制新路径。
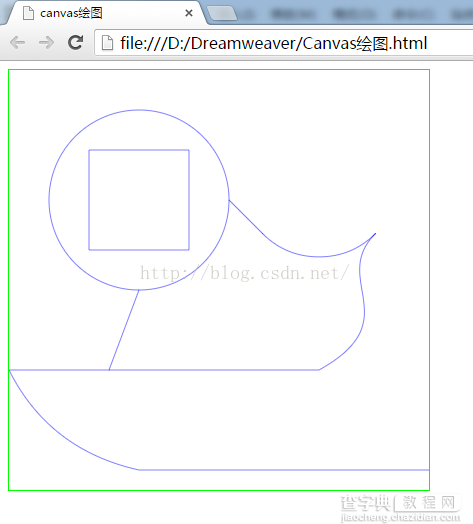
<!DOCTYPE html PUBLIC "-//W3C//DTD XHTML 1.0 Transitional//EN" "http://www.w3.org/TR/xhtml1/DTD/xhtml1-transitional.dtd"> <html xmlns="http://www.w3.org/1999/xhtml"> <head> <meta http-equiv="Content-Type" content="text/html; charset=utf-8" /> <title>canvas绘图</title> </head> <body> <canvas id="drawing" width="420" height="420">A Drawing of something</canvas> <script> var drawing=document.getElementById("drawing"); //确定浏览器支持<canvas>元素 if(drawing.getContext){ //取得绘图上下文对象的引用,“2d”是取得2D上下文对象 var context=drawing.getContext("2d"); //开始路径 context.beginPath(); /*绘制弧线,使用arc(x,y,radius,startAngle,endAngle,counterclockwise)方法 以(x,y)为圆心绘制一条弧线,弧线半径为radius,起始和结束角度(用弧度表示)分别为startAngle 和endAngle。最后一个参数表示是否按逆时针方向计算,值为false表示顺时针方向计算。 */ context.arc(130,130,90,0,2*Math.PI,false); /*arcTo(x1,y1,x2,y2,radius):从上一点开始绘制一条弧线,到(x2,y2)为止,并且以给 定的半径radius穿过(x1,y1) */ context.arcTo(310,220,400,130,80) /*bezierCurveTo(c1x,c1y,c2x,c2y,x,y):从上一点开始绘制一条曲线,到(x,y)为 止,并且以(c1x,c1y)和(c2x,c2y)为控制的。 */ context.bezierCurveTo(320,210,400,250,310,300); /*lineTo(x,y):从上一点开始绘制一条直线,到(x,y)为止*/ context.lineTo(0,300); context.moveTo(130,220); context.lineTo(100,300); /*quadraticCurveTo(cx,cy,x,y):从上一点开始绘制一条二次曲线,到(x,y)为止,并且 以(cx,cy)作为控制点 */ context.quadraticCurveTo(40,380,130,400); context.lineTo(450,400); /*rect(x,y,width,height):从点(x,y)开始绘制一个矩形路径*/ context.rect(80,80,100,100) context.strokeStyle="rgba(0,0,255,0.5)"; //最后必须调用stroke()方法,这样才能把图像绘制到画布上。 context.stroke(); } </script> </body> </html>
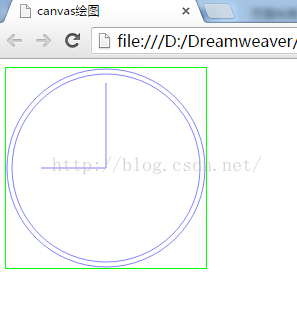
<!DOCTYPE html PUBLIC "-//W3C//DTD XHTML 1.0 Transitional//EN" "http://www.w3.org/TR/xhtml1/DTD/xhtml1-transitional.dtd"> <html xmlns="http://www.w3.org/1999/xhtml"> <head> <meta http-equiv="Content-Type" content="text/html; charset=utf-8" /> <title>canvas绘图</title> </head> <body> <canvas id="drawing" width="200" height="200">A Drawing of something</canvas> <script> var drawing=document.getElementById("drawing"); //确定浏览器支持<canvas>元素 if(drawing.getContext){ //取得绘图上下文对象的引用,“2d”是取得2D上下文对象 var context=drawing.getContext("2d"); //开始路径 context.beginPath(); //绘制外圆 context.arc(100,100,99,0,2*Math.PI,false); //绘制内圆 context.moveTo(194,100);//将绘图游标移动到(x,y),不画线 context.arc(100,100,94,0,2*Math.PI,false); //绘制分针 context.moveTo(100,100); context.lineTo(100,15); //绘制时针 context.moveTo(100,100); context.lineTo(35,100); context.strokeStyle="rgba(0,0,255,0.5)"; //最后必须调用stroke()方法,这样才能把图像绘制到画布上。 context.stroke(); } </script> </body> </html>
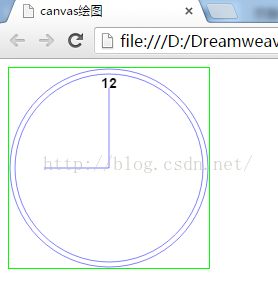
(4)、绘制文本
绘制文本主要有两个方法:fillText()和strokeText()。这两个方法接收4个参数:要绘制的文本字符串、x坐标,y坐标和可选的最大像素宽度。这两个方法有三个属性:font、textAlign和textBaseline。
<!DOCTYPE html PUBLIC "-//W3C//DTD XHTML 1.0 Transitional//EN" "http://www.w3.org/TR/xhtml1/DTD/xhtml1-transitional.dtd"> <html xmlns="http://www.w3.org/1999/xhtml"> <head> <meta http-equiv="Content-Type" content="text/html; charset=utf-8" /> <title>canvas绘图</title> </head> <body> <canvas id="drawing" width="200" height="200">A Drawing of something</canvas> <script> var drawing=document.getElementById("drawing"); //确定浏览器支持<canvas>元素 if(drawing.getContext){ //取得绘图上下文对象的引用,“2d”是取得2D上下文对象 var context=drawing.getContext("2d"); //开始路径 context.beginPath(); //绘制外圆 context.arc(100,100,99,0,2*Math.PI,false); //绘制内圆 context.moveTo(194,100);//将绘图游标移动到(x,y),不画线 context.arc(100,100,94,0,2*Math.PI,false); //绘制分针 context.moveTo(100,100); context.lineTo(100,20); //绘制时针 context.moveTo(100,100); context.lineTo(35,100); //添加文字“12” context.font="bold 14px Arial"; context.textAlign="center"; context.textBaseline="middle";//文本的基线 context.fillText("12",100,15); context.strokeStyle="rgba(0,0,255,0.5)"; //最后必须调用stroke()方法,这样才能把图像绘制到画布上。 context.stroke(); } </script> </body> </html>
(5)、变换
<!DOCTYPE html PUBLIC "-//W3C//DTD XHTML 1.0 Transitional//EN" "http://www.w3.org/TR/xhtml1/DTD/xhtml1-transitional.dtd"> <html xmlns="http://www.w3.org/1999/xhtml"> <head> <meta http-equiv="Content-Type" content="text/html; charset=utf-8" /> <title>canvas绘图</title> </head> <body> <canvas id="drawing" width="200" height="200">A Drawing of something</canvas> <script> var drawing=document.getElementById("drawing"); //确定浏览器支持<canvas>元素 if(drawing.getContext){ //取得绘图上下文对象的引用,“2d”是取得2D上下文对象 var context=drawing.getContext("2d"); //开始路径 context.beginPath(); //缩放图像 /*scale(scaleX,scaleY):缩放图像,在x方向乘以scaleX,在y方向乘以scaleY。 scaleX和scaleY的默认值都是1.0 */ context.scale(0.8,0.8); //绘制外圆 context.arc(100,100,99,0,2*Math.PI,false); //绘制内圆 context.moveTo(194,100);//将绘图游标移动到(x,y),不画线 context.arc(100,100,94,0,2*Math.PI,false); //变换原点 /*translate(x,y):将坐标原点移动到(x,y)。执行这个变换后,坐标(0,0)会变成之 前由(x,y)表示的点 */ context.translate(100,100); //添加文字“12” context.font="bold 14px Arial"; context.textAlign="center"; context.textBaseline="middle";//文本的基线 context.fillText("12",0,-85); //旋转表针 /*rotate(angle):围绕原点旋转图像angle弧度*/ context.rotate(1); //绘制分针 context.moveTo(0,0); context.lineTo(0,-80); //绘制时针 context.moveTo(0,0); context.lineTo(-65,0); context.strokeStyle="rgba(0,0,255,0.5)"; //最后必须调用stroke()方法,这样才能把图像绘制到画布上。 context.stroke(); } </script> </body> </html>

(6)、绘制图像
var drawing=document.getElementById("drawing"); //确定浏览器支持<canvas>元素 if(drawing.getContext){ //取得绘图上下文对象的引用,“2d”是取得2D上下文对象 var context=drawing.getContext("2d"); var image=document.getElementById("image"); context.drawImage(image,10,10,20,20);//起点为(10,10),图像大小会变成20x20像素; }
(7)、阴影
<!DOCTYPE html PUBLIC "-//W3C//DTD XHTML 1.0 Transitional//EN" "http://www.w3.org/TR/xhtml1/DTD/xhtml1-transitional.dtd"> <html xmlns="http://www.w3.org/1999/xhtml"> <head> <meta http-equiv="Content-Type" content="text/html; charset=utf-8" /> <title>canvas绘图</title> </head> <body> <canvas id="drawing" width="200" height="200">A Drawing of something</canvas> <script> var drawing=document.getElementById("drawing"); //确定浏览器支持<canvas>元素 if(drawing.getContext){ //取得绘图上下文对象的引用,“2d”是取得2D上下文对象 var context=drawing.getContext("2d"); //设置阴影 context.shadowColor="rgba(0,0,0,0.5)"//设置阴影颜色 context.shadowOffsetX=5;//设置形状或路径x轴方向的阴影偏移量,默认值为0; context.shadowOffsetY=5;//设置形状或路径y轴方向的阴影偏移量,默认值为0; context.shadowBlur=4;//设置模糊的像素数,默认值为0,即不模糊。 //绘制红色矩形 context.fillStyle="red"; context.fillRect(10,10,50,50); //绘制半透明的蓝色矩形 context.fillStyle="rgba(0,0,255,1)"; context.fillRect(30,30,50,50); } </script> </body> </html>
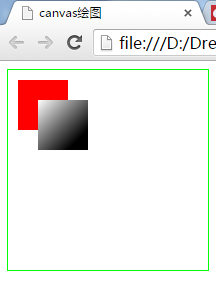
(8)、渐变
渐变由CanvasGradient实例表示,很容易通过2D上下文来创建和修改。要创建一个新的先行渐变,可以调用createLinearGradient()方法。这个方法接收4个参数:起点的x坐标,起点的y坐标,终点的x坐标,终点的y坐标。创建渐变对象后,下一步就是使用addColorStop()方法来指定色标,这个方法接收两个参数:色标位置和css颜色值。色标位置是一个0(开始的颜色)到1(结束的颜色)之间的数据。
<!DOCTYPE html PUBLIC "-//W3C//DTD XHTML 1.0 Transitional//EN" "http://www.w3.org/TR/xhtml1/DTD/xhtml1-transitional.dtd"> <html xmlns="http://www.w3.org/1999/xhtml"> <head> <meta http-equiv="Content-Type" content="text/html; charset=utf-8" /> <title>canvas绘图</title> </head> <body> <canvas id="drawing" width="200" height="200">A Drawing of something</canvas> <script> var drawing=document.getElementById("drawing"); //确定浏览器支持<canvas>元素 if(drawing.getContext){ //取得绘图上下文对象的引用,“2d”是取得2D上下文对象 var context=drawing.getContext("2d"); //设置渐变 var gradient=context.createLinearGradient(30,30,70,70); gradient.addColorStop(0,"white"); gradient.addColorStop(1,"black"); //绘制红色矩形 context.fillStyle="red"; context.fillRect(10,10,50,50); //绘制渐变矩形 context.fillStyle=gradient; context.fillRect(30,30,50,50); } </script> </body> </html>
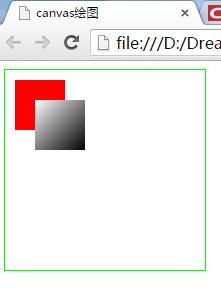
为了确保渐变与形状对齐,有时候可以考虑使用函数来确保坐标合适,例如:
function createRectLinearGradient(context,x,y,width,height){ return context.createLinearGradient(x,y,x+width,y+height); }
<!DOCTYPE html PUBLIC "-//W3C//DTD XHTML 1.0 Transitional//EN" "http://www.w3.org/TR/xhtml1/DTD/xhtml1-transitional.dtd"> <html xmlns="http://www.w3.org/1999/xhtml"> <head> <meta http-equiv="Content-Type" content="text/html; charset=utf-8" /> <title>canvas绘图</title> </head> <body> <canvas id="drawing" width="200" height="200">A Drawing of something</canvas> <script> var drawing=document.getElementById("drawing"); //确定浏览器支持<canvas>元素 if(drawing.getContext){ //取得绘图上下文对象的引用,“2d”是取得2D上下文对象 var context=drawing.getContext("2d"); //设置渐变 var gradient=createRectLinearGradient(context,30,30,50,50); gradient.addColorStop(0,"white"); gradient.addColorStop(1,"black"); //绘制红色矩形 context.fillStyle="red"; context.fillRect(10,10,50,50); //绘制渐变矩形 context.fillStyle=gradient; context.fillRect(30,30,50,50); } //确保渐变与形状对齐 function createRectLinearGradient(context,x,y,width,height){ return context.createLinearGradient(x,y,x+width,y+height); } </script> </body> </html>
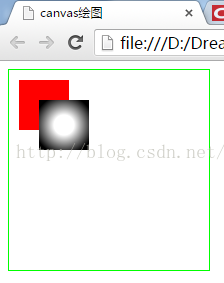
要创建径向渐变(或放射渐变),可以使用createRadialGradient()方法,这个方法接收6个参数,对应着两个圆的圆心和半径,
<!DOCTYPE html PUBLIC "-//W3C//DTD XHTML 1.0 Transitional//EN" "http://www.w3.org/TR/xhtml1/DTD/xhtml1-transitional.dtd"> <html xmlns="http://www.w3.org/1999/xhtml"> <head> <meta http-equiv="Content-Type" content="text/html; charset=utf-8" /> <title>canvas绘图</title> </head> <body> <canvas id="drawing" width="200" height="200">A Drawing of something</canvas> <script> var drawing=document.getElementById("drawing"); //确定浏览器支持<canvas>元素 if(drawing.getContext){ //取得绘图上下文对象的引用,“2d”是取得2D上下文对象 var context=drawing.getContext("2d"); //设置渐变 var gradient=context.createRadialGradient(55,55,10,55,55,30); gradient.addColorStop(0,"white"); gradient.addColorStop(1,"black"); //绘制红色矩形 context.fillStyle="red"; context.fillRect(10,10,50,50); //绘制渐变矩形 context.fillStyle=gradient; context.fillRect(30,30,50,50); } </script> </body> </html>
(9)、模式
模式其实就是重复的图像,可以用来填充或描边图形
var drawing=document.getElementById("drawing"); //确定浏览器支持<canvas>元素 if(drawing.getContext){ //取得绘图上下文对象的引用,“2d”是取得2D上下文对象 var context=drawing.getContext("2d"); var image=document.images[0]; pattern=context.createPattern(image,"repeat"); context.fillStyle=pattern; context.fillRect(10,10,150,150); }
以上就是本文的全部内容,希望对大家的学习有所帮助,也希望大家多多支持查字典教程网。
【JavaScript基础——使用Canvas绘图】相关文章:
★ JavaScript中Math.SQRT2属性的使用详解
★ JavaScript中的Math.sin()方法使用详解
★ JavaScript使用addEventListener添加事件监听用法实例
★ JavaScript中Number.MIN_VALUE属性的使用示例
★ JavaScript正则表达式中的global属性的使用