搭建环境
项目github地址
项目中涉及了json-server模拟get请求,用了vue-router;
关于Vue生命周期以及vue-router钩子函数详解
生命周期
1.0版本
1.哪些生命周期接口
init Created beforeCompile Compiled Ready Attatched Detached beforeDestory destoryed
2.执行顺序
1. 不具有keep-alive
进入:
init->create->beforeCompile->complied->attatched->ready
移出:
beforeDestory->detached->destoryed;
2. 具有keep-alive
第一次的时候
进入:
init->create->beforeCompile->complied->attatched->ready
移出:
detached;
之后的每次
进入:
attatched
移出:
detached
钩子函数
3.钩子函数有哪些
data
activete
deactivate
canactivate
candeactivate
4.执行顺序
进入:
canactivate->actiavte->date
移出:
candeactivate->deactiavte
两者一起出现
5.对于一个组件A里面有子组件B,当这个组件A进行移入和移出操作时,组件之间的生命周期喝钩子函数的执行顺序参考如下:
例如
A.vue
<div>
<B></B>
</div>
备注:下面括号里的是嵌套的子组件
1. 不具有keep-alive:
移入:
1. canActivate;
2. init;
3. create;
4. beforeCompile;
5. (嵌套子组件:init,create,beforeCompile,compile);
6. compile;
7. activate;
8. data;
9. attached;
10. (子组件attached);
11. (子组件ready);
12. ready;
移出:
13. canDeactivate;
14. deactivate;
15. beforeDestroy;
16. (子组件beforeDestroy);
17. (子组件destoryed);
18. detached;
19. (子组件detached);
20. destoryed;
2. 具有keep-alive:
移入:
1. canActivate;
2. activate;
3. data;
4. attached;
5. (子组件attached);
移出:
6. canDeactivate;
7. deactivate;
8. detached;
9. (子组件detached);
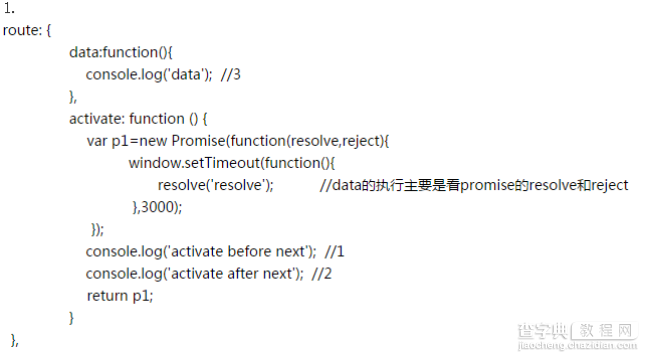
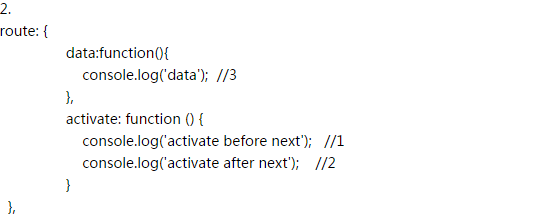
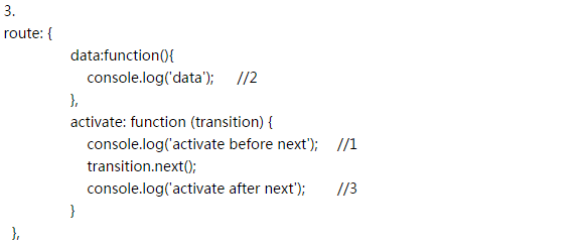
6.钩子函数activate和data的执行顺序
涉及钩子函数异步 resolve 规则:
1.如果钩子返回一个 Promise,则钩子何时 resolve 取决于该 Promise 何时 resolve。
2.如果钩子既不返回 Promise,也没有任何参数,则该钩子将被同步 resolve。
3.如果钩子不返回 Promise,但是有一个参数(transition),则钩子会等到transition.next(),transition.abort()或是transition.redirect()之一被调用才 resolve。
4.在验证类的钩子,比如canActivate,canDeactivate以及全局 beforeEach 钩子中,如果返回值是一个布尔值 (Boolean),也会使得钩子同步 resolve。
7.根据什么可以确保界面已经更新完成,也就是说挂在完成
执行生命周期attached说明已挂载
双向绑定与渲染机制
1.数据的监听和触发(订阅和发布observer)
src目录下observer:
1. array.js
2. dep.js;(实现一个发布订阅对象)
3. index.js;(利用Object.defineProperty这个API,并为此属性设计一个特殊的 getter/setter,然后在 setter 里触发一个函数,达到监听的效果);
下面是这部分的源码
Object.defineProperty(obj, key, { enumerable: true, configurable: true, get: function reactiveGetter () { var value = getter ? getter.call(obj) : val if (Dep.target) { dep.depend() if (childOb) { childOb.dep.depend() } if (isArray(value)) { for (var e, i = 0, l = value.length; i < l; i++) { e = value[i] e && e.__ob__ && e.__ob__.dep.depend() } } } return value }, set: function reactiveSetter (newVal) { var value = getter ? getter.call(obj) : val if (newVal === value) { return } if (setter) { setter.call(obj, newVal) } else { val = newVal } childOb = observe(newVal) dep.notify() } })
简化上面的监听与触发代码如下:
function notidy(obj,key){ console.log(key+" has changed"); console.log(key+" now is: "+obj[key]); } function ToData(key,val){ var ob=this; Object.defineProperty(ob,key,{ enumerable:true, configurable:true, get:function(){ return val; }, set:function(newval){ if(newval==val){ return; } val=newval; notidy(this,key); } }) }
src目录下directive.js
在directive中可以看到一系列解析出来的属性,而directive的实例化可以在utils/lifecycle.js中看到。
下面这段代码在Directive.prototype._bind中
var watcher = this._watcher = new Watcher( this.vm, this.expression, this._update, // callback { filters: this.filters, twoWay: this.twoWay, deep: this.deep, preProcess: preProcess, postProcess: postProcess, scope: this._scope } ) // v-model with inital inline value need to sync back to // model instead of update to DOM on init. They would // set the afterBind hook to indicate that. if (this.afterBind) { this.afterBind() } else if (this.update) { this.update(watcher.value) } Directive.prototype.set = function (value) { /* istanbul ignore else */ if (this.twoWay) { this._withLock(function () { this._watcher.set(value) }) } else if (process.env.NODE_ENV !== 'production') { warn( 'Directive.set() can only be used inside twoWay' + 'directives.' ) } }
src目录下Watch.js:
从下面的代码可以找到watcher对象通过addDep方法实现订阅
Watcher.prototype.addDep = function (dep) { var id = dep.id if (!this.newDepIds.has(id)) { this.newDepIds.add(id) this.newDeps.push(dep) if (!this.depIds.has(id)) { dep.addSub(this) } } }
2.前面说那么多关于双向绑定,其实这也是VUE内部的渲染机制,总结如下
1. 通过 observer 对 data 进行了监听,并且提供订阅某个数据项的变化的能力
2. 把 template 解析成一段 document fragment,然后解析其中的 directive,得到每一个 directive 所依赖的数据项及其更新方法。比如 v-text="message" 被解析之后 (这里仅作示意,实际程序逻辑会更严谨而复杂):所依赖的数据项this.$data.message,以及相应的视图更新方法 node.textContent = this.$data.message
3. 通过 watcher 把上述两部分结合起来,即把 directive 中的数据依赖订阅在对应数据的 observer 上,这样当数据变化的时候,就会触发 observer,进而触发相关依赖对应的视图更新方法,最后达到模板原本的关联效果。
3.vue是如何改进了v-for具有相同数据渲染出错的?
数组的渲染
未使用track-by的数组渲染内部缓存的默认id是数组的值value,意味着如果数组中存在相同的值,通过id获取的是相同的一个fragement片段,最后通过insertBefore操作DOM由于是相同的一个实例,故不会生效。
<div> <ul id='test'> <li id="child1">child1</li> <li id="child">child2</li> </ul> </div> <script> _element1=document.getElementById('child1'); _element2=document.getElementById('child2'); document.getElementById('test').insertBefore(_element1,_element2); </script>
渲染的结果是child2在child1前面
使用track-by目的是自定义这个内部的id,使得数组中具有相同的值的几项都不会选择到相同的实例,对于使用track-by='$index'还是其他唯一区分的id值有一定的区别,各有好处。
使用$index使得反转的数据没有移动操作,而对于使用其他的id在顺序不一样的时候会有相应的移动操作。
对象的渲染
对象一般使用键作为内部缓存对象的id,通过track-by也可以自定义这个id提高性能。
vm.model = { a: { id: 1, val: "model1"}, b: { id: 2, val: "model2"}, c: { id: 3, val: "model2"}, }
列表更新
vm.model = { d: { id: 1, val: "model1"}, e: { id: 2, val: "model2"}, f: { id: 3, val: "model2"} }
以上所述是小编给大家介绍的vue从使用到源码实现教程详解,希望对大家有所帮助,如果大家有任何疑问请给我们留言,小编会及时回复大家的。在此也非常感谢大家对查字典教程网的支持!
【vue从使用到源码实现教程详解】相关文章:
★ AspNet中使用JQuery上传插件Uploadify详解
★ Nodejs中session的简单使用及通过session实现身份验证的方法