最近火爆全球的PC游戏Battlerite(战争仪式)在倒计时的会生成一种类似夜幕降临的效果,会以战场中心为圆心,某个长度为半径的范围外是暗的,而这个半径会逐渐缩小,而圆之外的阴暗部分是附着地形的,本文就尝试使用屏幕后处理的手段来实现这种效果。
(暂时缺少Battlerite的截图,稍后会补上)
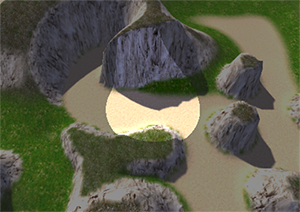
首先看效果图:
注:本文参考了Tasharen Fog of War插件
创建一个C#脚本,命名为NightFall.cs,为NightFall类创建一些公共变量(nightColor,center和radius),另外还需要一个NightFall.shader。
首先,我们要确定这个效果是在场景渲染之后还未送到屏幕显示之前的实现的,所以,NightFall脚本是要挂载到主Camera上的(添加特性[RequireComponent(typeof(Camera))]),并要实现OnRenderImage方法。
其次,在OnRenderImage方法里,我们最终需要调用Graphics.Blit方法,而这个方法的第三个参数是Material类型,所以我们需要在代码里创建一个临时材质,这个材质使用了NightFall.shader。
再次,我们需要在Shader里面将屏幕坐标转换为世界坐标,来计算与世界中心的坐标,所以我们需要MVP的逆矩阵(参考Shader山下(十六)坐标空间与转换矩阵)。
最后,为了附着地形,我们需要在Shader计算深度,也就是坐标点与摄像机的相对距离,所以需要摄像机的位置。
C#的代码:
using UnityEngine;
[RequireComponent(typeof(Camera))] public class NightFall : MonoBehaviour { public Shader shader; public Color nightColor = new Color(0.05f, 0.05f, 0.05f, 0.5f); public Vector3 center = Vector3.zero; public float radius = 10; Camera mCam; Matrix4x4 mInverseMVP; Material mMat; /// The camera we're working with needs depth. void OnEnable () { mCam = GetComponent<Camera>(); mCam.depthTextureMode = DepthTextureMode.Depth; if (shader == null) shader = Shader.Find("Image Effects/NightFall"); } /// Destroy the material when disabled. void OnDisable () { if (mMat) DestroyImmediate(mMat); } /// Automatically disable the effect if the shaders don't support it. void Start () { if (!SystemInfo.supportsImageEffects || !shader || !shader.isSupported) { enabled = false; } } // Called by camera to apply image effect void OnRenderImage (RenderTexture source, RenderTexture destination) { print (nightColor); print (destination); // Calculate the inverse modelview-projection matrix to convert screen coordinates to world coordinates mInverseMVP = (mCam.projectionMatrix * mCam.worldToCameraMatrix).inverse; if (mMat == null) { mMat = new Material(shader); mMat.hideFlags = HideFlags.HideAndDontSave; } Vector4 camPos = mCam.transform.position; // This accounts for Anti-aliasing on Windows flipping the depth UV coordinates. // Despite the official documentation, the following approach simply doesn't work: // http://docs.unity3d.com/Documentation/Components/SL-PlatformDifferences.html if (QualitySettings.antiAliasing > 0) { RuntimePlatform pl = Application.platform; if (pl == RuntimePlatform.WindowsEditor || pl == RuntimePlatform.WindowsPlayer || pl == RuntimePlatform.WindowsWebPlayer) { camPos.w = 1f; } } mMat.SetVector("_CamPos", camPos); mMat.SetMatrix("_InverseMVP", mInverseMVP); mMat.SetColor("_NightColor", nightColor); mMat.SetVector ("_Center", center); mMat.SetFloat ("_Radius", radius); Graphics.Blit(source, destination, mMat); } }
Shader代码:
Shader "Image Effects/NightFall" { Properties { _NightColor ("Night Color", Color) = (0.05, 0.05, 0.05, 0.05) _Center ("Center", Vector) = (0,0,0,0) _Radius ("Radius", float) = 10 } SubShader { Pass { ZTest Always Cull Off ZWrite Off Fog { Mode off } Blend SrcAlpha OneMinusSrcAlpha CGPROGRAM #pragma vertex vert_img #pragma fragment frag vertex:vert #pragma fragmentoption ARB_precision_hint_fastest #include "UnityCG.cginc" sampler2D _CameraDepthTexture; uniform float4x4 _InverseMVP; uniform float4 _CamPos; uniform half4 _NightColor; uniform half4 _Center; uniform half _Radius; struct Input { float4 position : POSITION; float2 uv : TEXCOORD0; }; void vert (inout appdata_full v, out Input o) { o.position = mul(UNITY_MATRIX_MVP, v.vertex); o.uv = v.texcoord.xy; } float3 CamToWorld (in float2 uv, in float depth) { float4 pos = float4(uv.x, uv.y, depth, 1.0); pos.xyz = pos.xyz * 2.0 - 1.0; pos = mul(_InverseMVP, pos); return pos.xyz / pos.w; } fixed4 frag (Input i) : COLOR { #if SHADER_API_D3D9 || SHADER_API_D3D11 float2 depthUV = i.uv; depthUV.y = lerp(depthUV.y, 1.0 - depthUV.y, _CamPos.w); float depth = UNITY_SAMPLE_DEPTH(tex2D(_CameraDepthTexture, depthUV)); float3 pos = CamToWorld(depthUV, depth); #else float depth = UNITY_SAMPLE_DEPTH(tex2D(_CameraDepthTexture, i.uv)); float3 pos = CamToWorld(i.uv, depth); #endif // Limit to sea level if (pos.y < 0.0) { // This is a simplified version of the ray-plane intersection formula: t = -( N.O + d ) / ( N.D ) float3 dir = normalize(pos - _CamPos.xyz); pos = _CamPos.xyz - dir * (_CamPos.y / dir.y); } half4 col; float dis = length(pos.xz - _Center.xz); if (dis < _Radius) { col = fixed4(0,0,0,0); } else { col = _NightColor; } return col; } ENDCG } } Fallback off }
需要说明的几个点:
1、因为平台差异性,为了兼容Direct3D,所以在C#和shader里通过CamPos(_CamPos)的w分量来调整uv坐标。
2、这里虽然没有声明_MainTex,但是_MainTex实际上就是即将成像的屏幕图像,所以这里的i.uv也就是指屏幕图像的纹理坐标。
3、_CameraDepthTexture是摄像机的深度纹理,通过UNITY_SAMPLE_DEPTH方法获取深度。
4、CamToWorld里面,先是根据uv坐标和深度depth创建了一个float4的坐标值pos,然后对pos乘2减1是将这个坐标范围从[0,1]转换到了[-1,1],对应世界坐标。然后使用传入的MVP逆矩阵_InverseMVP乘以这个坐标值,就得到了屏幕点的世界坐标。最后将pos的xyz分量除以w分量,这里w分量表示因为远近而产生的缩放值。
5、在计算过世界坐标之后,对于y小于0的坐标要做一下处理,将效果限制在海平面(sea level)之上,使用射线平面相交方程(ray-plane intersection formula)的简化版本来处理。
6、最后根据距离返回色彩值。
如果要实现夜幕降临倒计时的效果,只需要在控制脚本(C#)中获取Camera上的NightFall组件,根据时间修改radius变量即可。
以上所述是小编给大家介绍的C#使用Shader实现夜幕降临倒计时的效果,希望对大家有所帮助,如果大家有任何疑问请给我们留言,小编会及时回复大家的。在此也非常感谢大家对查字典教程网的支持!
【C#使用Shader实现夜幕降临倒计时的效果】相关文章:
★ C#利用System.Threading.Thread.Sleep即时输出信息的详解