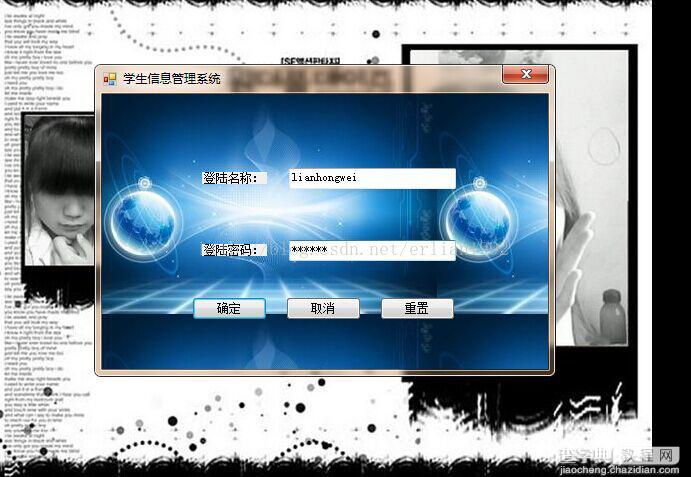
先来补充一下学生信息管理系统登录窗体,在完成的过程中总是遇到各种各样的问题,对于登录窗体的设计还是存在着一些弊端,那就是需要登录学生信息管理系统时如果输入的数据出错不必一个个删除,就需要在窗体上再添加一个清空写入数据的button控件,将其属性Text改为重置。还有一个与登录窗口设计的属性AcceptButton将其改为确定按钮的唯一名字(也就是button1),因此在按下回车键后我们也能登录到学生信息管理系统主页面相对应的CancelButton将其改为取消按钮的唯一名字(也就是button2),因此在按下退出键后也能退出登录窗口。
需要在重置的button按钮控件添加的Click事件的代码为:
<span>private void button3_Click(object sender, EventArgs e) { textBox1.Text = ""; textBox2.Text = ""; }</span>
完成改动后的登录窗口为:
下面就来设计一些需要都用到的子窗体。
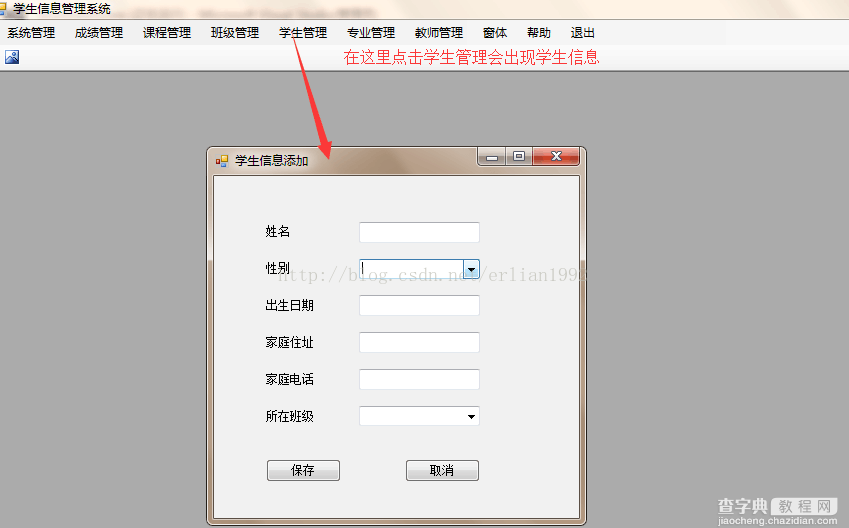
一、学生信息添加窗体
学生信息添加窗体窗体主要是用来添加学生信息或者修改学生信息,输入学号、姓名、性别、出生日期、家庭住址、家庭电话和所在班级,点击“保存”按钮即可录入或者修改学生信息记录,点击“取消”按钮,退出学生信息添加窗体。这个窗体需要用到的控件有Label控件,TextBox控件,Button控件,Panel控件和ComboBox控件。在学生信息管理系统主页面中的菜单选项中找到学生管理,再次单击学生信息就会出现学生信息添加的窗口。
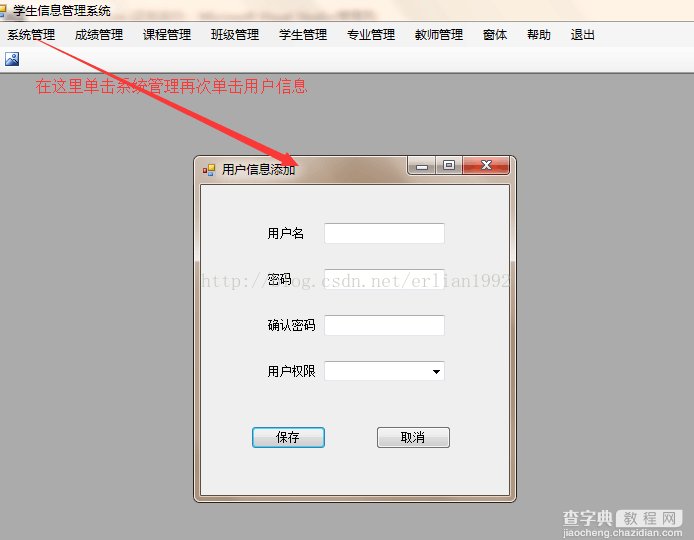
二、用户信息添加窗体
用户信息添加窗体主要是实现登录用户的添加操作。该窗体中包含了用户名、密码、确认密码和用户权限这些信息。当点击“保存”按钮时,即可以将用户的这些信息添加到数据库中。点击“取消”按钮,可以退出用户信息添加窗体。这个窗体需要用到的控件有Label控件,TextBox控件,Button控件,Panel控件和ComboBox控件。在学生信息管理系统主页面中的菜单选项中找到系统管理,再次单击用户信息就会出现用户信息添加的窗口。
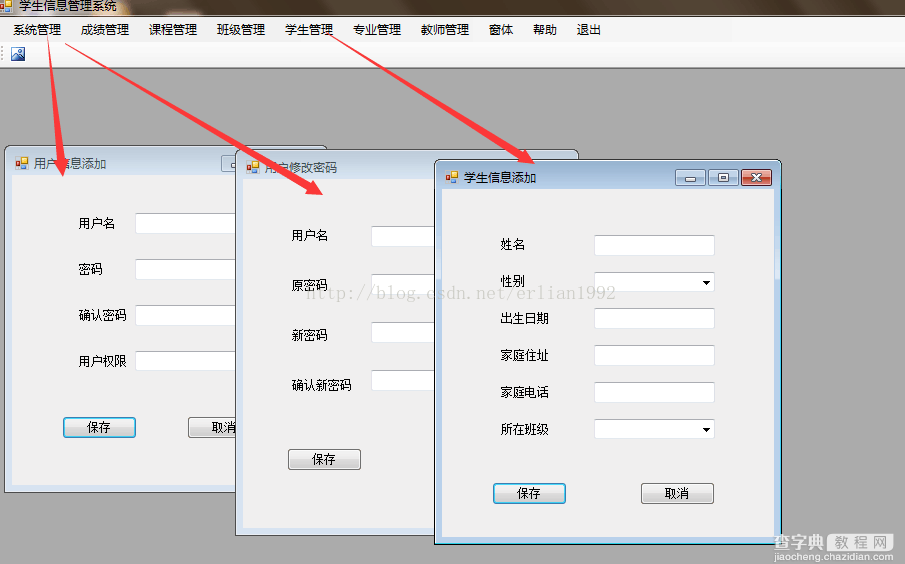
三、用户修改密码窗体
用户修改密码窗体主要是实现用户修改密码的功能。该窗体中,可以通过输入用户名和原密码,然后输入新密码和确认新密码,来修改用户的登录密码。这个窗体需要用到的控件有Label控件,TextBox控件,Button控件,Panel控件。在学生信息管理系统主页面中的菜单选项中找到系统管理,再次单击用户修改密码就会出现用户修改密码添加的窗口。

上述三个子窗体中的取消按钮都是一样的代码写入:
<span>private void button2_Click(object sender, EventArgs e) { Close(); }</span>
经过上述的改动和子窗体的添加后的完整的Form1(学生信息管理系统登录窗口)的代码为:
<span>using System; using System.Collections.Generic; using System.ComponentModel; using System.Data; using System.Drawing; using System.Linq; using System.Text; using System.Threading.Tasks; using System.Windows.Forms; namespace WindowsForms { public partial class Form1 : Form { public Form1() { InitializeComponent(); } private void button1_Click(object sender, EventArgs e) { string str = textBox1.Text;//获取你在textBox1中输入的信息 Form2 ad = new Form2(str);//创建一个学生信息管理系统主界面的对象 ad.Show();//点击确定后进入学生信息管理系统主界面 this.Hide();//单击确定后隐藏登录窗口 } private void button2_Click(object sender, EventArgs e) { Application.Exit();//点击取消退出整个程序 } private void button3_Click(object sender, EventArgs e) { textBox1.Text = "";//这是清空你写入的用户名称 textBox2.Text = "";//这是清空你写入的用户密码 } } }</span></span>
完整的Form2(学生信息管理系统主页面)的代码为:
<span><span>using System; using System.Collections.Generic; using System.ComponentModel; using System.Data; using System.Drawing; using System.Linq; using System.Text; using System.Threading.Tasks; using System.Windows.Forms; namespace WindowsForms { public partial class Form2 : Form { public Form2(string s) { InitializeComponent(); tssl_name.Text = s;//将登陆窗口textBox1输入的信息传递给状态栏Text属性 } private void 退出ToolStripMenuItem_Click(object sender, EventArgs e) { Application.Exit();//单击主菜单中的退出我们退出整个程序 } private void menuStrip1_ItemClicked(object sender, ToolStripItemClickedEventArgs e) { } private void toolStripButton1_Click(object sender, EventArgs e) { Children qq = new Children();//创建一个子窗体的实例 qq.MdiParent = this;//要求子窗体的父窗体是MDI窗体 qq.Show(); } private void 学生信息ToolStripMenuItem_Click(object sender, EventArgs e) { Children1 c1 = new Children1(); c1.MdiParent = this; c1.Show(); } private void 用户信息ToolStripMenuItem_Click(object sender, EventArgs e) { Children2 c2 = new Children2(); c2.MdiParent = this; c2.Show(); } private void 用户密码修改ToolStripMenuItem_Click(object sender, EventArgs e) { Children3 c3 = new Children3(); c3.MdiParent = this; c3.Show(); } } }</span>
完整的子窗体Children1(学生信息添加窗体)的代码为:
<span>using System; using System.Collections.Generic; using System.ComponentModel; using System.Data; using System.Drawing; using System.Linq; using System.Text; using System.Threading.Tasks; using System.Windows.Forms; namespace WindowsForms { public partial class Children1 : Form { public Children1() { InitializeComponent(); } private void button2_Click(object sender, EventArgs e) { Close(); } } }</span>
完整的子窗体Children2(用户信息添加窗体)的代码为:
<span>using System; using System.Collections.Generic; using System.ComponentModel; using System.Data; using System.Drawing; using System.Linq; using System.Text; using System.Threading.Tasks; using System.Windows.Forms; namespace WindowsForms { public partial class Children2 : Form { public Children2() { InitializeComponent(); } private void button2_Click(object sender, EventArgs e) { Close(); } private void s(object sender, EventArgs e) { } } }</span>
完整的子窗体Children2(用户密码修改窗体)的代码为:
<span>using System; using System.Collections.Generic; using System.ComponentModel; using System.Data; using System.Drawing; using System.Linq; using System.Text; using System.Threading.Tasks; using System.Windows.Forms; namespace WindowsForms { public partial class Children3 : Form { public Children3() { InitializeComponent(); } private void button2_Click(object sender, EventArgs e) { Close(); } } }</span>
在登录学生信息管理系统主页面打开子窗体的界面为:
在文件中找到你所编写的程序,打开exe运行学生信息管理系统,检验是否与自己设计想象的有什么不同,不同的话进行修改调试,直到与自己预想的结果相吻合就可以了。
以上就是本文的全部内容,希望对大家的学习有所帮助。
【Winform学生信息管理系统各子窗体剖析(3)】相关文章:
★ Winform之TextBox输入日期格式验证yyyy-mm-dd
★ winform使用委托和事件来完成两个窗体之间通信的实例
★ C# Winform 调用系统接口操作 INI 配置文件的代码
★ C# WinForm中Panel实现用鼠标操作滚动条的实例方法