在上篇文章在winform下实现左右布局多窗口界面的方法已经实现了左右布局多窗口界面,今天本来是研究基于winform的插件编程,没想到顺便又找到了另一种实现方案,这种实现方案更简单,要写的代码也很少,具体实现如下。
可视化设计部份:
1.父窗口:ParentForm的IsMdiContainer 设置为 true,即:this.IsMdiContainer=true;
2.在父窗口中添加一个顶部菜单:menuStrip1,并新增一个菜单项:Windows,且将menuStrip1的MdiWindowListItem设置为该Windows菜单对象,即: this.menuStrip1.MdiWindowListItem = this.windowsToolStripMenuItem;
3.在父窗口中添加一个树形菜单:treeView1,并将其Dock设为左靠齐,即:this.treeView1.Dock = System.Windows.Forms.DockStyle.Left;且将margin设为0;
4.在父窗口中添加一个Panel:panel1,且将其width设为3;
以下是设计后自动生成的代码:
namespace WinFormTest { partial class ParentForm { /// <summary> /// 必需的设计器变量。 /// </summary> private System.ComponentModel.IContainer components = null; /// <summary> /// 清理所有正在使用的资源。 /// </summary> /// <param name="disposing">如果应释放托管资源,为 true;否则为 false。</param> protected override void Dispose(bool disposing) { if (disposing && (components != null)) { components.Dispose(); } base.Dispose(disposing); } #region Windows 窗体设计器生成的代码 /// <summary> /// 设计器支持所需的方法 - 不要 /// 使用代码编辑器修改此方法的内容。 /// </summary> private void InitializeComponent() { this.menuStrip1 = new System.Windows.Forms.MenuStrip(); this.windowsToolStripMenuItem = new System.Windows.Forms.ToolStripMenuItem(); this.treeView1 = new System.Windows.Forms.TreeView(); this.panel1 = new System.Windows.Forms.Panel(); this.menuStrip1.SuspendLayout(); this.SuspendLayout(); // // menuStrip1 // this.menuStrip1.Items.AddRange(new System.Windows.Forms.ToolStripItem[] { this.windowsToolStripMenuItem}); this.menuStrip1.Location = new System.Drawing.Point(0, 0); this.menuStrip1.MdiWindowListItem = this.windowsToolStripMenuItem; this.menuStrip1.Name = "menuStrip1"; this.menuStrip1.Size = new System.Drawing.Size(684, 25); this.menuStrip1.TabIndex = 0; this.menuStrip1.Text = "menuStrip1"; // // windowsToolStripMenuItem // this.windowsToolStripMenuItem.Name = "windowsToolStripMenuItem"; this.windowsToolStripMenuItem.Size = new System.Drawing.Size(73, 21); this.windowsToolStripMenuItem.Text = "Windows"; // // treeView1 // this.treeView1.Dock = System.Windows.Forms.DockStyle.Left; this.treeView1.Location = new System.Drawing.Point(0, 25); this.treeView1.Margin = new System.Windows.Forms.Padding(0); this.treeView1.Name = "treeView1"; this.treeView1.Size = new System.Drawing.Size(228, 380); this.treeView1.TabIndex = 3; this.treeView1.NodeMouseDoubleClick += new System.Windows.Forms.TreeNodeMouseClickEventHandler(this.treeView1_NodeMouseDoubleClick); // // panel1 // this.panel1.Anchor = ((System.Windows.Forms.AnchorStyles)(((System.Windows.Forms.AnchorStyles.Top | System.Windows.Forms.AnchorStyles.Bottom) | System.Windows.Forms.AnchorStyles.Left))); this.panel1.BackColor = System.Drawing.Color.Red; this.panel1.BorderStyle = System.Windows.Forms.BorderStyle.FixedSingle; this.panel1.Cursor = System.Windows.Forms.Cursors.VSplit; this.panel1.Location = new System.Drawing.Point(230, 28); this.panel1.Margin = new System.Windows.Forms.Padding(0); this.panel1.Name = "panel1"; this.panel1.Size = new System.Drawing.Size(3, 100); this.panel1.TabIndex = 5; // // Form1 // this.AutoScaleDimensions = new System.Drawing.SizeF(6F, 12F); this.AutoScaleMode = System.Windows.Forms.AutoScaleMode.Font; this.ClientSize = new System.Drawing.Size(684, 405); this.Controls.Add(this.panel1); this.Controls.Add(this.treeView1); this.Controls.Add(this.menuStrip1); this.IsMdiContainer = true; this.MainMenuStrip = this.menuStrip1; this.Name = "Form1"; this.Text = "Form1"; this.Load += new System.EventHandler(this.Form1_Load); this.Resize += new System.EventHandler(this.Form1_Resize); this.menuStrip1.ResumeLayout(false); this.menuStrip1.PerformLayout(); this.ResumeLayout(false); this.PerformLayout(); } #endregion private System.Windows.Forms.MenuStrip menuStrip1; private System.Windows.Forms.ToolStripMenuItem windowsToolStripMenuItem; private System.Windows.Forms.TreeView treeView1; private System.Windows.Forms.Panel panel1; } }
编码部份:
其实上面的设计后,如果通过以下定义的方法打开一个子窗口,则直接实现了左右布局且包含多子窗口的界面。
private void ShowChildForm<TForm>() where TForm : Form, new() { Form childForm = new TForm(); childForm.MdiParent = this; childForm.Name = "ChildForm - " + DateTime.Now.Millisecond.ToString(); childForm.Text = childForm.Name; childForm.Show(); }
当然仍然有不完美的地方,那就是左边菜单栏宽度不能动态调整,而又没有用到splitContainer,故我们只有自己来实现,其实也很简单,步骤如下:
1.在父窗口构造函数中加入初始化panel1(用作分割器)位置及订阅相关事件,代码如下:
public ParentForm() { InitializeComponent(); panel1.MouseDown += panel1_MouseDown; panel1.MouseUp += panel1_MouseUp; panel1.MouseMove += panel1_MouseMove; panel1.Top = menuStrip1.Height; panel1.Left = treeView1.Left + treeView1.Width; panel1.Height = panel1.Parent.Height; }
上述代码的作用是:1.保证panel1的高度与位置与左侧树形菜单控件相匹配;2.订阅的三个Mouse事件主要是为了后面实现移动panel1。
2.实现订阅的三个Mouse事件所对应的方法,分别为鼠标按下、鼠标移动、鼠标松开,代码如下:
private bool startMove = false; //用于标记是否在移动中 void panel1_MouseMove(object sender, MouseEventArgs e) { if (startMove) { panel1.Left += e.X; } } void panel1_MouseUp(object sender, MouseEventArgs e) { if (startMove) { panel1.Left += e.X; startMove = false; this.treeView1.Width = panel1.Left; } } void panel1_MouseDown(object sender, MouseEventArgs e) { startMove = true; }
上述代码作用:按下鼠标标记为开始移动,然后移动鼠标,若是标记移动中,说明是要移动panel1,故直接将鼠标当前的X坐标位置累加到panel1.Left属性上,从而实现移动,当鼠标弹起后,则将树形菜单的宽度设置为panel1.Left,从而实现树形菜单随panel1的移动而改变大小。
同时为了保证panel1的高度始终与树形菜单相同,在父窗口的Resize方法加入动态调整panel1的高度,代码如下:
private void ParentForm_Resize(object sender, EventArgs e) { panel1.Height = panel1.Parent.Height; }
到此就完成了整个的实现方案,为了便于模拟在树形菜单中双击打开子窗口的效果,同时也添加了如下代码:
private void ParentForm_Load(object sender, EventArgs e) { LoadMenuNodes(); } private void LoadMenuNodes() //实现情况应该是从数据库及用户权限来进行动态创建菜单项 { this.treeView1.Nodes.Clear(); var root = this.treeView1.Nodes.Add("Root"); for (int i = 1; i <= 10; i++) { var section = root.Nodes.Add("Section-" + i); int maxNodes = new Random(i).Next(1, 10); for (int n = 1; n <= maxNodes; n++) { section.Nodes.Add(string.Format("Level-{0}-{1}", i, n)); } } } private void treeView1_NodeMouseDoubleClick(object sender, TreeNodeMouseClickEventArgs e) { if (e.Node.Nodes.Count <= 0)//当非父节点(即:实际的功能节点) { ShowChildForm<ChildForm>(); } }
附上完整的实现代码:
using System; using System.Collections.Generic; using System.ComponentModel; using System.Data; using System.Drawing; using System.Linq; using System.Text; using System.Threading.Tasks; using System.Windows.Forms; namespace WinFormTest { public partial class ParentForm : Form { private bool startMove = false; public ParentForm() { InitializeComponent(); panel1.MouseDown += panel1_MouseDown; panel1.MouseUp += panel1_MouseUp; panel1.MouseMove += panel1_MouseMove; panel1.Top = menuStrip1.Height; panel1.Left = treeView1.Left + treeView1.Width; panel1.Height = panel1.Parent.Height; } void panel1_MouseMove(object sender, MouseEventArgs e) { if (startMove) { panel1.Left += e.X; } } void panel1_MouseUp(object sender, MouseEventArgs e) { if (startMove) { panel1.Left += e.X; startMove = false; this.treeView1.Width = panel1.Left; } } void panel1_MouseDown(object sender, MouseEventArgs e) { startMove = true; } private void ParentForm_Load(object sender, EventArgs e) { LoadMenuNodes(); } private void treeView1_NodeMouseDoubleClick(object sender, TreeNodeMouseClickEventArgs e) { if (e.Node.Nodes.Count <= 0)//当非父节点(即:实际的功能节点) { ShowChildForm<ChildForm>(); } } private void ParentForm_Resize(object sender, EventArgs e) { panel1.Height = panel1.Parent.Height; } private void LoadMenuNodes() //实现情况应该是从数据库及用户权限来进行动态创建菜单项 { this.treeView1.Nodes.Clear(); var root = this.treeView1.Nodes.Add("Root"); for (int i = 1; i <= 10; i++) { var section = root.Nodes.Add("Section-" + i); int maxNodes = new Random(i).Next(1, 10); for (int n = 1; n <= maxNodes; n++) { section.Nodes.Add(string.Format("Level-{0}-{1}", i, n)); } } } private void ShowChildForm<TForm>() where TForm : Form, new() { Form childForm = new TForm(); childForm.MdiParent = this; childForm.Name = "ChildForm - " + DateTime.Now.Millisecond.ToString(); childForm.Text = childForm.Name; childForm.Show(); } } }
最终效果如下图示:
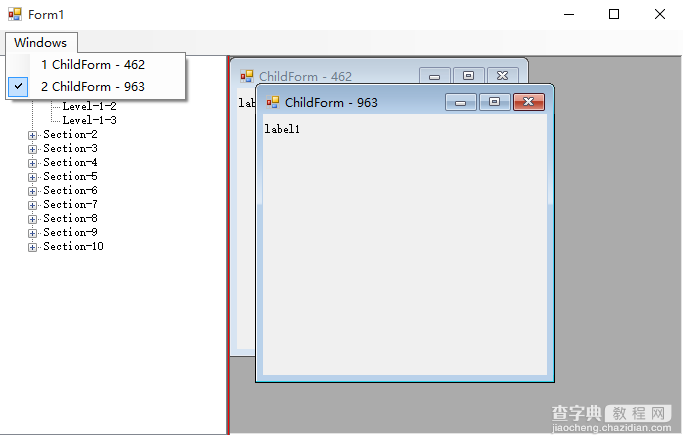
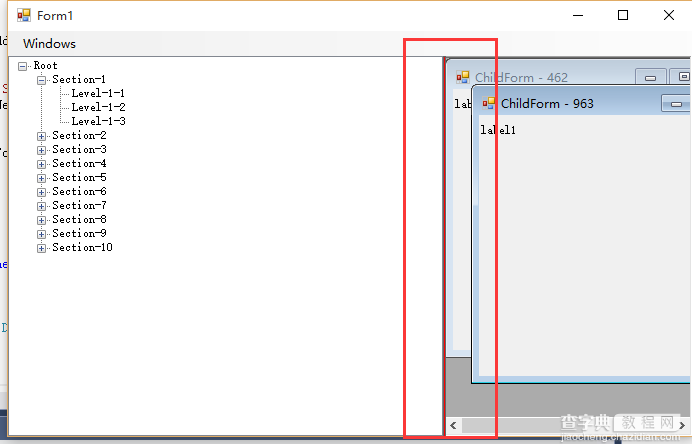
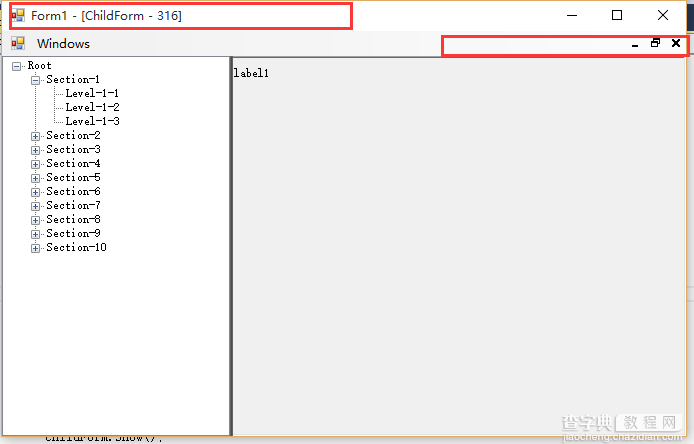
说明:我这里为了体现分割器,故将其背景色设为红色,便于大家观察,这种解决方案与之前的解决方案功能上是相同的,但有一点小小区别,之前的解决方案中子窗口的标题栏是在父窗口的容器内,而本文的解决方案中子窗口在最大化后,子窗口的标题栏会与父窗口合并,如下图示,至于大家用哪种依实际场景。
关于在winform下实现左右布局多窗口界面的方法之续篇的相关知识就给大家介绍到这里,后续时间我会继续研究winform关于插件式编程(近期工作任务要求),到时候同样会分享给大家,也欢迎大家一起交流,当然高手可以无视。
【在winform下实现左右布局多窗口界面的方法之续篇】相关文章:
★ C#用Activex实现Web客户端读取RFID功能的代码
★ winfrom 打印表格 字符串的封装实现代码 附源码下载