Android 动态改变布局
最近项目需求,动态的改变布局,为了增加客户体验,尤其是在输入框出现小键盘的时候,为了避免小键盘遮挡APP内容就需要动态改变布局:
先看下实现效果图:

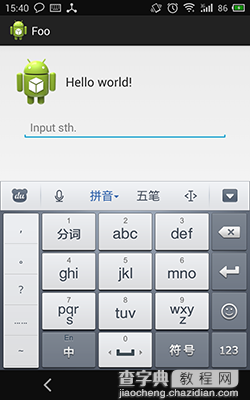
其实是一个软件的登录界面,初始是第一个图的样子,当软键盘弹出后变为第二个图的样子,因为登录界面有用户名、密码、登录按钮,不这样的话软键盘弹出后会遮住登录按钮(其实之前的实现放到了ScrollView里面,监听软键盘弹出后滚动到底部,软键盘隐藏后滚动到顶部,也是可以的)。
最简单的方法就是多加几个冗余的View,根据软键盘的状态隐藏不需要的View,显示需要的View,但这样感觉太挫了,然后就想起了前两年研究的RelativeLayout布局,RelativeLayout中子控件的布局都是相对位置,只需要在软键盘弹出隐藏时改变应用的位置规则就行了。
先来看一下布局文件
<RelativeLayout xmlns:android="http://schemas.android.com/apk/res/android" xmlns:tools="http://schemas.android.com/tools" android:id="@+id/root" android:layout_width="match_parent" android:layout_height="match_parent" android:padding="20dp" tools:context="${packageName}.${activityClass}" > <RelativeLayout android:id="@+id/container" android:layout_width="match_parent" android:layout_height="wrap_content" android:layout_alignParentTop="true" > <ImageView android:id="@+id/logo" android:layout_width="150dp" android:layout_height="150dp" android:layout_centerHorizontal="true" android:scaleType="centerCrop" android:src="@drawable/ic_launcher" tools:ignore="ContentDescription" /> <TextView android:id="@+id/label" android:layout_width="wrap_content" android:layout_height="wrap_content" android:layout_below="@id/logo" android:layout_centerHorizontal="true" android:layout_marginLeft="10dp" android:layout_marginTop="10dp" android:text="@string/hello_world" android:textSize="20sp" /> </RelativeLayout> <EditText android:id="@+id/input" android:layout_width="match_parent" android:layout_height="wrap_content" android:layout_below="@id/container" android:layout_margin="16dp" android:hint="Input sth." tools:ignore="HardcodedText" /> </RelativeLayout>
软键盘的弹出隐藏用OnGlobalLayoutListener监听实现,对Activity应用android:windowSoftInputMode="stateHidden|adjustResize",这样开始时软键盘不显示,当软键盘弹出时布局被Resize。
接下来是代码,所有的代码都在这里了
public class MainActivity extends Activity { private View root; // 最外层布局 private View logo; // Logo图标 private View label; // Logo附近的文字 private int rootBottom = Integer.MIN_VALUE; @Override protected void onCreate(Bundle savedInstanceState) { super.onCreate(savedInstanceState); setContentView(R.layout.activity_main); root = findViewById(R.id.root); logo = findViewById(R.id.logo); label = findViewById(R.id.label); root.getViewTreeObserver().addOnGlobalLayoutListener(new OnGlobalLayoutListener() { @Override public void onGlobalLayout() { Rect r = new Rect(); root.getGlobalVisibleRect(r); // 进入Activity时会布局,第一次调用onGlobalLayout,先记录开始软键盘没有弹出时底部的位置 if (rootBottom == Integer.MIN_VALUE) { rootBottom = r.bottom; return; } // adjustResize,软键盘弹出后高度会变小 if (r.bottom < rootBottom) { RelativeLayout.LayoutParams lp = (LayoutParams) logo.getLayoutParams(); // 如果Logo不是水平居中,说明是因为接下来的改变Logo大小位置导致的再次布局,忽略掉,否则无限循环 if (lp.getRules()[RelativeLayout.CENTER_HORIZONTAL] != 0) { // Logo显示到左上角 lp.addRule(RelativeLayout.CENTER_HORIZONTAL, 0); // 取消水平居中 lp.addRule(RelativeLayout.ALIGN_PARENT_LEFT); // 左对齐 // 缩小Logo为1/2 int height = logo.getHeight(); // getMeasuredHeight() int width = logo.getWidth(); lp.width = width / 2; lp.height = height / 2; logo.setLayoutParams(lp); // Logo下的文字 RelativeLayout.LayoutParams labelParams = (LayoutParams) label.getLayoutParams(); labelParams.addRule(RelativeLayout.CENTER_HORIZONTAL, 0); // 取消水平居中 labelParams.addRule(RelativeLayout.BELOW, 0); // 取消显示到logo的下方 labelParams.addRule(RelativeLayout.RIGHT_OF, R.id.logo); // 显示到Logo的右方 labelParams.addRule(RelativeLayout.CENTER_VERTICAL); // 垂直居中 label.setLayoutParams(labelParams); } } else { // 软键盘收起或初始化时 RelativeLayout.LayoutParams lp = (LayoutParams) logo.getLayoutParams(); // 如果没有水平居中,说明是软键盘收起,否则是开始时的初始化或者因为此处if条件里的语句修改控件导致的再次布局,忽略掉,否则无限循环 if (lp.getRules()[RelativeLayout.CENTER_HORIZONTAL] == 0) { // 居中Logo lp.addRule(RelativeLayout.CENTER_HORIZONTAL); lp.addRule(RelativeLayout.ALIGN_PARENT_LEFT, 0); // 还原Logo为原来大小 int height = logo.getHeight(); int width = logo.getWidth(); lp.width = width * 2; lp.height = height * 2; logo.setLayoutParams(lp); // Logo下的文字 RelativeLayout.LayoutParams labelParams = (LayoutParams) label.getLayoutParams(); labelParams.addRule(RelativeLayout.CENTER_HORIZONTAL); // 设置水平居中 labelParams.addRule(RelativeLayout.BELOW, R.id.logo); // 设置显示到Logo下面 labelParams.addRule(RelativeLayout.RIGHT_OF, 0); // 取消显示到Logo右面 labelParams.addRule(RelativeLayout.CENTER_VERTICAL, 0); // 取消垂直居中 label.setLayoutParams(labelParams); } } } }); } }
当Activity启动时也会进行Layout,此时用rootBottom记录了初始时最外层布局底部的位置,此后当软键盘弹出时,布局被压缩,再次获取同一个View底部的位置,如果比rootBottom小说明软键盘弹出了,如果大于或等于rootBottom说明软键盘隐藏了。
所有的代码都在上面,也有详细注释,有两点需要注意一下:
1.Activity启动时会进行Layout,此时会调用onGlobalLayout,而且一般会调用两次,这样第二次时会进入else语句,要注意过滤
2.软键盘弹出或隐藏时进入onGlobalLayout,此时根据需要缩放Logo的大小,并改变Logo和Label的位置,这些操作会引起再次onGlobalLayout,需要将之后的onGlobalLayout过滤掉,不然就无限循环了。
可以看到上面代码中的过滤条件,以else语句中的为例,Activity启动时会进入else,此时Logo是水平居中状态,会跳过else里面的if语句,这样就处理掉了第一种情况。
当因为软键盘收起进入else时,Logo已经因为if语句块变为了显示在左上角,所以会进入else中的if语句,重新改变Logo为水平居中,由于修改了Logo的大小和位置,会导致再次进入onGlobalLayout,仍是进入else,但此时已经设置Logo为水平居中了,不会再次进入else中的if语句,这样通过一个条件判断就处理了上面提到的两点注意事项。
关于addRule
RelativeLayout中每一个子控件所应用的规则都是通过数组保存的,如下所示:
public static final int TRUE = -1; public void addRule(int verb) { mRules[verb] = TRUE; mInitialRules[verb] = TRUE; mRulesChanged = true; } public void addRule(int verb, int anchor) { mRules[verb] = anchor; mInitialRules[verb] = anchor; mRulesChanged = true; }
以某一规则的索引为下标,值就是规则对应的anchor,如果是相对于另一个子控件,值就是另一个子控件的ID,如果是相对于父控件,值就是`TRUE`,即-1,如果没有应用某一规则值就是0,可以看到,removeRule就是把相应位置的值改为了0:
public void removeRule(int verb) { mRules[verb] = 0; mInitialRules[verb] = 0; mRulesChanged = true; }
removeRule是API 17才加的方法,为了在API 17前也能使用,可以使用它的等价方法,像上面的例子中的一样,使用addRule(verb, 0)。
感谢阅读,希望能帮助到大家,谢谢大家对本站的支持!
【Android 动态改变布局实例详解】相关文章:
★ Android开发之ContentProvider的使用详解
★ Android 动画之RotateAnimation应用详解