Google在2015的IO大会上,给我们带来了更加详细的Material Design设计规范,同时,也给我们带来了全新的Android Design Support Library,在这个support库里面,Google给我们提供了更加规范的MD设计风格的控件。最重要的是,Android Design Support Library的兼容性更广,直接可以向下兼容到Android 2.2。
这两天需要做一个仿京东详情的页面,上面的Tab切换,以前都是自己写Viewpager+fragment,或者Indicator的深度定制,一直想尝试一下TabLayout,于是就有了下面的坑。
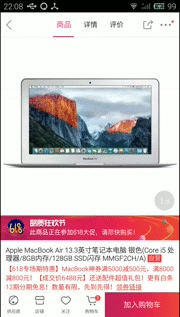
然后下面是我简单的实现效果(个人觉得很坑,还不如自己自定义的导航器)

添加引用库
dependencies { compile fileTree(dir: 'libs', include: ['*.jar']) compile 'com.android.support:appcompat-v7:24.2.0' compile 'com.android.support:design:24.2.0' compile 'com.android.support:recyclerview-v7:24.2.0' compile 'com.android.support:cardview-v7:24.2.0' }
Toolbar与TabLayout
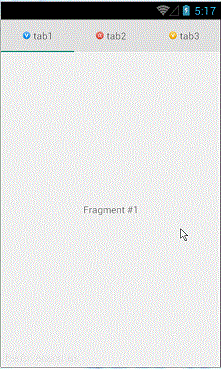
我们来看一下实现的布局:
<"1.0" encoding="utf-8"?> <LinearLayout xmlns:android="http://schemas.android.com/apk/res/android" xmlns:app="http://schemas.android.com/apk/res-auto" android:layout_width="match_parent" android:layout_height="match_parent" android:orientation="vertical"> <LinearLayout android:layout_width="match_parent" android:layout_height="wrap_content" android:background="@color/c12" android:gravity="center_vertical" android:minHeight="45dp" android:orientation="horizontal" android:paddingLeft="15dp" android:paddingRight="15dp"> <ImageView android:id="@+id/back" android:layout_width="wrap_content" android:layout_height="wrap_content" android:background="@drawable/back_icon" /> <LinearLayout android:layout_width="0dp" android:layout_height="match_parent" android:layout_weight="1" android:orientation="horizontal"> <android.support.design.widget.TabLayout android:id="@+id/tabLayout" android:layout_width="match_parent" android:layout_height="match_parent" app:tabTextAppearance="@style/TabLayoutTextStyle" app:tabGravity="center" app:tabMode="fixed" app:tabTextColor="@color/c7" app:tabSelectedTextColor="@color/c8"/> </LinearLayout> <ImageView android:id="@+id/toolbar_more" android:layout_width="wrap_content" android:layout_height="wrap_content" android:layout_marginLeft="10dp" android:background="@drawable/more_icon" /> </LinearLayout> <View /> <android.support.v4.view.ViewPager android:id="@+id/viewPager" android:layout_width="match_parent" android:layout_height="0dp" android:layout_weight="1" /> <View /> <LinearLayout android:layout_width="match_parent" android:layout_height="48dp" android:background="@color/c12" android:orientation="horizontal"> <LinearLayout android:layout_width="0dp" android:layout_height="match_parent" android:layout_weight="1"> <TextView android:layout_width="0dp" android:layout_height="match_parent" android:layout_weight="1" android:gravity="center" android:text="收藏" android:textSize="10sp" /> <View /> <TextView android:layout_width="0dp" android:layout_height="match_parent" android:layout_weight="1" android:gravity="center" android:text="购物车" android:textSize="10sp" /> </LinearLayout> <LinearLayout android:layout_width="0dp" android:layout_height="match_parent" android:layout_weight="1.5" android:background="@color/c8" android:gravity="center"> <TextView android:gravity="center" android:text="加入购物车" /> </LinearLayout> </LinearLayout> </LinearLayout>
这布局文件最关键的一点就是android.support.design.widget.TabLayout 标签中的app:tabMode=”scrollable”,他设置tab的模式为“可滑动的”。
其他的用法和Indicator的用法差不多,都需要设置适配器,然后通过数据实现页面的适配。直接上代码
Adapter
public class ProductDetailPagerAdapter extends FragmentPagerAdapter { private List<Fragment> mFragments=null; private List<String> mTitles=null; public ProductDetailPagerAdapter(FragmentManager fm, List<Fragment> mFragments,List<String> mTitles) { super(fm); this.mFragments =mFragments; this.mTitles=mTitles; } public ProductDetailPagerAdapter(FragmentManager fm, Fragment... fragments) { super(fm); this.mFragments = Arrays.asList(fragments); } @Override public Fragment getItem(int position) { return mFragments.get(position); } @Override public int getCount() { return mFragments.size(); } @Override public CharSequence getPageTitle(int position) { return mTitles.get(position); } }
主页面的相关逻辑,这里的Fragment就是简单的Fragment。
public class ProductDetailsActivity extends BaseActivity { @BindView(R.id.viewPager) ViewPager viewPager; @BindView(R.id.toolbar_more) ImageView toolbarMore; @BindView(R.id.tabLayout) TabLayout tabLayout; private List<Fragment> mFragments; private String[] titles = new String[]{"商品", "详情"}; private ProductDetailPagerAdapter productPagerAdapter = null; private MorePopupWindow popupWindow = null; @Override protected void onCreate(Bundle savedInstanceState) { super.onCreate(savedInstanceState); setContentView(R.layout.activity_product_details); ButterKnife.bind(this); init(); } private void init() { initViewPager(); } private void initViewPager() { mFragments = new ArrayList<>(); mFragments.add(new ProductFragment()); mFragments.add(new ProductDetailFragment()); productPagerAdapter = new ProductDetailPagerAdapter(getSupportFragmentManager(), mFragments, Arrays.asList(titles)); viewPager.setOffscreenPageLimit(2); viewPager.setAdapter(productPagerAdapter); viewPager.setCurrentItem(1); tabLayout.setupWithViewPager(viewPager); } @OnClick(R.id.back) public void backClick() { finish(); } @OnClick(R.id.toolbar_more) public void moreClick() { } private AdapterView.OnItemClickListener onItemClickListener = new AdapterView.OnItemClickListener() { @Override public void onItemClick(AdapterView<?> parent, View view, int position, long id) { popupWindow.dismiss(); } }; public static void open(Context context) { Intent intent = new Intent(context, ProductDetailsActivity.class); context.startActivity(intent); } }
上面的代码都比较简单不做过多的解释,在使用TabLayout的时候需要注意一点:
tabmode有两个属性值:
MODE_FIXED:Fixed tabs display all tabs concurrently and are best used with content that benefits from quick pivots between tabs.
MODE_SCROLLABLE:Scrollable tabs display a subset of tabs at any given moment, and can contain longer tab labels and a larger number of tabs.
MODE_SCROLLABLE适合很多tabs的情况,是可以滚动的,如果你要实现京东的那种挤在一起的效果就需要MODE_FIXED了。
为了更好的满足开发需要,TabLayout实现了自定义TabLayout的样式,然后通过引入
app:tabTextAppearance=""
自定义icon添加到tab
当前的TabLayout没有方法让我们去添加icon,我们可以使用SpannableString结合ImageSpan来实现
private int[] imageResId = { R.drawable.ic_one, R.drawable.ic_two, R.drawable.ic_three }; // ... @Override public CharSequence getPageTitle(int position) { // Generate title based on item position // return tabTitles[position]; Drawable image = context.getResources().getDrawable(imageResId[position]); image.setBounds(0, 0, image.getIntrinsicWidth(), image.getIntrinsicHeight()); SpannableString sb = new SpannableString(" "); ImageSpan imageSpan = new ImageSpan(image, ImageSpan.ALIGN_BOTTOM); sb.setSpan(imageSpan, 0, 1, Spannable.SPAN_EXCLUSIVE_EXCLUSIVE); return sb; }
运行,发现没有显示,这是因为TabLayout创建的tab默认设置textAllCaps属性为true,这阻止了ImageSpan被渲染出来,可以通过下面的样式文件定义来改变:
<style name="MyCustomTabLayout" parent="Widget.Design.TabLayout"> <item name="tabTextAppearance">@style/MyCustomTextAppearance</item> </style> <style name="MyCustomTextAppearance" parent="TextAppearance.Design.Tab"> <item name="textAllCaps">false</item> </style>
然后在getPageTitle方法中设置上有标题的tab
@Override public CharSequence getPageTitle(int position) { // Generate title based on item position Drawable image = context.getResources().getDrawable(imageResId[position]); image.setBounds(0, 0, image.getIntrinsicWidth(), image.getIntrinsicHeight()); // Replace blank spaces with image icon SpannableString sb = new SpannableString(" " + tabTitles[position]); ImageSpan imageSpan = new ImageSpan(image, ImageSpan.ALIGN_BOTTOM); sb.setSpan(imageSpan, 0, 1, Spannable.SPAN_EXCLUSIVE_EXCLUSIVE); return sb; }
TabLayout还支持自定义View,通过getTabView来设置,这里就不讲怎么实现了,有兴趣的可以自行研究。
部分代码:https://github.com/xiangzhihong/jingdongApp
以上就是本文的全部内容,希望对大家的学习有所帮助,也希望大家多多支持查字典教程网。
【Android TabLayout实现京东详情效果】相关文章:
★ Android定制RadioButton样式三种实现方法
★ Android RelativeLayout相对布局属性简析