首先给出跑马灯效果图

中间的色块是因为视频转成GIF造成的失真,自动忽略哈。
大家知道,横向的跑马灯android自带的TextView就可以实现,详情请百度【Android跑马灯效果】。但是竖直的跑马灯效果原生Android是不支持的。网上也有很多网友实现了自定义的效果,但是我一贯是不喜欢看别人的代码,所以这篇博客的思路完全是我自己的想法哈。
首先,我们需要给自定义的控件梳理一下格局,如下图所示:
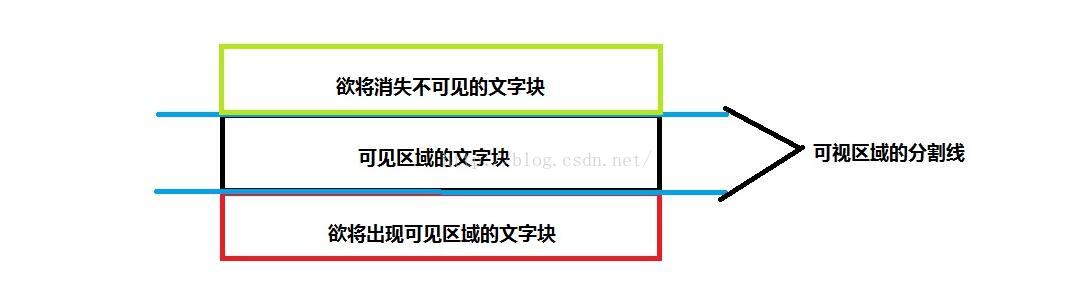
1、首先我们将控件分为三个区块,上面绿色部分为消失不可见的块,中间黑色部分为可见区域,下面红色部分为欲出现不可见区域。蓝色的线代表的是整个控件的上线和下线。
2、首先我们只给出两个文字块在内存中,分别是黑色部分的可见块和红色部分的欲出现块。
3、求出这些块的宽度、高度与中心点的坐标值。
4、滚动时,动态地改变每个块的中心点y坐标,使之向上平移。
5、当平移结束后,可见块位于欲消失的不可见块,欲出现的可见块位于可见区域的文字块。此时将欲消失的文字块移除List,并重新设置后一个索引的Text和重心坐标值,重新加入List中,刷新。
6、用一个Handler来处理动画的间隔时间。用属性动画ValueAnimator来实现平移的动画效果。
下面开始代码讲解,首先是用链式设置法设置一些常规属性:
<span> public VerticalMarqueeView color(int color){ this.color = color; return this; } public VerticalMarqueeView textSize(int textSize){ this.textSize = textSize; return this; } public VerticalMarqueeView datas(String[] datas){ this.datas = datas; return this; } public void commit(){ if(this.datas == null || datas.length == 0){ Log.e("VerticalMarqueeView", "the datas's length is illegal"); throw new IllegalStateException("may be not invoke the method named datas(String[])"); } paint.setColor(color); paint.setTextSize(textSize); }</span>
最后一定要调用commit方法进行提交,通过代码可以看出来这里除了有排空措施,还有最重要的一步:设置字体的大小。
然后我抽象出一个文字块的bean类:
public class TextBlock { private int width; private int height; private String text; private int drawX; private int drawY; private Paint paint; private int position; public TextBlock(int width, int height, Paint paint){ this.width = width; this.height = height; this.paint = paint; } public void reset(int centerY){ reset(text, centerX, centerY, position); } public void reset(String text, int centerY){ reset(text, centerX, centerY, position); } public void reset(String text, int centerY, int position){ reset(text, centerX, centerY, position); } public void reset(String text, int centerX, int centerY, int position){ this.text = text; this.position = position; int measureWidth = (int)paint.measureText(text); drawX = (width - measureWidth) / 2; FontMetrics metrics = paint.getFontMetrics(); drawY = (int)(centerY + (metrics.bottom - metrics.top) / 2 - metrics.bottom); } public int getPosition(){ return position; } public void draw(Canvas canvas){ canvas.drawText(text, drawX, drawY, paint); } }
这个bean类,最重要的方法就是几个重载的reset方法,通过改变centerY的值,来动态得改变绘制文字的起点实现居中绘制。关于文字的居中绘制请参考百度【android canvas 居中绘制文本】。
然后是重写onMeasure方法
@Override protected void onMeasure(int widthMeasureSpec, int heightMeasureSpec){ super.onMeasure(widthMeasureSpec, heightMeasureSpec); if(this.datas == null || this.datas.length == 0){ Log.e("VerticalMarqueeView", "the datas's length is illegal"); return; } width = MeasureSpec.getSize(widthMeasureSpec) - getPaddingLeft() - getPaddingRight(); height = MeasureSpec.getSize(heightMeasureSpec) - getPaddingTop() - getPaddingBottom(); centerX = width / 2; centerY = height / 2; blocks.clear(); //添加显示区域的文字块 TextBlock block1 = new TextBlock(width, height, paint); block1.reset(datas[0], centerX, centerY, 0); blocks.add(block1); if(datas.length > 1){ TextBlock block2 = new TextBlock(width, height, paint); block2.reset(datas[1], centerX, centerY + height, 1); blocks.add(block2); } }
在这个方法中,首先进行非空判断以免出现致命逻辑错误。然后得到整个控件的宽高和重心坐标。然后实例化两个文字块TextBlock,第一个文字块通过reset设置中点y坐标为整个控件的中点y坐标,第二个文字块通过reset设置中点y坐标为centerY+height,意思就是置于下一个文字块的不可见区域内。
然后是onDraw方法,这个方法非常简单,已经将业务逻辑转交给TextBlock的draw方法了。
@Override protected void onDraw(Canvas canvas){ for(int i = 0; i < blocks.size(); i++){ blocks.get(i).draw(canvas); } }
最关键的就是滚动效果的实现了,首先我们给出两个方法,开始滚动和结束滚动。
public void startScroll(){ isStopScroll = false; if(datas == null || datas.length == 0 || datas.length == 1){ Log.e("VerticalMarqueeView", "the datas's length is illegal"); return; } if(!isStopScroll){ handler.postDelayed(new Runnable(){ @Override public void run(){ scroll(); if(!isStopScroll){ handler.postDelayed(this, DURATION_SCROLL); } } }, DURATION_SCROLL); } } public void stopScroll(){ this.isStopScroll = true; }
原理很简单,首先给出一个boolean标志isStopScroll。然后用Handler的postDelayed方法进行循环延迟得调用scroll方法进行滚动。接下来给出全文最重要的方法,scroll方法。
private void scroll(){ ValueAnimator animator = ValueAnimator.ofPropertyValuesHolder(PropertyValuesHolder.ofInt("scrollY", centerY, centerY - height)); animator.setDuration(DURATION_ANIMATOR); animator.addUpdateListener(new AnimatorUpdateListener(){ @Override public void onAnimationUpdate(ValueAnimator animation){ int scrollY = (int)animation.getAnimatedValue("scrollY"); blocks.get(0).reset(scrollY); blocks.get(1).reset(scrollY + height); invalidate(); } }); animator.addListener(new AnimatorListener(){ @Override public void onAnimationStart(Animator animation){ } @Override public void onAnimationRepeat(Animator animation){ } @Override public void onAnimationEnd(Animator animation){ //移除第一块 int position = blocks.get(1).getPosition(); TextBlock textBlock = blocks.remove(0); //最后一个 if(position == datas.length - 1){ position = 0; }else{ position ++; } textBlock.reset(datas[position], centerY + height, position); blocks.add(textBlock); invalidate(); } @Override public void onAnimationCancel(Animator animation){ } }); animator.start(); }
首先采用ValueAnimator类进行属性动画,开始值为控件的中点y坐标,结束值为centerY-height,意味着要从下往上移动一个文字块的距离。然后在动画更新回调方法中,进行对文字块的reset方法。当动画结束后,得到第二个文字块的position值,然后移除第一个文字块,重新reset这个文字块的索引值,再加入到List的容器中。如此循坏。
最后给一个get方法返回position吧。
public int getCurrentPosition(){ if(datas == null || datas.length == 0){ return -1; } if(datas.length == 1 && blocks.size() == 1){ return 0; } return blocks.get(0).getPosition(); }
上述就将这个自定义控件的所有代码都呈现出来了,考虑到比较零散,这里讲所有代码都打印出来:
/** * @FileName: VerticalMarqueeView.java * @Author * @Description: * @Date 2016年7月13日 上午9:32:27 * @CopyRight CNP Corporation */ package cc.wxf.component; import android.animation.Animator; import android.animation.Animator.AnimatorListener; import android.animation.PropertyValuesHolder; import android.animation.ValueAnimator; import android.animation.ValueAnimator.AnimatorUpdateListener; import android.content.Context; import android.graphics.Canvas; import android.graphics.Color; import android.graphics.Paint; import android.graphics.Paint.FontMetrics; import android.os.Handler; import android.util.AttributeSet; import android.util.Log; import android.view.View; import java.util.ArrayList; import java.util.List; public class VerticalMarqueeView extends View{ public static final int DURATION_SCROLL = 3000; public static final int DURATION_ANIMATOR = 1000; private int color = Color.BLACK; private int textSize = 30; private String[] datas = null; private int width; private int height; private int centerX; private int centerY; private List<TextBlock> blocks = new ArrayList<TextBlock>(2); private Paint paint = new Paint(Paint.ANTI_ALIAS_FLAG); private Handler handler = new Handler(); private boolean isStopScroll = false; public VerticalMarqueeView(Context context, AttributeSet attrs, int defStyleAttr){ super(context, attrs, defStyleAttr); } public VerticalMarqueeView(Context context, AttributeSet attrs){ super(context, attrs); } public VerticalMarqueeView(Context context){ super(context); } public VerticalMarqueeView color(int color){ this.color = color; return this; } public VerticalMarqueeView textSize(int textSize){ this.textSize = textSize; return this; } public VerticalMarqueeView datas(String[] datas){ this.datas = datas; return this; } public void commit(){ if(this.datas == null || datas.length == 0){ Log.e("VerticalMarqueeView", "the datas's length is illegal"); throw new IllegalStateException("may be not invoke the method named datas(String[])"); } paint.setColor(color); paint.setTextSize(textSize); } @Override protected void onMeasure(int widthMeasureSpec, int heightMeasureSpec){ super.onMeasure(widthMeasureSpec, heightMeasureSpec); if(this.datas == null || this.datas.length == 0){ Log.e("VerticalMarqueeView", "the datas's length is illegal"); return; } width = MeasureSpec.getSize(widthMeasureSpec) - getPaddingLeft() - getPaddingRight(); height = MeasureSpec.getSize(heightMeasureSpec) - getPaddingTop() - getPaddingBottom(); centerX = width / 2; centerY = height / 2; blocks.clear(); //添加显示区域的文字块 TextBlock block1 = new TextBlock(width, height, paint); block1.reset(datas[0], centerX, centerY, 0); blocks.add(block1); if(datas.length > 1){ TextBlock block2 = new TextBlock(width, height, paint); block2.reset(datas[1], centerX, centerY + height, 1); blocks.add(block2); } } @Override protected void onDraw(Canvas canvas){ for(int i = 0; i < blocks.size(); i++){ blocks.get(i).draw(canvas); } } public void startScroll(){ isStopScroll = false; if(datas == null || datas.length == 0 || datas.length == 1){ Log.e("VerticalMarqueeView", "the datas's length is illegal"); return; } if(!isStopScroll){ handler.postDelayed(new Runnable(){ @Override public void run(){ scroll(); if(!isStopScroll){ handler.postDelayed(this, DURATION_SCROLL); } } }, DURATION_SCROLL); } } public void stopScroll(){ this.isStopScroll = true; } private void scroll(){ ValueAnimator animator = ValueAnimator.ofPropertyValuesHolder(PropertyValuesHolder.ofInt("scrollY", centerY, centerY - height)); animator.setDuration(DURATION_ANIMATOR); animator.addUpdateListener(new AnimatorUpdateListener(){ @Override public void onAnimationUpdate(ValueAnimator animation){ int scrollY = (int)animation.getAnimatedValue("scrollY"); blocks.get(0).reset(scrollY); blocks.get(1).reset(scrollY + height); invalidate(); } }); animator.addListener(new AnimatorListener(){ @Override public void onAnimationStart(Animator animation){ } @Override public void onAnimationRepeat(Animator animation){ } @Override public void onAnimationEnd(Animator animation){ //移除第一块 int position = blocks.get(1).getPosition(); TextBlock textBlock = blocks.remove(0); //最后一个 if(position == datas.length - 1){ position = 0; }else{ position ++; } textBlock.reset(datas[position], centerY + height, position); blocks.add(textBlock); invalidate(); } @Override public void onAnimationCancel(Animator animation){ } }); animator.start(); } public int getCurrentPosition(){ if(datas == null || datas.length == 0){ return -1; } if(datas.length == 1 && blocks.size() == 1){ return 0; } return blocks.get(0).getPosition(); } public class TextBlock { private int width; private int height; private String text; private int drawX; private int drawY; private Paint paint; private int position; public TextBlock(int width, int height, Paint paint){ this.width = width; this.height = height; this.paint = paint; } public void reset(int centerY){ reset(text, centerX, centerY, position); } public void reset(String text, int centerY){ reset(text, centerX, centerY, position); } public void reset(String text, int centerY, int position){ reset(text, centerX, centerY, position); } public void reset(String text, int centerX, int centerY, int position){ this.text = text; this.position = position; int measureWidth = (int)paint.measureText(text); drawX = (width - measureWidth) / 2; FontMetrics metrics = paint.getFontMetrics(); drawY = (int)(centerY + (metrics.bottom - metrics.top) / 2 - metrics.bottom); } public int getPosition(){ return position; } public void draw(Canvas canvas){ canvas.drawText(text, drawX, drawY, paint); } } }
最后给出使用的方法,很简单。
package cc.wxf.androiddemo; import android.app.Activity; import android.content.Context; import android.os.Bundle; import android.view.View; import android.widget.Toast; import cc.wxf.component.VerticalMarqueeView; public class MainActivity extends Activity { private VerticalMarqueeView vmView; @Override public void onCreate(Bundle savedInstanceState) { super.onCreate(savedInstanceState); setContentView(R.layout.activity_main); vmView = (VerticalMarqueeView)findViewById(R.id.vmView); String[] datas = new String[]{ "南海又开始动荡了","菲律宾到处都在肇事","这次为了一张审判废纸,菲律宾投入了多少成本呢","测试数据4","测试数据5为了长度不一样","就把这条当做测试数据吧" }; vmView.color(getResources().getColor(android.R.color.black)) .textSize(sp2px(this, 15)) .datas(datas).commit(); vmView.startScroll(); vmView.setOnClickListener(new View.OnClickListener(){ @Override public void onClick(View v){ Toast.makeText(MainActivity.this, "当前的索引为:" + vmView.getCurrentPosition(), Toast.LENGTH_SHORT).show(); } }); } private int sp2px(Context context, int sp){ float density = context.getResources().getDisplayMetrics().scaledDensity; return (int) (sp * density + 0.5f); } @Override protected void onDestroy() { super.onDestroy(); //必须要调用,否则内存中会一直无限循环 vmView.stopScroll(); } }
demo就不提供了,自定义View就只有上面一个文件。
以上就是本文的全部内容,希望对大家的学习有所帮助,也希望大家多多支持查字典教程网。
【Android自定义View实现竖直跑马灯效果案例解析】相关文章:
★ Android 使用Gallery实现3D相册(附效果图+Demo源码)