本文实例讲述了Android编程重写ViewGroup实现卡片布局的方法。分享给大家供大家参考,具体如下:
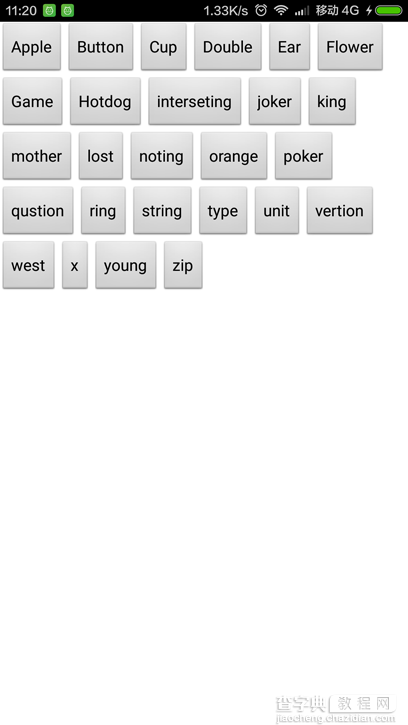
实现效果如图:
实现思路
1. 重写onMeasure(int widthMeasureSpec, int heightMeasureSpec)设置每个子View的大小
2. 重写onLayout(boolean changed, int l, int t, int r, int b) 设置每个子View的位置
第一步:新建FlowLayout继承ViewGroup
package com.rong.activity; import android.content.Context; import android.util.AttributeSet; import android.view.View; import android.view.ViewGroup; /** * 卡片布局 * * @author 徐荣 * */ public class FlowLayout extends ViewGroup { public FlowLayout(Context context, AttributeSet attrs) { super(context, attrs); } @Override protected void onLayout(boolean changed, int l, int t, int r, int b) { // 当前子View的数量 int childSize = getChildCount(); // 获取行宽 int lineWidth = getMeasuredWidth(); // 当前是第几行 int lines = 1; // 当前累加的行宽 int nowLineWidth = 0; for (int i = 0; i < childSize; i++) { View view = getChildAt(i); // 子View的宽度 int childWidth = view.getMeasuredWidth(); // 子View的高度 int childHeight = view.getMeasuredHeight(); // 如果当前的nowLineWidth+childWidth>= lineWidth 则换行 if (nowLineWidth + childWidth >= lineWidth) { nowLineWidth = 0; lines = lines + 1; } // 设置子View的位置 view.layout(nowLineWidth, childHeight * (lines - 1), nowLineWidth + childWidth, childHeight * lines); nowLineWidth = nowLineWidth + childWidth; // 如果nowLineWidth >= lineWidth 则换行 if (nowLineWidth >= lineWidth) { nowLineWidth = 0; lines = lines + 1; } } } @Override protected void onMeasure(int widthMeasureSpec, int heightMeasureSpec) { super.onMeasure(widthMeasureSpec, heightMeasureSpec); // 设置自己View的大小 setMeasuredDimension(widthMeasureSpec, heightMeasureSpec); for (int i = 0; i < getChildCount(); i++) { View view = getChildAt(i); // 设置每个子View的大小 view.measure(view.getMeasuredWidth(), view.getMeasuredHeight()); } } }
第二步:新建布局文件
<"1.0" encoding="utf-8"?> <RelativeLayout xmlns:android="http://schemas.android.com/apk/res/android" android:layout_width="match_parent" android:layout_height="match_parent" android:background="@android:color/black" android:orientation="vertical" > <com.rong.activity.FlowLayout android:layout_width="match_parent" android:layout_height="match_parent" android:background="#ffffff" > <Button android:layout_width="wrap_content" android:layout_height="wrap_content" android:text="Apple" /> <Button android:layout_width="wrap_content" android:layout_height="wrap_content" android:text="Button" /> <Button android:layout_width="wrap_content" android:layout_height="wrap_content" android:text="Cup" /> <Button android:layout_width="wrap_content" android:layout_height="wrap_content" android:text="Double" /> <Button android:layout_width="wrap_content" android:layout_height="wrap_content" android:text="Ear" /> <Button android:layout_width="wrap_content" android:layout_height="wrap_content" android:text="Flower" /> <Button android:layout_width="wrap_content" android:layout_height="wrap_content" android:text="Game" /> <Button android:layout_width="wrap_content" android:layout_height="wrap_content" android:text="Hotdog" /> <Button android:layout_width="wrap_content" android:layout_height="wrap_content" android:text="interseting" /> <Button android:layout_width="wrap_content" android:layout_height="wrap_content" android:text="joker" /> <Button android:layout_width="wrap_content" android:layout_height="wrap_content" android:text="king" /> <Button android:layout_width="wrap_content" android:layout_height="wrap_content" android:text="mother" /> <Button android:layout_width="wrap_content" android:layout_height="wrap_content" android:text="lost" /> <Button android:layout_width="wrap_content" android:layout_height="wrap_content" android:text="noting" /> <Button android:layout_width="wrap_content" android:layout_height="wrap_content" android:text="orange" /> <Button android:layout_width="wrap_content" android:layout_height="wrap_content" android:text="poker" /> <Button android:layout_width="wrap_content" android:layout_height="wrap_content" android:text="qustion" /> <Button android:layout_width="wrap_content" android:layout_height="wrap_content" android:text="ring" /> <Button android:layout_width="wrap_content" android:layout_height="wrap_content" android:text="string" /> <Button android:layout_width="wrap_content" android:layout_height="wrap_content" android:text="type" /> <Button android:layout_width="wrap_content" android:layout_height="wrap_content" android:text="unit" /> <Button android:layout_width="wrap_content" android:layout_height="wrap_content" android:text="vertion" /> <Button android:layout_width="wrap_content" android:layout_height="wrap_content" android:text="west" /> <Button android:layout_width="wrap_content" android:layout_height="wrap_content" android:text="x" /> <Button android:layout_width="wrap_content" android:layout_height="wrap_content" android:text="young" /> <Button android:layout_width="wrap_content" android:layout_height="wrap_content" android:text="zip" /> </com.rong.activity.FlowLayout> </RelativeLayout>
运行!
希望本文所述对大家Android程序设计有所帮助。
【Android编程重写ViewGroup实现卡片布局的方法】相关文章:
★ android TextView设置中文字体加粗实现方法