本文实例总结了Android编程中图片特效处理方法。分享给大家供大家参考,具体如下:
这里介绍的Android图片处理方法包括:
转换 - drawable To bitmap
缩放 - Zoom
圆角 - Round Corner
倒影 - Reflected
bitmapPrcess code:
package com.learn.games; import android.graphics.Bitmap; import android.graphics.Canvas; import android.graphics.LinearGradient; import android.graphics.Matrix; import android.graphics.Paint; import android.graphics.PixelFormat; import android.graphics.PorterDuffXfermode; import android.graphics.Rect; import android.graphics.RectF; import android.graphics.Bitmap.Config; import android.graphics.PorterDuff.Mode; import android.graphics.Shader.TileMode; import android.graphics.drawable.Drawable; public class bitmapProcess { // zoom public static Bitmap zoomBitmap(Bitmap bitmap, int w, int h){ int width = bitmap.getWidth(); int height = bitmap.getHeight(); Matrix matrix = new Matrix(); float scaleWidth = w/(float)width; float scaleHeight = h/(float)height; matrix.postScale(scaleWidth, scaleHeight); Bitmap bitmap2 = Bitmap.createBitmap(bitmap, 0, 0, width, height, matrix, true); return bitmap2; } // drawable to bitmap public static Bitmap drawable2Bitmap(Drawable drawable){ int width = drawable.getIntrinsicHeight(); int height = drawable.getIntrinsicHeight(); Bitmap bitmap = Bitmap.createBitmap(width, height, drawable.getOpacity() != PixelFormat.OPAQUE ? Bitmap.Config.ARGB_8888 : Bitmap.Config.RGB_565); Canvas canvas = new Canvas(bitmap); drawable.setBounds(0, 0, width, height); drawable.draw(canvas); return bitmap; } // Round Corner Bitmap public static Bitmap getRoundCornerBitmap(Bitmap bitmap, float roundPX){ int width = bitmap.getWidth(); int height = bitmap.getHeight(); Bitmap bitmap2 = Bitmap.createBitmap(width, height, Config.ARGB_8888); Canvas canvas = new Canvas(bitmap2); final int color = 0xff424242; final Paint paint = new Paint(); final Rect rect = new Rect(0, 0, width, height); final RectF rectF = new RectF(rect); paint.setColor(color); paint.setAntiAlias(true); canvas.drawARGB(0, 0, 0, 0); canvas.drawRoundRect(rectF, roundPX, roundPX, paint); paint.setXfermode(new PorterDuffXfermode(Mode.SRC_IN)); canvas.drawBitmap(bitmap, rect, rect, paint); return bitmap2; } // Reflect Bitmap public static Bitmap createReflectedBitmap(Bitmap bitmap){ final int reflectedGap = 4; int width = bitmap.getWidth(); int height = bitmap.getHeight(); Matrix matrix = new Matrix(); matrix.preScale(1, -1); Bitmap reflectedImage = Bitmap.createBitmap(bitmap, 0, height/2, width, height/2, matrix, false); Bitmap reflectedBitmap = Bitmap.createBitmap(width, (height + height/2), Config.ARGB_8888); Canvas canvas = new Canvas(reflectedBitmap); canvas.drawBitmap(bitmap, 0, 0, null); Paint defaultPaint = new Paint(); canvas.drawRect(0, height, width, height + reflectedGap, defaultPaint); canvas.drawBitmap(reflectedImage, 0, height + reflectedGap, null); Paint paint = new Paint(); LinearGradient shader = new LinearGradient(0, bitmap.getHeight(), 0, reflectedBitmap.getHeight() + reflectedGap, 0x70ffffff, 0x00ffffff, TileMode.CLAMP); paint.setShader(shader); paint.setXfermode(new PorterDuffXfermode(Mode.DST_IN)); canvas.drawRect(0, height, width, reflectedBitmap.getHeight() + reflectedGap, paint); return reflectedBitmap; } }
Java Code:
package com.learn.games; import android.app.Activity; import android.graphics.Bitmap; import android.graphics.drawable.BitmapDrawable; import android.graphics.drawable.Drawable; import android.os.Bundle; import android.widget.ImageView; public class MyBitmapProcessActivity extends Activity { private ImageView imgView1; private ImageView imgView2; private ImageView imgView3; private ImageView imgView4; /** Called when the activity is first created. */ @Override public void onCreate(Bundle savedInstanceState) { super.onCreate(savedInstanceState); setContentView(R.layout.main); drawBitmap(); } private void drawBitmap(){ imgView1 = (ImageView)findViewById(R.id.imgView1); imgView2 = (ImageView)findViewById(R.id.imgView2); imgView3 = (ImageView)findViewById(R.id.imgView3); imgView4 = (ImageView)findViewById(R.id.imgView4); Drawable drawable = this.getWallpaper(); Bitmap bitmap = bitmapProcess.drawable2Bitmap(drawable); // drawable to bitmap Bitmap zoomBitmap = bitmapProcess.zoomBitmap(bitmap, 100, 100); // zoom Bitmap roundBitmap = bitmapProcess.getRoundCornerBitmap(zoomBitmap, 10.0f); // round corner Bitmap reflectedBitmap = bitmapProcess.createReflectedBitmap(zoomBitmap); // reflect bitmap // drawable to bitmap imgView1.setImageBitmap(bitmap); imgView2.setImageBitmap(zoomBitmap); imgView3.setImageBitmap(roundBitmap); imgView4.setImageBitmap(reflectedBitmap); // bitmap to drawable Drawable roundDrawable = new BitmapDrawable(roundBitmap); Drawable reflectedDrawable = new BitmapDrawable(reflectedBitmap); imgView1.setBackgroundDrawable(roundDrawable); imgView2.setBackgroundDrawable(reflectedDrawable); } }
XML:
<"1.0" encoding="utf-8"?> <LinearLayout xmlns:android="http://schemas.android.com/apk/res/android" android:orientation="vertical" android:layout_width="fill_parent" android:layout_height="fill_parent" > <ImageView android:id="@+id/imgView1" android:layout_width="wrap_content" android:layout_height="wrap_content"/> <ImageView android:id="@+id/imgView2" android:layout_width="wrap_content" android:layout_height="wrap_content"/> <ImageView android:id="@+id/imgView3" android:layout_width="wrap_content" android:layout_height="wrap_content"/> <ImageView android:id="@+id/imgView4" android:layout_width="wrap_content" android:layout_height="wrap_content"/> </LinearLayout>
效果图:
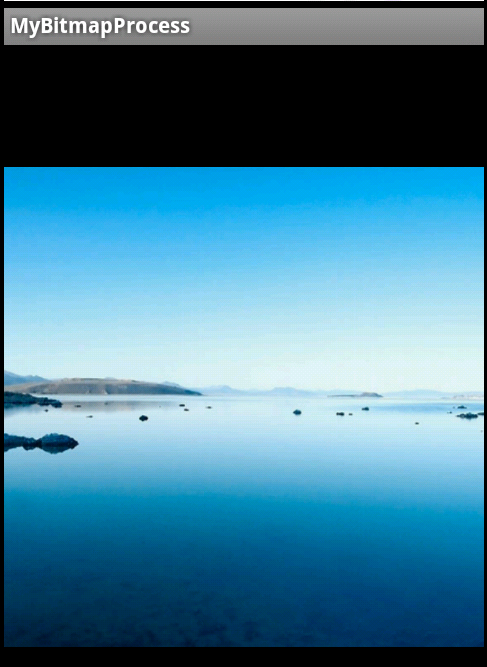
drawable2bitmap
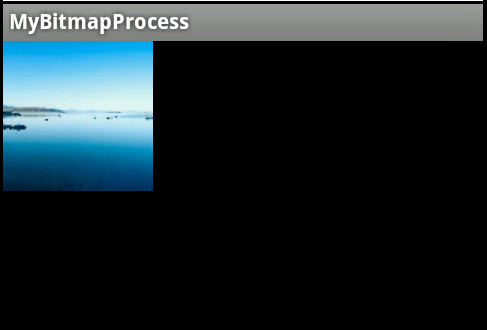
zoom
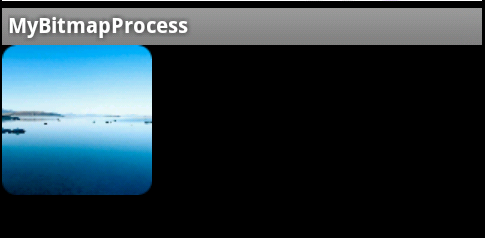
round corner
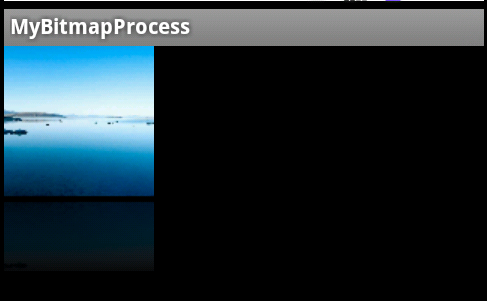
reflected bitmap
希望本文所述对大家Android程序设计有所帮助。
【Android编程中图片特效处理方法小结】相关文章: