我们都知道Android Studio用起来很棒,其中布局预览更棒。我们在调UI的时候基本是需要实时预览来看效果的,在Android Studio中只需要切换到Design就可以看到,而且我们需要在布局上填充数据预览效果更好,比如我们在TextView中设定text属性来看下字体大小与布局是否正确,但是呢正式环境我们又需要移除这些额外的数据,不然看着很不舒服,这个时候就用到了本篇博客介绍的一个技巧。
废话不多说,直接上图:
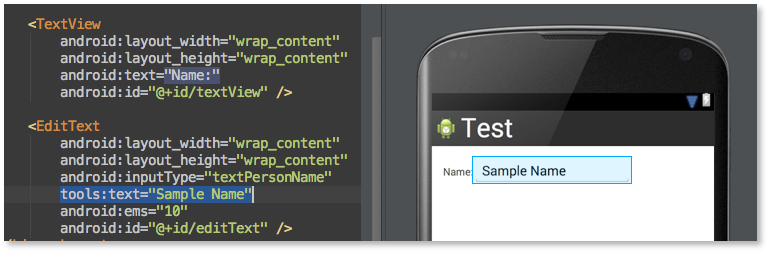
上述示例中只需要在xml布局文件中添加tools命名空间的text属性就ok了,此属性和正式发布的版本完全无关,是不是很酷?
用之前只需要在跟布局添加命名空间就ok了
复制代码 代码如下:
<LinearLayout
xmlns:android="http://schemas.android.com/apk/res/android"
xmlns:tools="http://schemas.android.com/tools"
android:layout_width="match_parent"
...
用法很简单,只需要用tools的命名空间代替android的命名空间,我们可以这样使用
复制代码 代码如下:
<ListView
android:id="@+id/listView"
android:layout_width="wrap_content"
android:layout_height="wrap_content"
android:fastScrollAlwaysVisible="true"
tools:fastScrollAlwaysVisible=""/>
也可以这样使用
复制代码 代码如下:
<Button
android:id="@+id/button"
android:layout_width="wrap_content"
android:layout_height="wrap_content"
android:text="First"
tools:visibility="invisible" />
<Button
android:id="@+id/button2"
android:layout_width="wrap_content"
android:layout_height="wrap_content"
android:text="Second"
tools:visibility="visible" />
注意的是tools属性只能在layout文件中使用,而且只能使用framework自带的一些属性,不可以用使用自定义属性,不过这足够了,基本上能满足我们的需求了。
【Android Studio使用小技巧:布局预览时填充数据】相关文章:
★ Android layout_weight使用方法及实例
★ Android Map新用法:MapFragment应用介绍
★ Android Studio怎么查看程序安全码获取SHA1值?