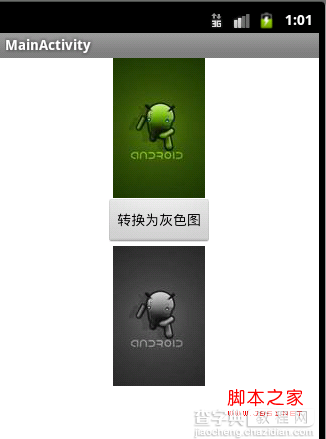
实例:RGB2Grey
项目运行效果图:


源代码:
[java]
public class MainActivity extends Activity {
/* (non-Javadoc)
* @see android.app.Activity#onCreate(android.os.Bundle)
*/
@Override
public void onCreate(Bundle savedInstanceState) {
super.onCreate(savedInstanceState);
setContentView(R.layout.activity_main);
//通过Id来获取界面中组件的引用
Button rgb2greyBtn = (Button) findViewById(R.id.rgb2greybtn);
ImageView imageView1 = (ImageView) findViewById(R.id.imageView1);
final ImageView imageView2 = (ImageView) findViewById(R.id.imageView2);
//通过位图工厂,创建一个位图
final Bitmap bitmap = BitmapFactory.decodeResource(getResources(), R.drawable.ic_android);
imageView1.setImageBitmap(bitmap);
//为“转换为灰度图”按钮添加监听事件
rgb2greyBtn.setOnClickListener(new OnClickListener() {
@Override
public void onClick(View v) {
// TODO Auto-generated method stub
//将转换过后的灰度图显示出来
imageView2.setImageBitmap(convertGreyImg(bitmap));
}
});
}
/**
* 将彩色图转换为灰度图
* @param img 位图
* @return 返回转换好的位图
*/
public Bitmap convertGreyImg(Bitmap img) {
int width = img.getWidth(); //获取位图的宽
int height = img.getHeight(); //获取位图的高
int []pixels = new int[width * height]; //通过位图的大小创建像素点数组
img.getPixels(pixels, 0, width, 0, 0, width, height);
int alpha = 0xFF << 24;
for(int i = 0; i < height; i++) {
for(int j = 0; j < width; j++) {
int grey = pixels[width * i + j];
int red = ((grey & 0x00FF0000 ) >> 16);
int green = ((grey & 0x0000FF00) >> 8);
int blue = (grey & 0x000000FF);
grey = (int)((float) red * 0.3 + (float)green * 0.59 + (float)blue * 0.11);
grey = alpha | (grey << 16) | (grey << 8) | grey;
pixels[width * i + j] = grey;
}
}
Bitmap result = Bitmap.createBitmap(width, height, Config.RGB_565);
result.setPixels(pixels, 0, width, 0, 0, width, height);
return result;
}
}
public class MainActivity extends Activity {
/* (non-Javadoc)
* @see android.app.Activity#onCreate(android.os.Bundle)
*/
@Override
public void onCreate(Bundle savedInstanceState) {
super.onCreate(savedInstanceState);
setContentView(R.layout.activity_main);
//通过Id来获取界面中组件的引用
Button rgb2greyBtn = (Button) findViewById(R.id.rgb2greybtn);
ImageView imageView1 = (ImageView) findViewById(R.id.imageView1);
final ImageView imageView2 = (ImageView) findViewById(R.id.imageView2);
//通过位图工厂,创建一个位图
final Bitmap bitmap = BitmapFactory.decodeResource(getResources(), R.drawable.ic_android);
imageView1.setImageBitmap(bitmap);
//为“转换为灰度图”按钮添加监听事件
rgb2greyBtn.setOnClickListener(new OnClickListener() {
@Override
public void onClick(View v) {
// TODO Auto-generated method stub
//将转换过后的灰度图显示出来
imageView2.setImageBitmap(convertGreyImg(bitmap));
}
});
}
/**
* 将彩色图转换为灰度图
* @param img 位图
* @return返回转换好的位图
*/
public Bitmap convertGreyImg(Bitmap img) {
int width = img.getWidth();//获取位图的宽
int height = img.getHeight();//获取位图的高
int []pixels = new int[width * height];//通过位图的大小创建像素点数组
img.getPixels(pixels, 0, width, 0, 0, width, height);
int alpha = 0xFF << 24;
for(int i = 0; i < height; i++){
for(int j = 0; j < width; j++) {
int grey = pixels[width * i + j];
int red = ((grey & 0x00FF0000 ) >> 16);
int green = ((grey & 0x0000FF00) >> 8);
int blue = (grey & 0x000000FF);
grey = (int)((float) red * 0.3 + (float)green * 0.59 + (float)blue * 0.11);
grey = alpha | (grey << 16) | (grey << 8) | grey;
pixels[width * i + j] = grey;
}
}
Bitmap result = Bitmap.createBitmap(width, height, Config.RGB_565);
result.setPixels(pixels, 0, width, 0, 0, width, height);
return result;
}
}
布局文件:
[html]
<LinearLayout xmlns:android="http://schemas.android.com/apk/res/android"
xmlns:tools="http://schemas.android.com/tools"
android:id="@+id/LinearLayout1"
android:layout_width="match_parent"
android:layout_height="match_parent"
android:orientation="vertical" >
<ImageView
android:id="@+id/imageView1"
android:layout_width="wrap_content"
android:layout_height="wrap_content"
android:layout_gravity="center_horizontal"
/>
<Button
android:id="@+id/rgb2greybtn"
android:layout_width="wrap_content"
android:layout_height="wrap_content"
android:text="@string/rgb2greybtn"
android:layout_gravity="center_horizontal"/>
<ImageView
android:id="@+id/imageView2"
android:layout_width="wrap_content"
android:layout_height="wrap_content"
android:layout_gravity="center_horizontal"
/>"
</LinearLayout>
【Android-如何将RGB彩色图转换为灰度图方法介绍】相关文章:
★ Android的ImageButton当显示Drawable图片时就不显示文字
