本教程向朋友们介绍Maya Nurbs 车轮建模的流程,教程介绍的很详细,知识教程是英文教程,感兴趣的朋友可以慢慢阅读一下!
为了让大家更能理解这个教程,我并不翻译其中一些命令,这样可以让一些初学者 ( 不是很熟悉 maya nurbs 建模命令 ) 更快找到这些命令。另:我的英文不好,所以在翻译的时候会有一些不足之处,如果有让你发笑的地方,请你给我提醒,我将更改过来 , 我的 email: chinacache@163.com.
希望可以和大家一同进步!!!!!
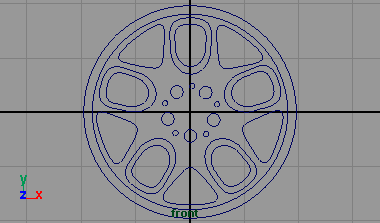
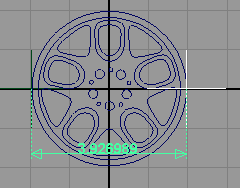
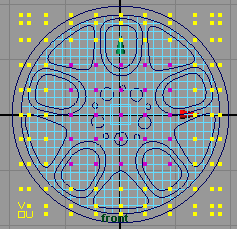
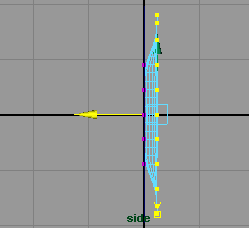
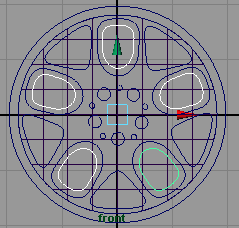
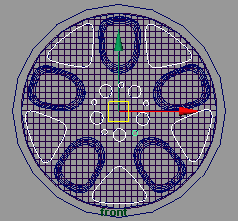
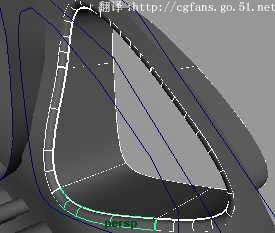
打开你的 maya, 切换到 front 视图,创建圆滑的曲线 ( 如 pic 0 所示 ). 在这个教程里我使用厘米作为单位,车轮的直径为 3.927( 如 pic 1), 这个尺寸在 xyz 轴上都是有效的,你可以自己选择你喜欢的尺寸,如 3.9 或 4.
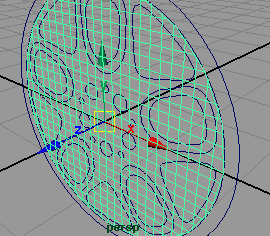
nowselectsecond circle shapes (pic 1a), then surface planar. and then edit nurbs rebuild surfaces, open option box and enter 8x8 for uv spans (pic 2) , this rebuild surface step is important #39;cause we needa high-resolution nurbs for this main front object.
现在选择第二条圆环曲线 (pic 1a), 使用 surface planar 命令 . 然后使用 edit nurbsrebuild 命令重建曲面,改变曲面 uv 度为 8x8(pic 2), 这一点非常重要,因为我们需要一个非常精确的曲面。

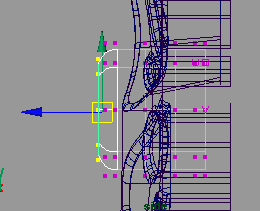
from front viewselectthese outer cv#39;s (pic 3) then drag to -z axis (pic 4), -z value its about -0.235. you could expand your cv information on the right panel to see the value.
在 front 视图里选择 cv 点 (pic 3) 将其在 -z 轴方向拉伸 (pic 4), 数值约为 -0.235. 你可以在 channel box 里看到这一数值。
select these 9 center cv#39;s (pic 5) and drag also to -0.235 -z axis (pic 6).
选择 9 个 cv 点 (pic 5) 将其在 -z 轴上拉 -0.235 的距离 (pic 6).
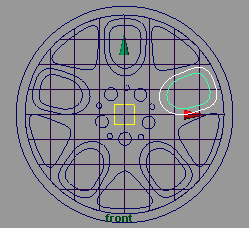
select these oval shapes (pic 7) and drag to about -0.46 of -z axis (pic 8).
选择那些卵形的曲线 (pic 7) ,并在 -z 轴上移动 -0.46(pic 8).
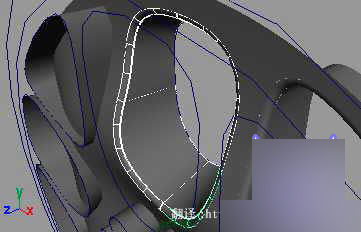
now you have front oval shapes (bigger) and oval back shapes (smaller) right? ok nowselectevery set of oval shapes like in pic 9 and loft them (every set of them), then it would look like this pic (pic10).
先选择大的卵形曲线,按住 shift 键选择小形卵形曲线 (pic 9) ,一组一组的 loft 它们,然后就可得到如下图的结果 (pic 10).
nowselectthe other shapes (triangle and small shapes in the center) (pic 11) and then extrude them to -0.5 of -z axis (pic 12). remember : to extrude a curve as nurbs, open your extrude option box andset the style to distance, and make sure output geometry has been set to nurbs
现在选择其它曲线 ( 三角形和中心那些小圆 )(pic 11), 然后在 -z 轴上 extrude -0.5 的距离 .
记住 : extrude 出来是应该椒 nurbs 曲面,打开你的 extrude 选项,设定距离并确定输出的几何体为 nurbs 曲面 .

before entering this fillet amp; trim work, there is something important that we should know about preview resolution (antialias settings) and tessellation smoothness within maya.
在进入 fillet 及 trim 的工作之前,有一些很重要的事情我们应该了解一下 maya 的镶嵌的圆滑设置 .
most of new maya users are shy of this nurbs gaps that are caused by fillet amp; trim works.
很多的使用 maya 的人都会造成此类现象。
when using nurbs with lots of fillet amp; trim works, it is important to preview the scene with production quality on render globals. even if it#39;s just a preview, production quality has soft multi-pixel filtering. anti-alias is important for nurbs with fillet amp; trim in maya. in this case, i am not talking about rebuilding the surfaces, but we could use smooth anti-alias combined with better tessellation settings to close the gaps.
当你在使用 nurbs 做一些 fillet 和 trim 的工作时,在全局渲染里将预视图设为产品质量 (production quality) 是很重要的 . 虽然它只是预视图,产品质量 (production quality) 可以圆滑缝合点 . 抗锯齿 (anti-alias) 在 maya 里的设置,对 fillet 和 trim nurbs 表面也是同样重要 . 在这种情况下,我不是想说要重建表面,我们可以通过对抗锯齿的设置来改善它 .
ok its about resolution preview, now about the tessellation problem, you can choose one of these 3 optionsorplay around with each settings :
让我们谈谈镶嵌的问题,你可以选择这 3 个选项中的一个或三个都选来设置 :
1. before circular filleting an object, be sure your positional tolerance (in circular fillet option box) has been set to minimal value for better tessellation between two surfaces, you could set it to 0.010 (the default is 0.0100), and also you can change the tangent tolerance to about 0.0100, with this option and value, maya will create more tightconnection between two surfaces.
1. 在 circular fillet 物体前,确认你的 positional tolerance( 在 circular fillet 选项里 ) 是否已经设置到最小的值,以便在两个要 fillet 的曲面中得到最好的结果,你可以设为 0.010( 缺省就是 0.010), 同样你也可以将 tangent tolerance 设为 0.0100, 在这种设置下, maya 可以在严谨的连接两个曲面 .
2. maya has built-in automatic nurbs tessellation check located in the render menu. if you want to render your nurbs scene, all you have todo isselectall of your nurbs objects, go to the render menu andselectset nurbs tessellation, apply this function, then render the scene, it will reduce the gaps automatically. this feature evaluates a set frame (s) and automatically determines the optimum tessellation settings, which results in smoother surfaces without over-tessellation (of course this saves time and memory).
2.maya 会自动创建 nurbs 曲面的镶嵌,你可以在 render menu 里查看它 . 如果你想渲染你的 nurbs 场景,你必需要做的是选择你所有的 nurbs 物体,到你的 render menu 里设置 nurbs 镶嵌,然后渲染场景,它可以减少缝隙 . 它会增加你的渲染时间和内存,但是可以使你的曲面平滑 .
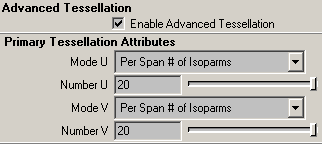
3. every time you#39;re finished with fillet amp; trim,selectyourtrimmed amp; filleted objects and set/turn on advanced tessellation andset number of uv to 20x20 (pic 14), and again, don#39;t forget to set your render globals to production quality. it doesn#39;t have to be 20x20, but i have found these to be good settings, but be carefull with this settings, the surfaces would very very smooth which increasing yourrendering times.
3. 当你每次完成 fillet 和 trim 操作,选择已被 fillet 和 trim 过的物体设置它们的 advanced tessllation 属性,将 uv 设为 20x20(pic 14), 不要忘记在全局渲染里设置产品质量 . 虽然不一定要到 20x20, 但是我认为这是一个比较好的数值 , 请你注意使用这个方法,它会增加你的渲染时间 .
4. worst case; you can also add new lofted surface by lofting isoparm and trimmed surfaces between two separated surfaces
4. 如果遇上很糟糕的情况,你可以在两个表面连接的地方之间增加你的 isoparm.
but i suggest you to use no.1 and no.2
但我认为你会使用 no.1 和 no.2 来改善这种情况 .anyway...please...don#39;t be to much worried about these gaps/space ..:) --- 不要太担心这种情况 .
-----------------------------------------------
ha...still with me guys ?.....ok..let#39;s continue our wheel lesson
circular fillet amp; trim (part 1)
important : you must turn on create curve on surface on circular fillet option box, otherwise you cannot trim the surface.
重要 : 在你 circular fillet 时,一定要在选项框中选择在表面创建曲线,否则你将不能剪切曲面 .
to circular fillet,selectlofted/extruded object first, thenselectmain body object, then circular fillet it, this would help us to remember the last settings of circular fillet directions.
cirular fillet 前,先选择 loft/extrude 的曲面,然后再选择主要的面, circular fillet 它们,这样会让我们记得 circular fillet 的方向 .
start circular fillet; in this case, i started with extruded triangle in the upper right area (pic 15). for this triangle, put a circular fillet with value of -0.03 on normal fillet direction (this circular fillet direction could be different, it depends on your u and vdirection). here#39;s after circular fillet and trim (pic 16)
开始 circular fillet: 在这里,我首先 circular 三解形曲面 (pic 15). 我将 circular fillet 的值设为 -0.03( 有可能 circular fillet 的值会设为另一方向,如 0.03 ,这取决于你的曲面 u 和 v 的方向 ).(pic 16) 是 circular fillet 后 trim 出来的结果 .
note : if your measurement is bigger than this tutorial, than use ahigher value; as i said in the beginning of this tutorial that measurement affects every xyz and of course this fillet value as well.
记住 : 如果你发现你的尺寸大了,那么使用一个更小的值 ; 我想说的是,在开始做之前,应该检查它们的尺寸。
next fillet and trim the oval lofted object, for this oval lofted object fillet, use reverse primary surface normal with radius of -0.03, (pic 17)
接下来 fillet 和 trim 卵形的曲面,我将 fillet 的值设为 -0.03.(pic 17).
do the same steps with the same settings for the other extruded andlofted objects (except inner objectsorsmall extruded objects) bellow.
然后重复 circular 并 trim 这些三角形及卵形曲面 ( 中间的圆形曲面后面再做 ).
cirucular fillet amp; trim 2
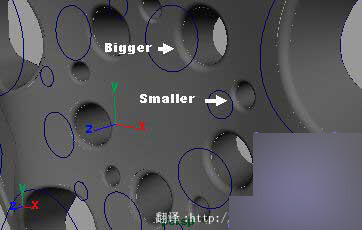
for these small cylinder objects (pic 18) use reverse primary surface normal with value of -0.30 for bigger cylinders and -0.20 for smaller cylinders.
在 circular 比较大的圆形曲面时,我取值为 -0.30, 小的取值为 -0.20.
create cap for logos
创建车轮盖子
from front view, create a nurbs cylinder and rescale it to 0.234 (xyz), rotate it to 90deg; , drag to the center of the objects (pic 19) and translate -z axis to -0.235 (pic 20).
在前视窗中,创建一个圆柱体并将它的尺寸在 xyz 轴缩小到 0.234, 旋转 90 度 , 并将它移动到物体的中心 (pic 19) ,然后在 -z 轴上移动 -0.235 的距离 (pic 20).

adjust the front cv#39;s until they look like in the following image (pic 21), thenselectoutter isoparm then surfaces planar to closethe cap (pic 22).
调整前面的 cv 点到如 (pic 21) 的效果,调整好后,选择最外面的 isoparm 线,使用 surfacesplanar 命令闭合这个车轮盖子 (pic 22).

next, you need to fillet the cap body with a value of 0.030 ( normal fillet direction ) (pic 23).
接下的,你需要 fillet 盖子, circular fillet 的值为 0.030(pic 23).
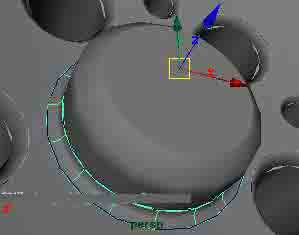
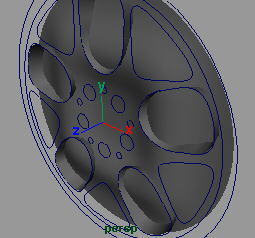
ok, now you can hide all helper curves/shapes,selectall objects and apply a default phong-e material as soft steel and set the main color to just a little bit brighter than default (i.e. v=0.678) on hsv color sliders :)
ok, 现在你可以将所有的补助线隐藏起来,选择所有物体,并给它们一个缺省的 phonge 材质,调整 phonge 材质的主颜色 (main color) ( 在 hsv 色板上 v 的取值约为 0.678).
final check before render :
渲染前的检查 :
select editselectall by type nurbs surfaces , go to rendering module, go to render set nurbs tessellation option box , set the curvature tolerance to highest value , set the u and v division factor to 5, then hit set and close.
editselectall by type nurbs surfaces , 到 rendering module , 再到 render set nurbs tessellation option box , 将 curvature tolerance 设为 highest value , 将 u 和 v division facto 设为 5, 然后 set and close .
be sure your render global has been set to production quality (and raytracing if you want). now render it, you should have this lovely nurbs...
确认你在全局渲染的设置里设置为产品质量 ( 还有光线跟踪 -- 如果你想的话 ), 然后渲染它,你将得到 ....
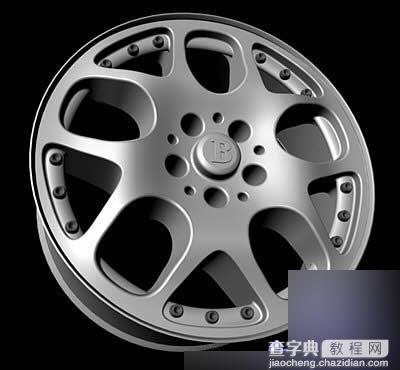
ooohh mommyyyy....its a brabussss...!!!

(完)
教程结束,以上就是Maya Nurbs 车轮建模的流程解析方法介绍,操作很简单的,大家学会了吗?希望能对大家有所帮助!
【Maya Nurbs 车轮建模的流程解析】相关文章: