一、首先检查你VPS的PPP和TUN有没有启用:
cat /dev/ppp
cat /dev/net/tun
显示结果为:cat: /dev/ppp: No such device or address和cat: /dev/net/tun: File descriptor in bad state,表明通过,上述两条只要有一个没通过都不行。如果没有启用,你可以给VPS提供商Submit 一个 Ticket请求开通:
Hello
Could you enabled TUN-TAP for me? I want run pptp-vpn on my VPS.
Thank you.
确认 PPP 和 TUN 启用后,开始安装 ppp 和 iptables:
yum install -y ppp iptables
二、安装pptp:
rpm -ivh http://acelnmp.googlecode.com/files/pptpd-1.3.3-1.rhel4.1.i386.rpm(适用32位系统)
rpm -ivh http://acelnmp.googlecode.com/files/pptpd-1.3.3-1.rhel4.x86_64.rpm(适用64位系统)
三、配置pptp,编辑/etc/pptpd.conf文件:
vim /etc/pptpd.conf
把下面字段前面的#去掉:
localip 192.168.0.1
remoteip 192.168.0.234-238,192.168.0.245
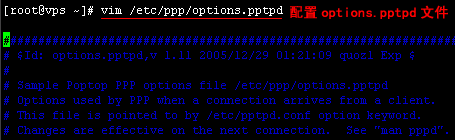
四、编辑/etc/ppp/options.pptpd 文件:
vim /etc/ppp/options.pptpd
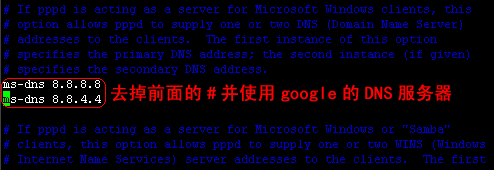
去掉ms-dns前面的#,并使用Google的DNS服务器,修改成如下字段:
ms-dns 8.8.8.8
ms-dns 8.8.4.4
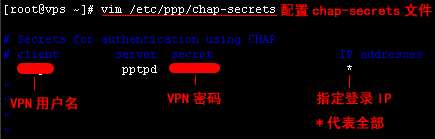
五、设置VPN账号密码,编辑/etc/ppp/chap-secrets这个文件:
vim /etc/ppp/chap-secrets
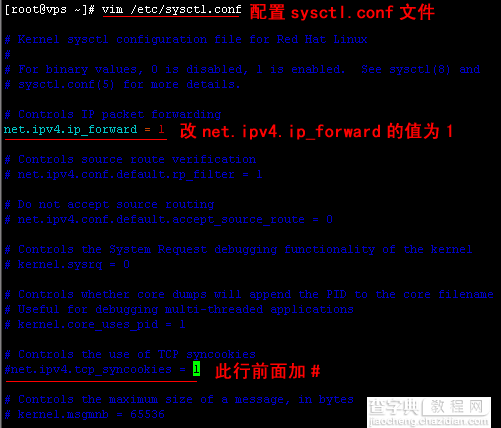
六、修改内核设置,使其支持转发,编辑 /etc/sysctl.conf 文件:
vim /etc/sysctl.conf
将“net.ipv4.ip_forward”的值改为1,同时在“net.ipv4.tcp_syncookies = 1”前面加#
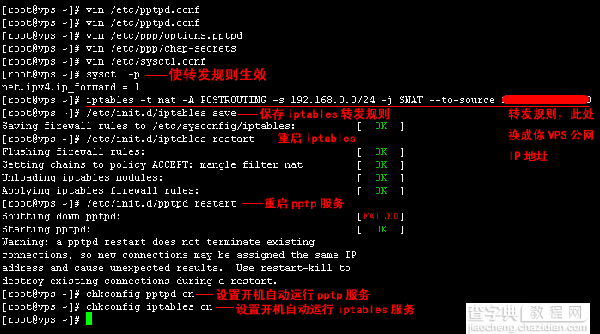
七、使 sysctl.conf 配置文件生效并添加 iptables 转发规则:
sysctl -p iptables -t nat -A POSTROUTING -s 192.168.0.0/24 -j SNAT --to-source ***.***.***.***
(***.***.***.***为你VPS的公网IP地址)
iptables -A INPUT -p tcp -m state --state NEW -m tcp --dport 1723 -j ACCEPT #注:这条命令尽量放在防火墙列表前面几条不然可能会阻止
保存iptables转发规则:
/etc/init.d/iptables save
重启 iptables:
/etc/init.d/iptables restart
重启pptp服务:
/etc/init.d/pptpd restart
设置开机自动运行pptp服务:
chkconfig pptpd on
设置开机自动运行iptables服务:
chkconfig iptables on
到此安装配置结束了。
以下是疑难问题解答
iptables转发规则写错了会出现错误678提示(亲历),可用
iptables -F 删除旧规则再配置!
如果出现错误619则输入命令
rm /dev/ppp
mknod /dev/ppp c 108 0
还不管用的话(有时出现错误651),请下载vps 上/var/log/messages 查看日志,最后发现:
Jan 2 07:26:11 fr pptpd[1604]: CTRL: Starting call (launching pppd, opening GRE) Jan 2 07:26:11 fr pppd[1605]: Plugin /usr/lib/pptpd/pptpd-logwtmp.so is for pppd version 2.4.3, this is 2.4.5 Jan 2 07:26:11 fr pptpd[1604]: GRE: read(fd=6,buffer=804fa20,len=8196) from PTY failed: status = -1 error = Input/output error, usually caused by unexpected termination of pppd, check option syntax and pppd logs Jan 2 07:26:11 fr pptpd[1604]: CTRL: PTY read or GRE write failed (pty,gre)=(6,7)
Jan 2 07:26:11 fr pptpd[1604]: CTRL: Client X.X.X.X control connection finished
logwtmp插件版本不兼容出错了!
vi /etc/pptpd.conf
找到logwtmp,在前面加#
service pptpd restart
就解决了!!!
如果你需要图形化管理VPN的话,建议使用Webmin:
rpm -ivh http://nchc.dl.sourceforge.net/project/webadmin/webmin/1.510/webmin-1.510-1.noarch.rpm
注意:如果虚拟机内核不支持MPPE的话,无法使用加密,用WINDOWS默认VPN连接会显示“证书信任错误”。
解决方法:修改/etc/ppp/options.pptpd注释掉require-mppe-128这行,然后windows的vpn拨号的属性改为可选加密,再次连接就成功了。
另外附上有用命令:
使用命令查看pptpd服务进程、端口和接口 使用ps命令检查pptpd进程:
ps -ef |grep pptpd
使用netstat命令检查pptpd运行的端口:
netstat -nutap | grep pptpd
使用ifconfig命令查看ppp0接口
centos设置VPN后,客户端连接提示错误800!
我是直接把iptables关闭了!哈哈 反正先连接进去再说了。
iptables -P INPUT ACCEPT
iptables -P OUTPUT ACCEPT
iptables -F
iptables -X
iptables -P INPUT ACCEPT
iptables -P OUTPUT ACCEPT
/etc/init.d/iptables save
【详解在CentOS系统的服务器上搭建VPN的方法】相关文章:
★ 在 CentOS 7 系统上安装 Kernel 4.0的方法